Overleaf Pro

iSchool faculty, researchers, students, and staff have access to Overleaf Pro through our UW Enterprise agreement.

Overleaf is an online LaTeX editor that’s easy to use. It offers a no-installation solution, real-time collaboration, version control, hundreds of LaTeX templates, and more. This is primarily used to write formal papers and articles, and is heavily used by faculty, researchers, and PhDs.

To gain access to Overleaf pro please follow one of these two options:

Option 1: Existing Overleaf account without UW email linked
  • Log in to Overleaf (https://overleaf.com) with your non-UW email
  • In account settings, add your UW email (your_netid@uw.edu)
  • Log out, then log in with “Log in with SSO” using your @uw.edu email
Option 2: New to Overleaf or UW email already linked to account 
Note: Using this option when you have an account not linked to your @uw.edu email may result in 2 accounts with separate access levels and data

FAQ:

Q. I’m not sure what this is, do I need to do anything?
A. If you don’t write cited and formatted papers, articles, books or other materials that you would use LaTeX to format, then you likely don’t need Overleaf.

Q. I have two accounts and only one has access to Overleaf Pro, what can I do?
A. Transfer ownership of any data out of the newest account and to your most established account. Delete the empty account. Log in to your primary account and set a secondary email address using that of the deleted account. Your accounts will be effectively merged. When your @uw.edu email address is associated with your account and you log in via SSO login you will have access to Overleaf Pro features.

Q. Where can I learn more about Overleaf? How do I format stuff using this?
A. Please refer to the Overleaf Documentation. iSchool IT is not versed in LaTeX formatting and cannot offer usage guidance.

Acquiring Adobe Acrobat Pro or Adobe Creative Cloud

The University of Washington has a contract with Adobe. We are required to procure these Adobe products through the UW contract. This article explains the procedures for purchasing Adobe products at the iSchool, including the approval process, pricing, and license management.

Procurement:

iSchool IT will manage the purchase and renewal of Adobe licenses. iSchool employees should not pay for Adobe products out of pocket and seek reimbursement. Instead, to order Adobe products, employees should contact ihelp@uw.edu. Please do not fill out the UW Connect order form yourself.

Approval Process:

For staff who need Adobe Acrobat Pro or Adobe Creative Cloud to perform the functions of their job, the cost will be funded by a general budget. However, you must provide a business use case, and your supervisor must approve your request.

For faculty who need Adobe Acrobat Pro or Adobe Creative Cloud for research or academic projects, you will need to provide a budget. This can be from your fast funds, your start funds, or a grant budget if appropriate.

Pricing:

Adobe product prices are listed in the following UW-IT service catalog entries:

License Management:

iSchool IT keeps track of Adobe licenses, which are transferable, and the iSchool can realize cost savings by reusing licenses. These licenses are automatically renewed annually in July and must be intentionally canceled. The iSchool must track these purchases to ensure licenses are not billed after people separate from the school.

If you wish to cancel your Adobe subscription prior to July of a given year, please contact ihelp@uw.edu. Failing to do so will result in an automatic renewal. Note that UW-IT does not pro-rate the purchase of these annual licenses, and they renew in July, to align with UW fiscal years.

Outlook sign in/login issue

If you are experiencing the following, with Microsoft Outlook on a Windows computer:

– Outlook is reporting it is “disconnected”

– Outlook flashes a small window and the window disappears repeatedly

– Outlook displays the behavior as seen in the video below:


Take the following actions:

– Quit/close/exit Outlook and all other Microsoft Office applications; Word, Excel, Powerpoint, etc.

– Start Word, click Account, click Sign Out, click Yes/Sign Out

– Quit/close/exit Word

– Start Outlook, click Sign in, proceed with the sign-in process


After doing the sign out/sign in actions above Outlook should work as expected. If it does not work as expected, please try restarting your computer.

Sync OneDrive and SharePoint Document Libraries to your computer

Using a web browser to create, edit, and manage files in the cloud works most of the time (and is recommended whenever it works) but sometimes you need to use the more advanced features of apps like Excel (Pivot Tables, etc.) or Word (Tables, etc.) that are not supported in the online versions. Or you might have a workflow that requires your files to be local instead of in the cloud.

The OneDrive client – which is available for both Windows and macOS – lets you selectively sync Document Libraries in your personal OneDrive and in our Intranet (which is hosted on SharePoint Online). You can even make the files available “on demand” meaning they will not sync until you open them up. This is great because then your local drive will not be filled up with files you might not need to work with.

Here are instructions for syncing OneDrive and SharePoint Document Libraries.

https://support.microsoft.com/en-us/office/sync-sharepoint-files-and-folders-87a96948-4dd7-43e4-aca1-53f3e18bea9b

NOTE – you will need a recent version of the OneDrive client. If your iSchool computer has not been imaged in some time (over one year) and/or you have never used the OneDrive client, please update it first by downloading the latest version here and then logging in to the client with your UW email address.

https://www.microsoft.com/en-us/microsoft-365/onedrive/download

If you are using a personal computer that never had the OneDrive client installed, just download the client from the above link and then log in with the account that has access to the files you want to sync.

The “Files On-Demand” feature in the OneDrive client also lets you keep all your files in the cloud where they are accessible securely from anywhere in the world, even from your mobile device.

Apple macOS device enrollment

Apple macOS device enrollment

All iSchool-purchased Apple devices (faculty, staff, computer-classroom computers, iPads, Apple TVs) are “enrolled” in The iSchool’s Apple Mobile Device Management (MDM) tool, “Jamf Pro”. It is possible, infrequently, that you may be prompted to renew or update your device’s enrollment. Follow the steps below.

1) Click the “Device Enrollment” notification if it appears.

2) An “Update Device Enrollment” message in System Preferences -> Profiles should open. Click “Update.”

3) Enter your UW NetID credentials, click “Connect”.

4) After a few seconds you should see wording about the device being “…supervised and managed by University Of Washington.” This is expected and the desired result. You may quit out of System Preferences.

Set up iSchool issued Windows computer

Set up iSchool issued Windows computer

The following initial, one-time-setup-steps need to be done to set up an iSchool-issued Windows computer. Please contact the iSchool IT Help Desk, 206-616-3086 or ihelp@uw.edu, if there are any questions or issues during this set up process.

This process could take around 30-45 minutes or more to complete.

(The following screen shots are a reference based on the time of writing. The actual screens, icons, and options you see and click through are subject to change at any time per Microsoft Windows updates and changes.)

1) Plug in the power adapter if the computer is a laptop. Turn on the computer.

2) If you and the computer are on campus: connect the computer to the wired campus network or the University of Washington WiFi network, sign in with your UW NetID credentials, then skip to step 8.

If you and the computer are off campus: connect the computer to any available Internet network:

3) Click the “Network sign-in” button:

4) On the “Network sign-in” screen, enter your UW NetID credentials, click the forward/enter arrow:

5) At the F5 Networks VPN Client window, sign in with UW NetID credentials, authenticate at the Duo two-factor authentication screen:

6) You should see a screen indicating “Connecting…” is happening:

Wait. After a handful of seconds, you may see a screen indicating the time. Click a mouse button or trackpad button or press a keyboard key, click the lower/second APM Network Access button, you should see the word “Connected“. Click the forward/enter arrow next to “Click here for logging on to Windows“:

7) Sign in with your UW NetID credentials:

8) You should see a series of information screens indicating the sign-in was successful and things are happening. Wait until you eventually reach the desktop.

9) Install the Code42/CrashPlan file backup software by following the steps on this web page: Install the CrashPlan file backup software

Use the Code42/CrashPlan software to restore files from a previous computer if necessary. Detailed directions are on this web page:

How to restore files using the Code42/CrashPlan application

Restoring files via Code42/CrashPlan is not necessarily a trivial step. Please contact the iSchool IT Help Desk if there are any questions about restoring files via Code42/CrashPlan.

10) If the Windows device is a laptop, complete the “Eduroam” WiFi network onboarding steps as described on this web page: Eduroam Onboarding Guides

At this point, your iSchool Windows computer has completed the necessary one-time-setup-steps and is ready to use but may not have all of the customizations you need. Some examples of further actions you may need to take:

If Microsoft Outlook is your email application of choice, find and start the Microsoft Outlook application. Follow the instructions provided by Outlook to add your @uw.edu email address.

If you have access to a shared @uw.edu email account and need to add the account to Outlook follow the steps on this web page: https://www.kb.ischool.uw.edu/how-to-add-shared-netid-email-account-to-outlook/

If you need to install Zoom: https://zoom.us/download

If you need to install SecureCRT (to access The UW Student Data Base): https://itconnect.uw.edu/uware/securecrt/

You may need or want to sign in to your web browser of choice to sync/retrieve bookmarks:

Google Chrome sync directions

Firefox sync directions

Microsoft Edge sync directions

Please contact the iSchool IT Help Desk, 206-616-3086 or ihelp@uw.edu, if there are any questions or issues during this setup process.

Add printer to iSchool computer

Add printer to iSchool computer

This web page includes detailed directions for adding an iSchool printer to an iSchool-issued computer:

Windows

macOS


Windows

1) Windows computers should arrive to you with all iSchool printers available to you. You should be able to print to any of the printers listed in Settings -> Bluetooth & devices -> Printers & scanners.

If the printer you need to use is not listed, proceed to step 2.

2) In the “Printers & scanners” settings, click Add device.

3) In a handful of seconds a “The printer that I want isn’t listed” message and an Add manually button should appear. Click the Add manually button.

4) Select “Find a printer in the directory…“, click Next.

5) Select the printer you need, click OK. Printer names should be self explanatory. Contact iSchool IT, ihelp@uw.edu, if there are any questions.

6) After a few seconds you should see a “…successfully added printer…” message. Click Next.

7) You should see another “…successfully added printer…” message. The “Set as the default printer” checkbox is optional. Click Finish.


macOS

1) Open a Finder window, click Applications, start the application Self Service, sign into Self Service with UW NetID credentials if prompted for credentials.

3) Click the Printers category, click Install for any and all printers you need to use.

Web browsers not loading websites, Sophos Web Protection

Web browsers not loading websites, Sophos Web Protection

Some users with Sophos installed on macOS computers have reported the following issue:

-All web browsers do not load any and all web pages

-Other network activity like email and video conferencing continue to work

One troubleshooting / workaround that has “fixed” the issue in the past are the following steps:

1) Click the Sophos icon in the top-right menu bar, click Open Preferences….

2) Click Web Protection, click General, click both switches OFF.

3) Switch to any web browser application. Load any website. Confirm websites and pages load as expected.

4) Back in Sophos, click both Web Protection switches back ON. Switch back to a web browser and confirm web pages continue to load and work as expected.

Set up iSchool issued macOS computer

Set up iSchool issued macOS computer

The following steps need to be done to set up an iSchool-issued macOS computer. Please contact the iSchool IT Help Desk, 206-616-3086 or ihelp@uw.edu, if there are any questions or issues during this setup process.

This process could take around 30-45 minutes or more to complete.

(The following screenshots are a reference based on the time of writing. The actual screens and options you see and click through are subject to change at any time per Apple macOS updates.)

1) Plug in the power adapter if the computer is a laptop. Turn on the computer.

2) Select language, click the forward-arrow.

3) Select your country or region, click Continue.

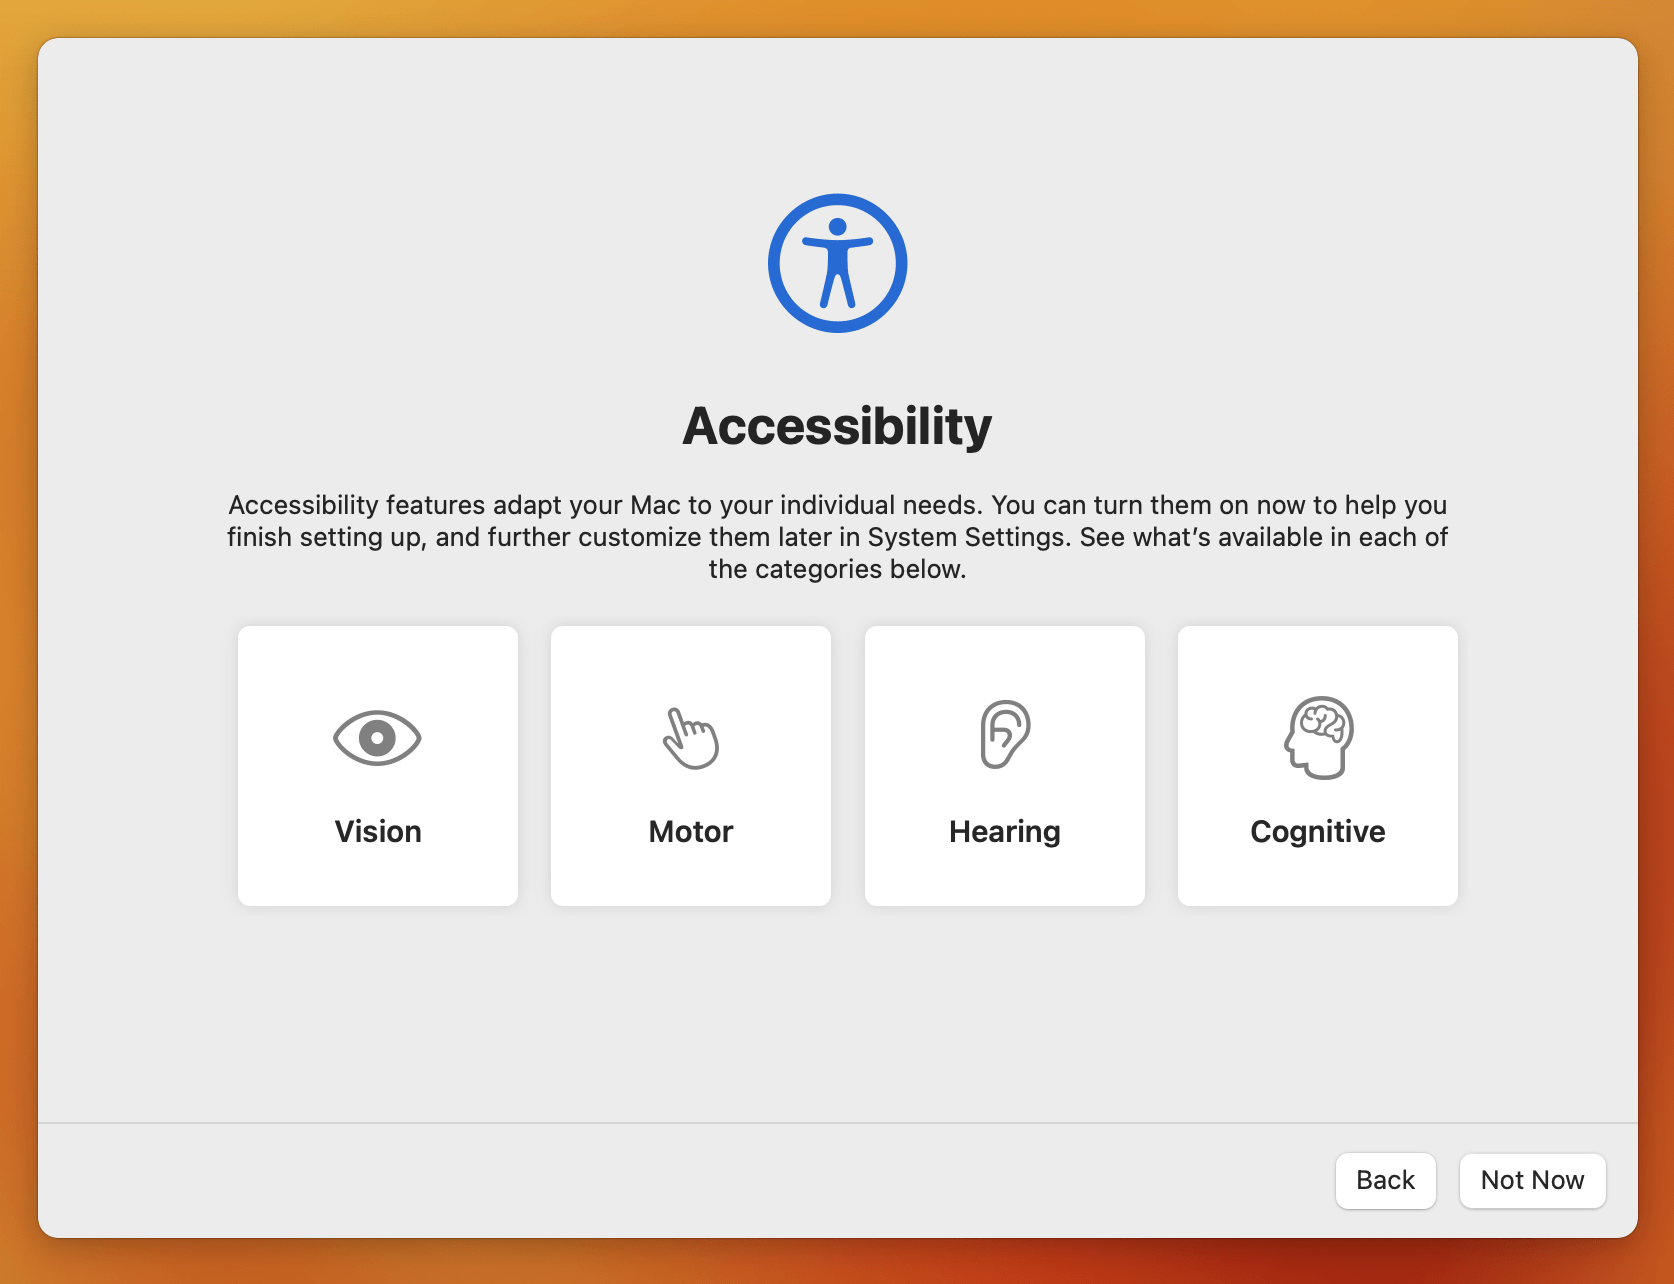
4) Select and adjust any or all accessibility features or click Not Now to set up later.

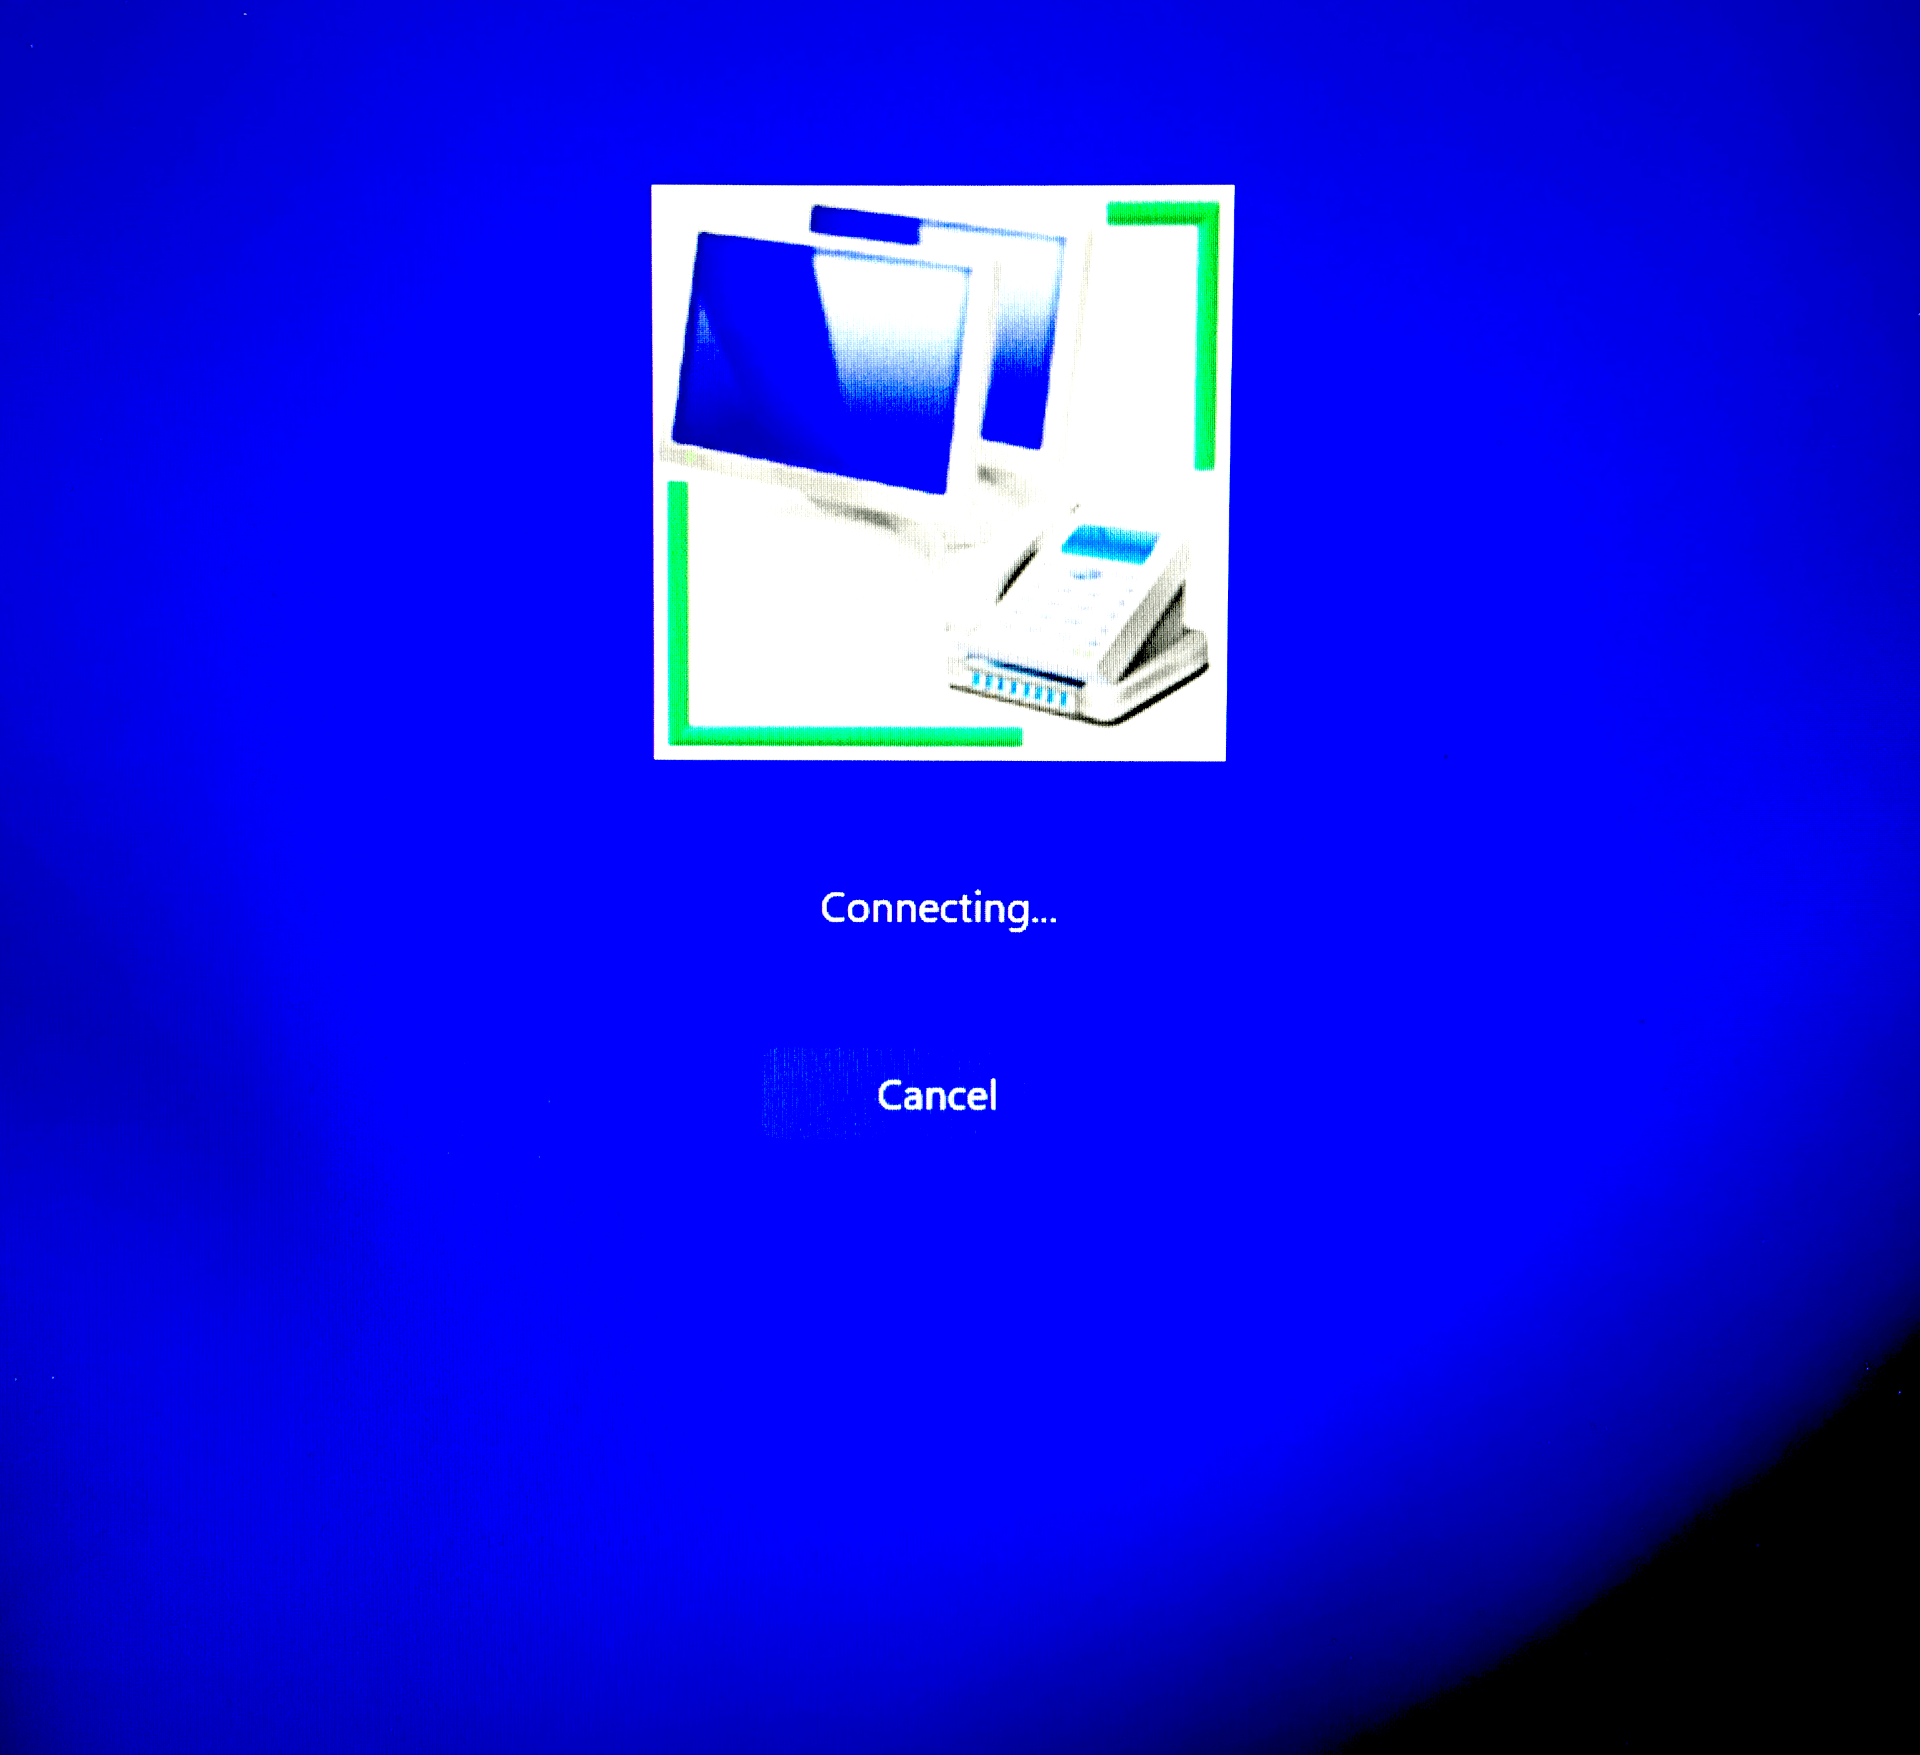
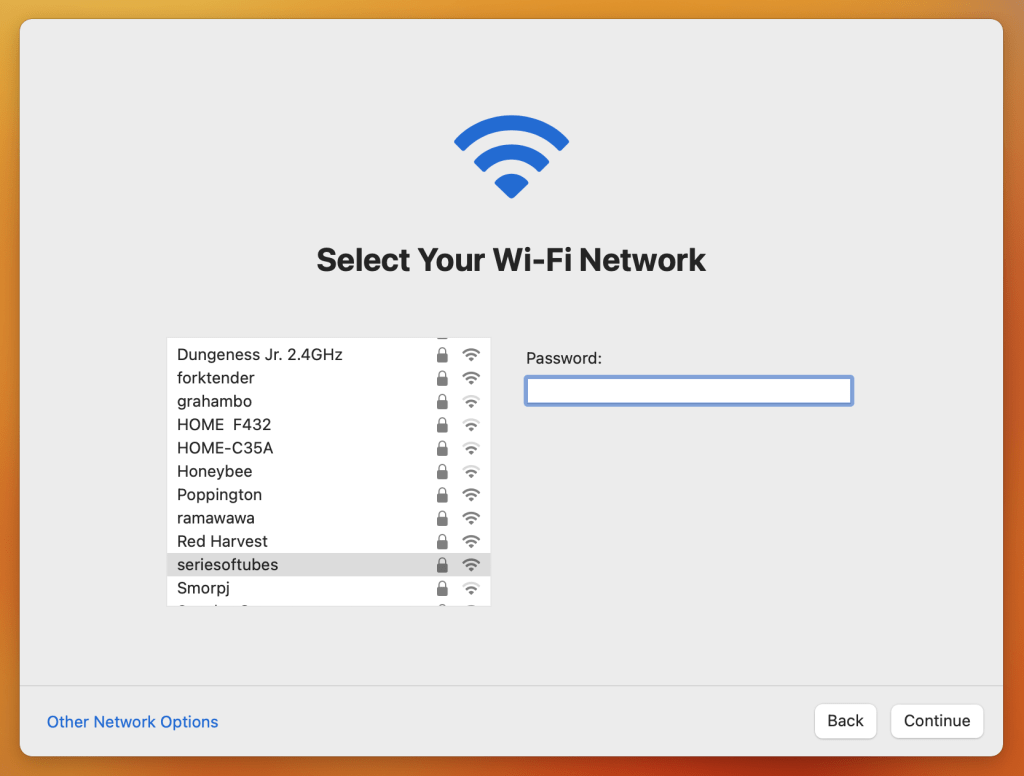
5) Connect to any available Internet network.

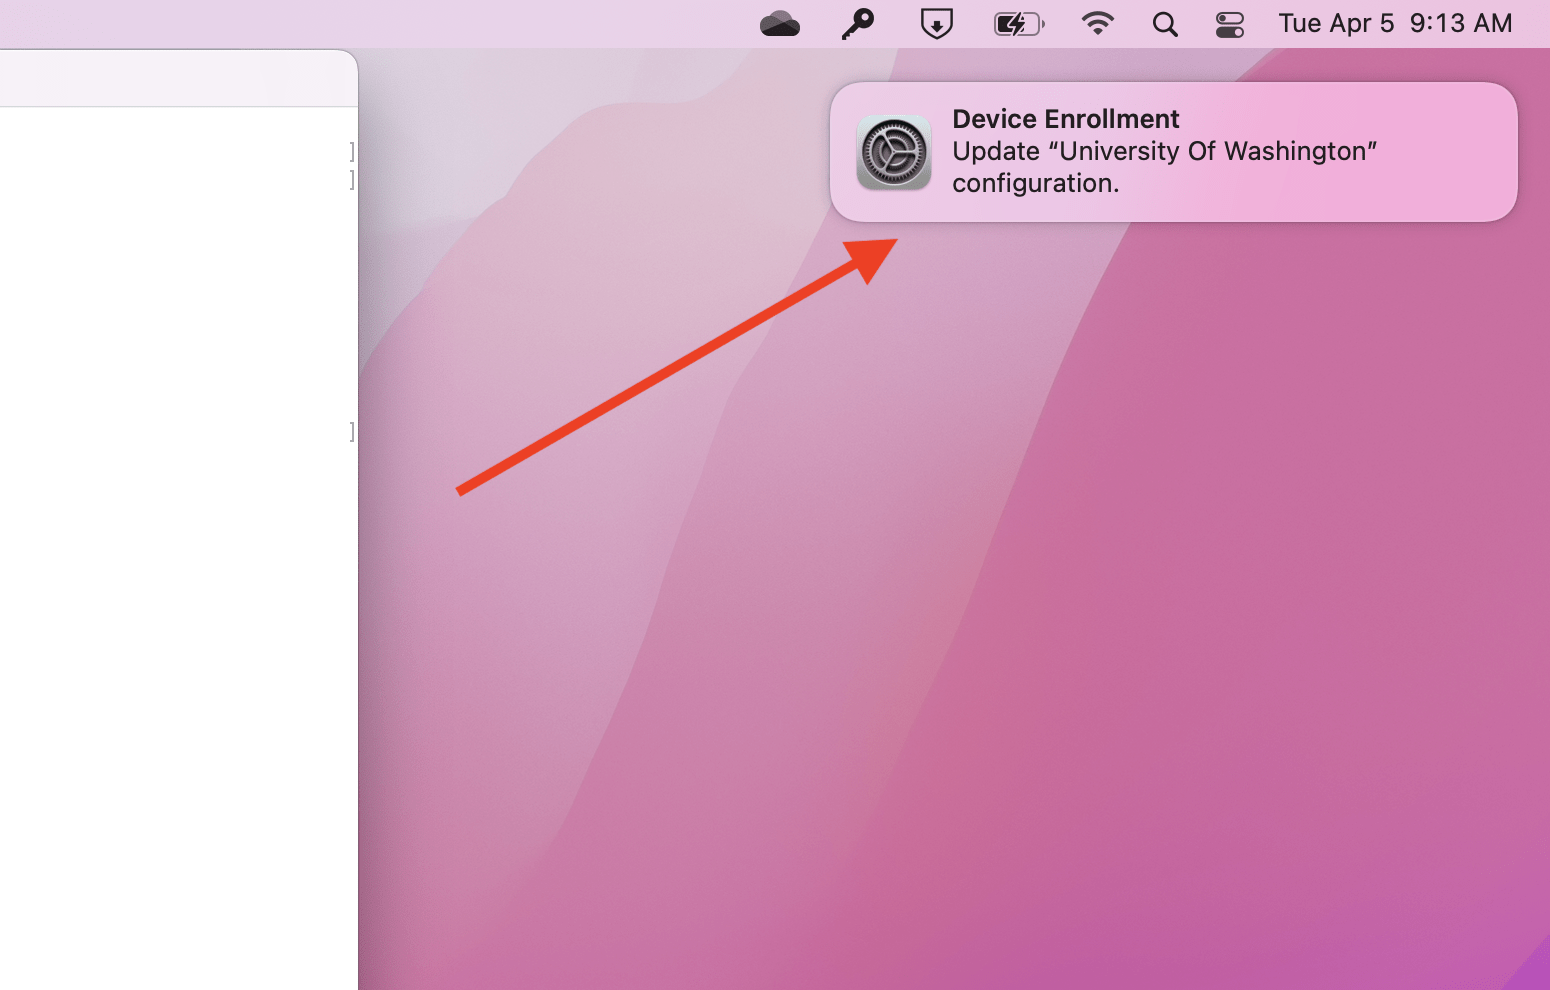
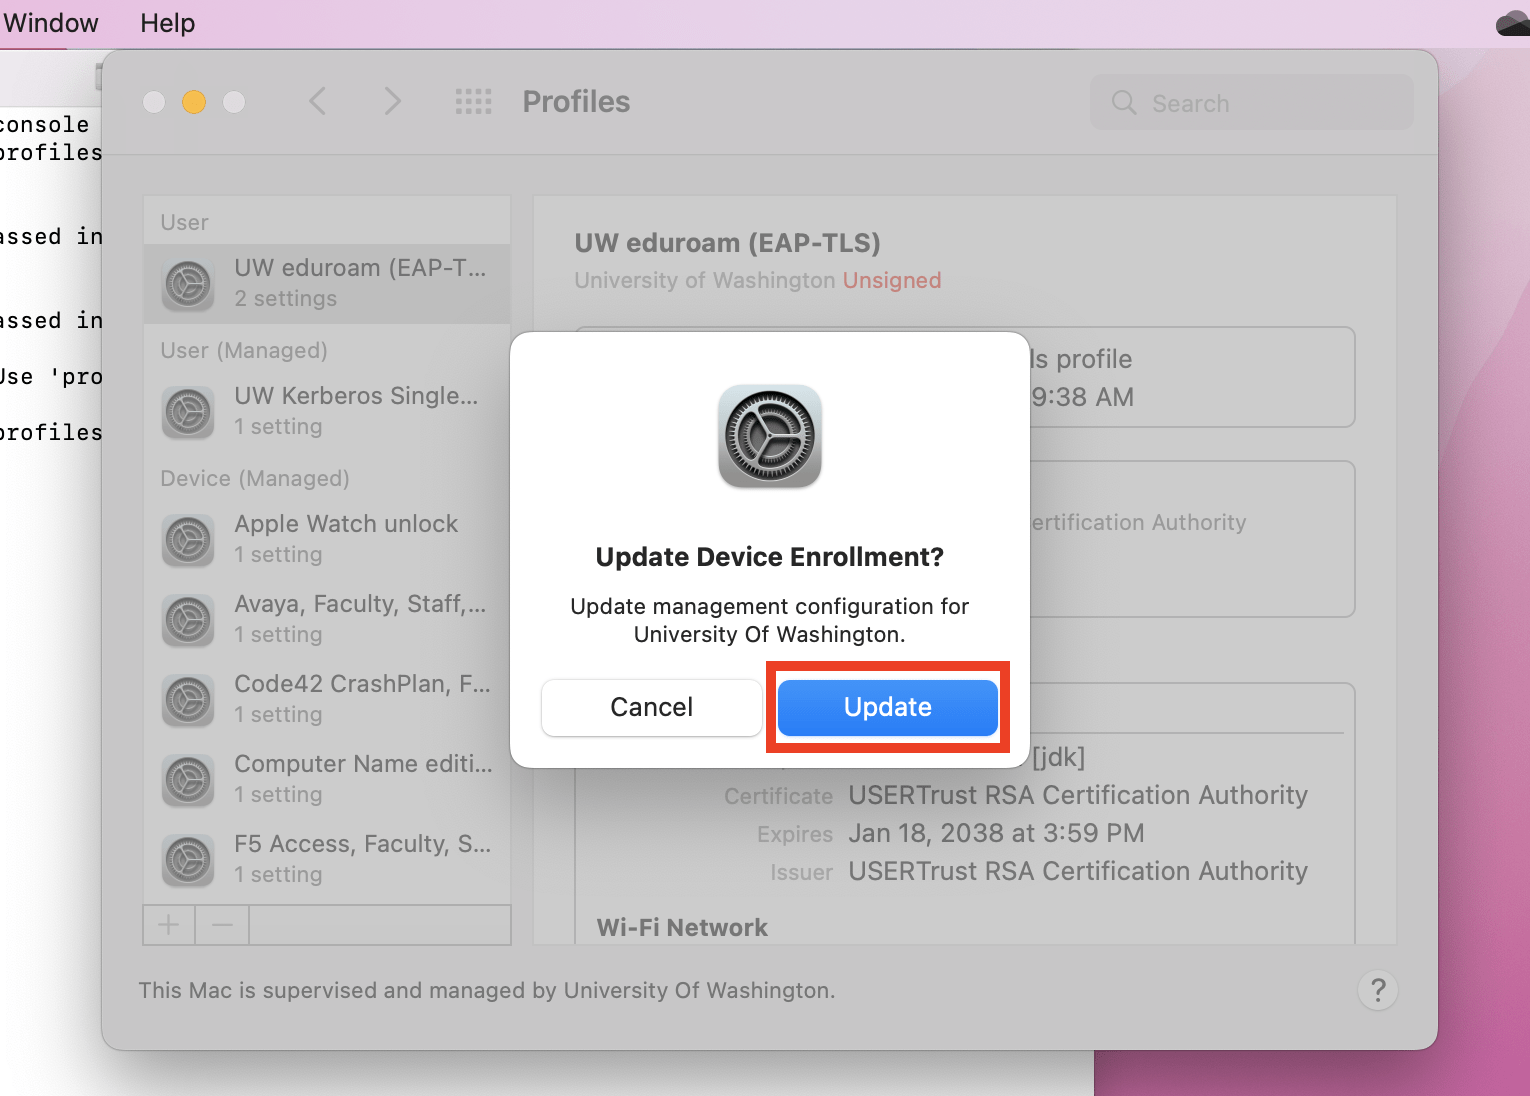
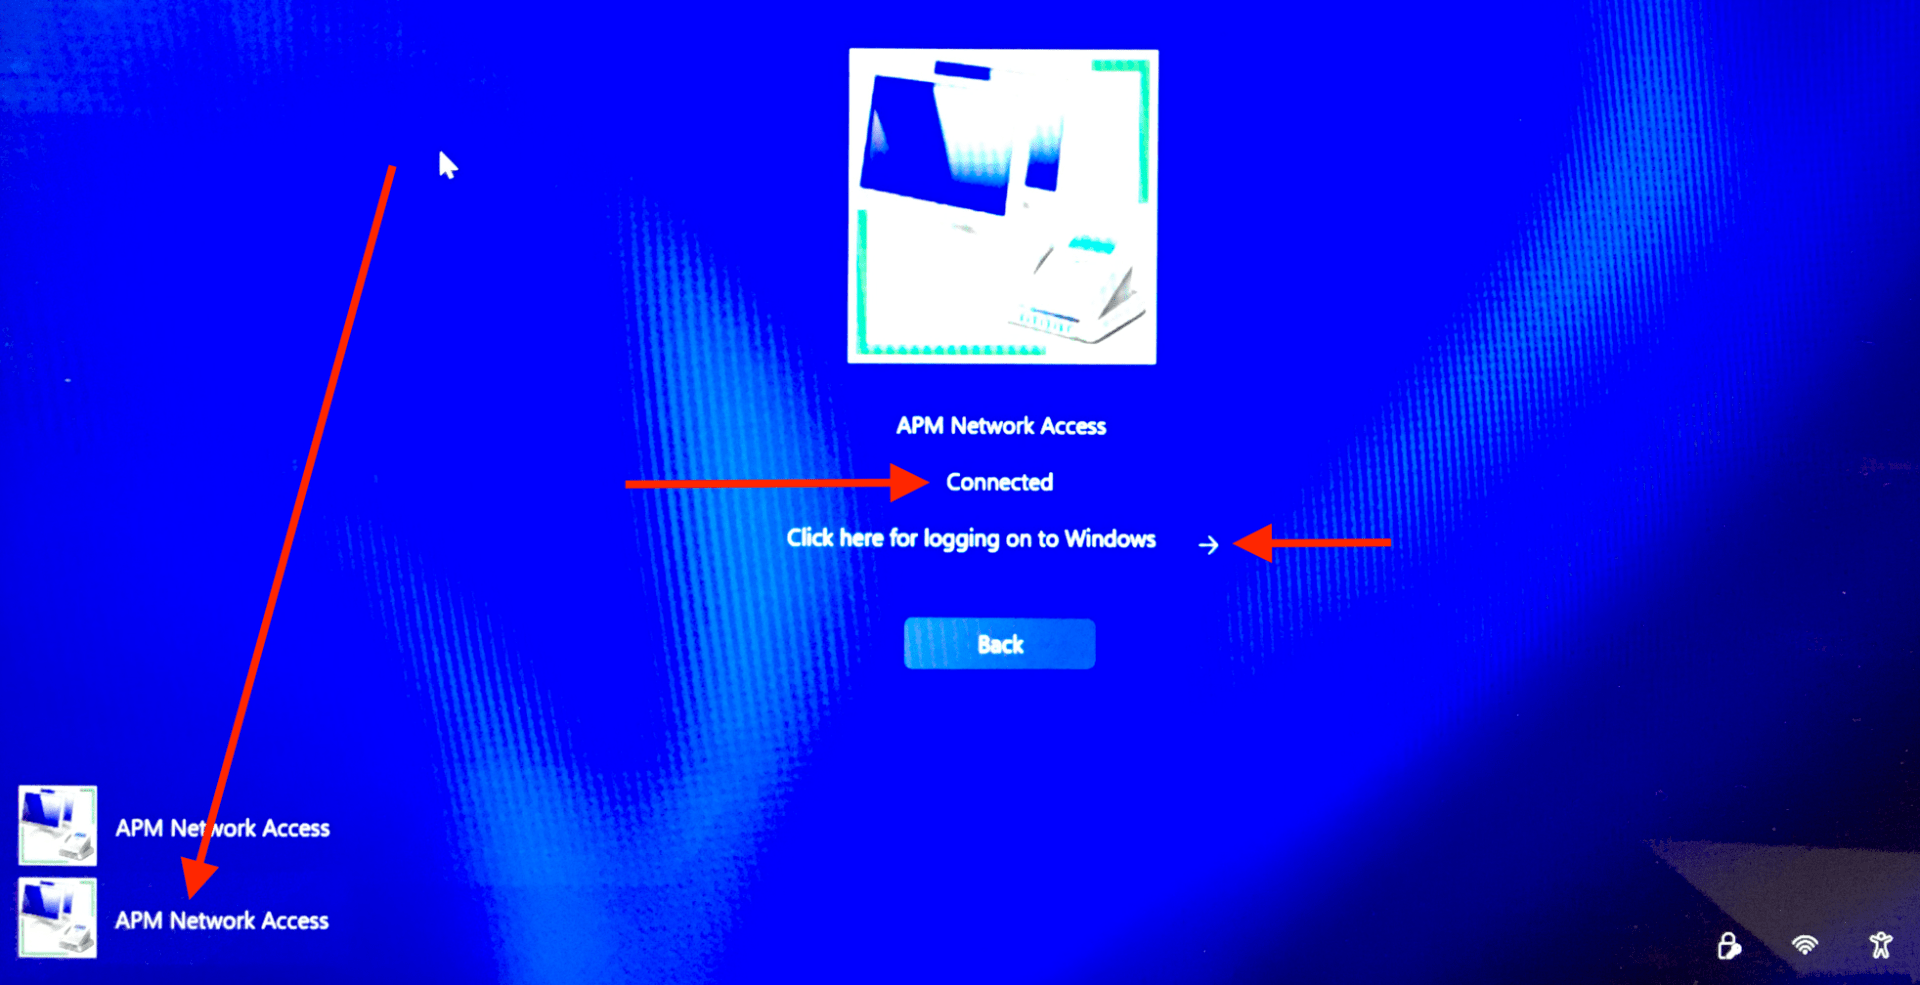
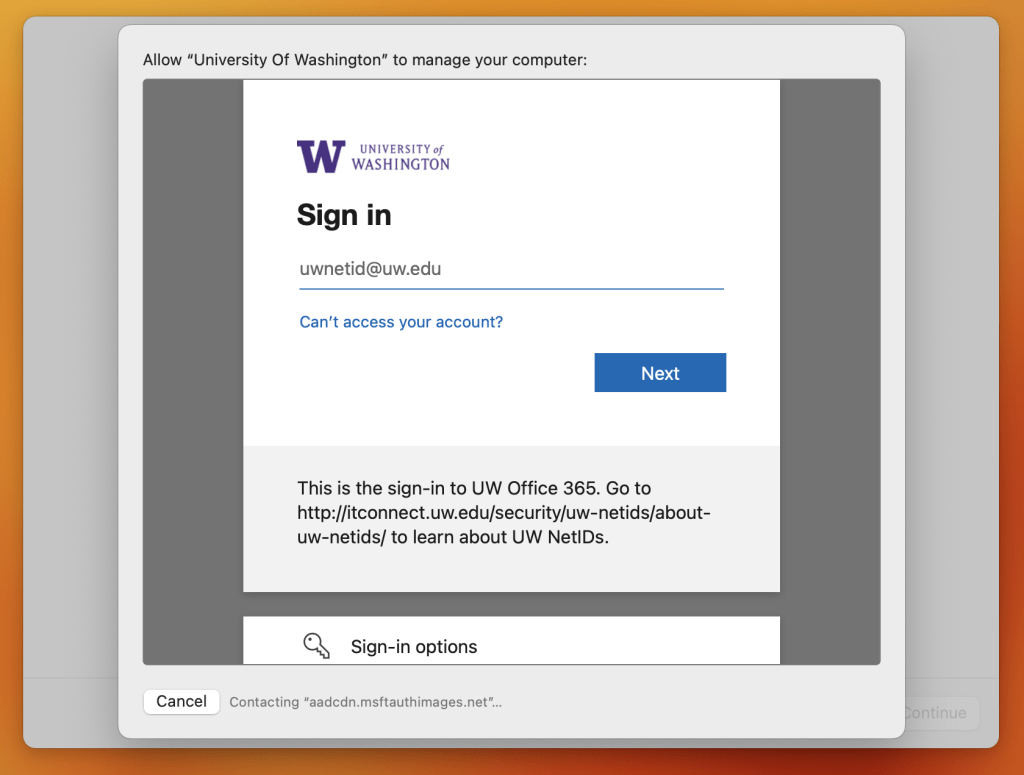
6) Click Continue at the University of Washington Remote Management screen.

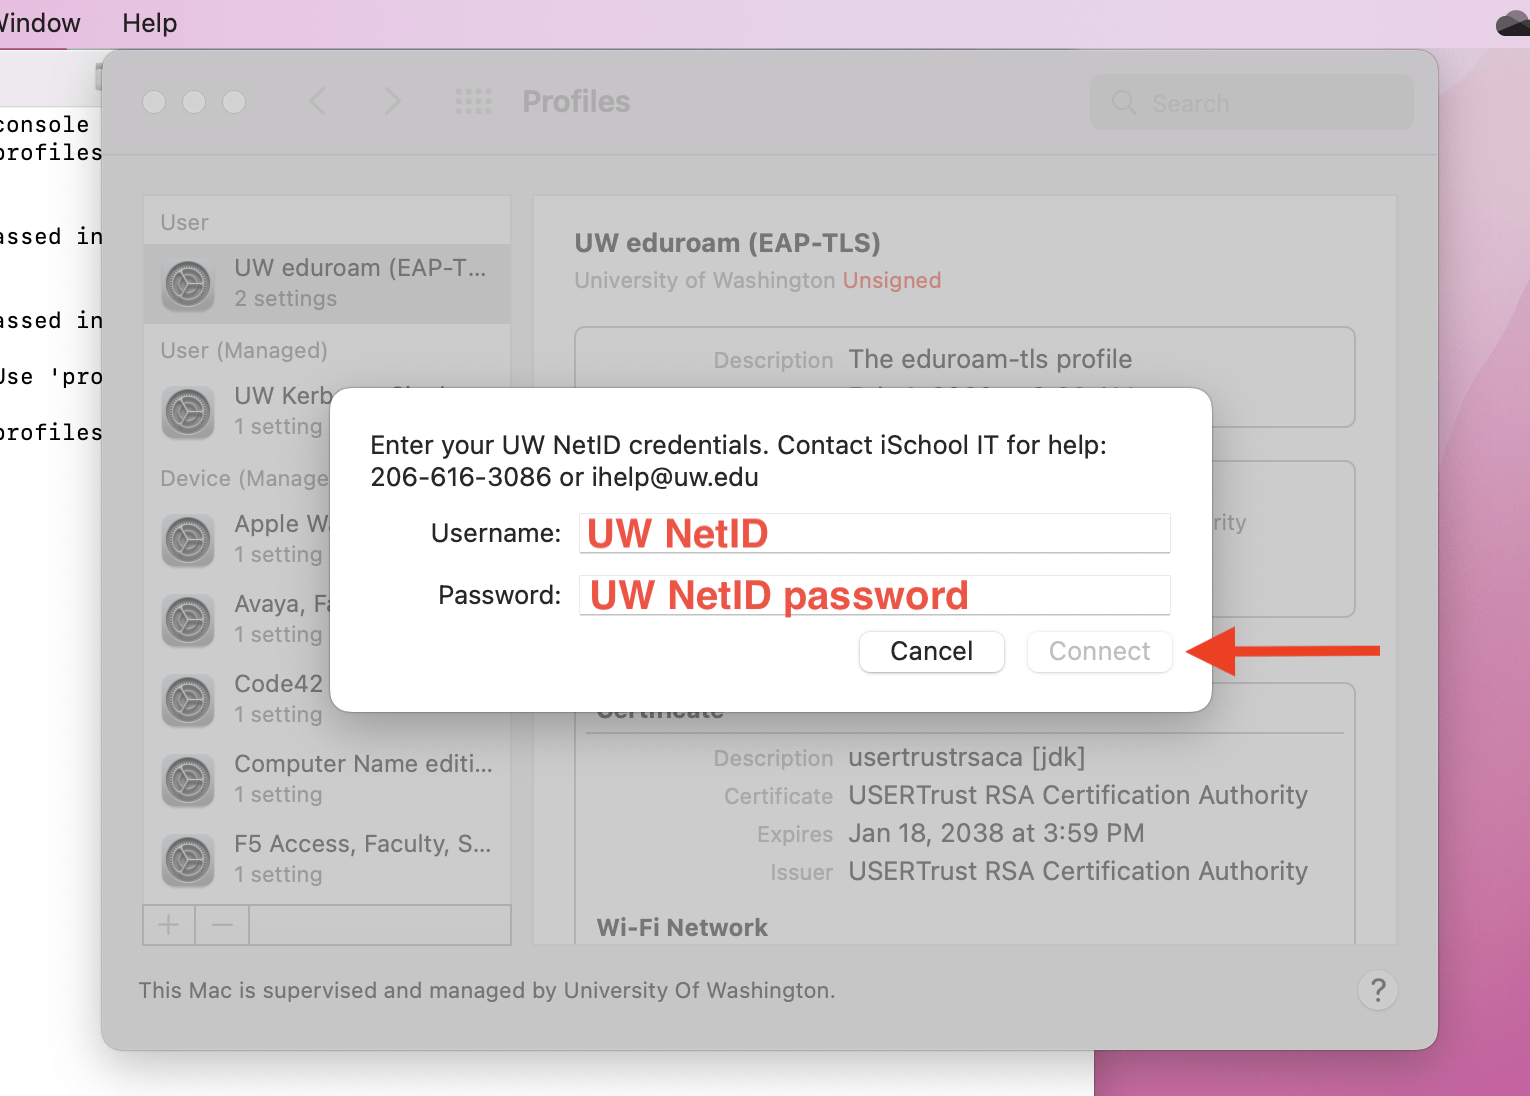
7) Authenticate with your UWNetID@uw.edu credentials.

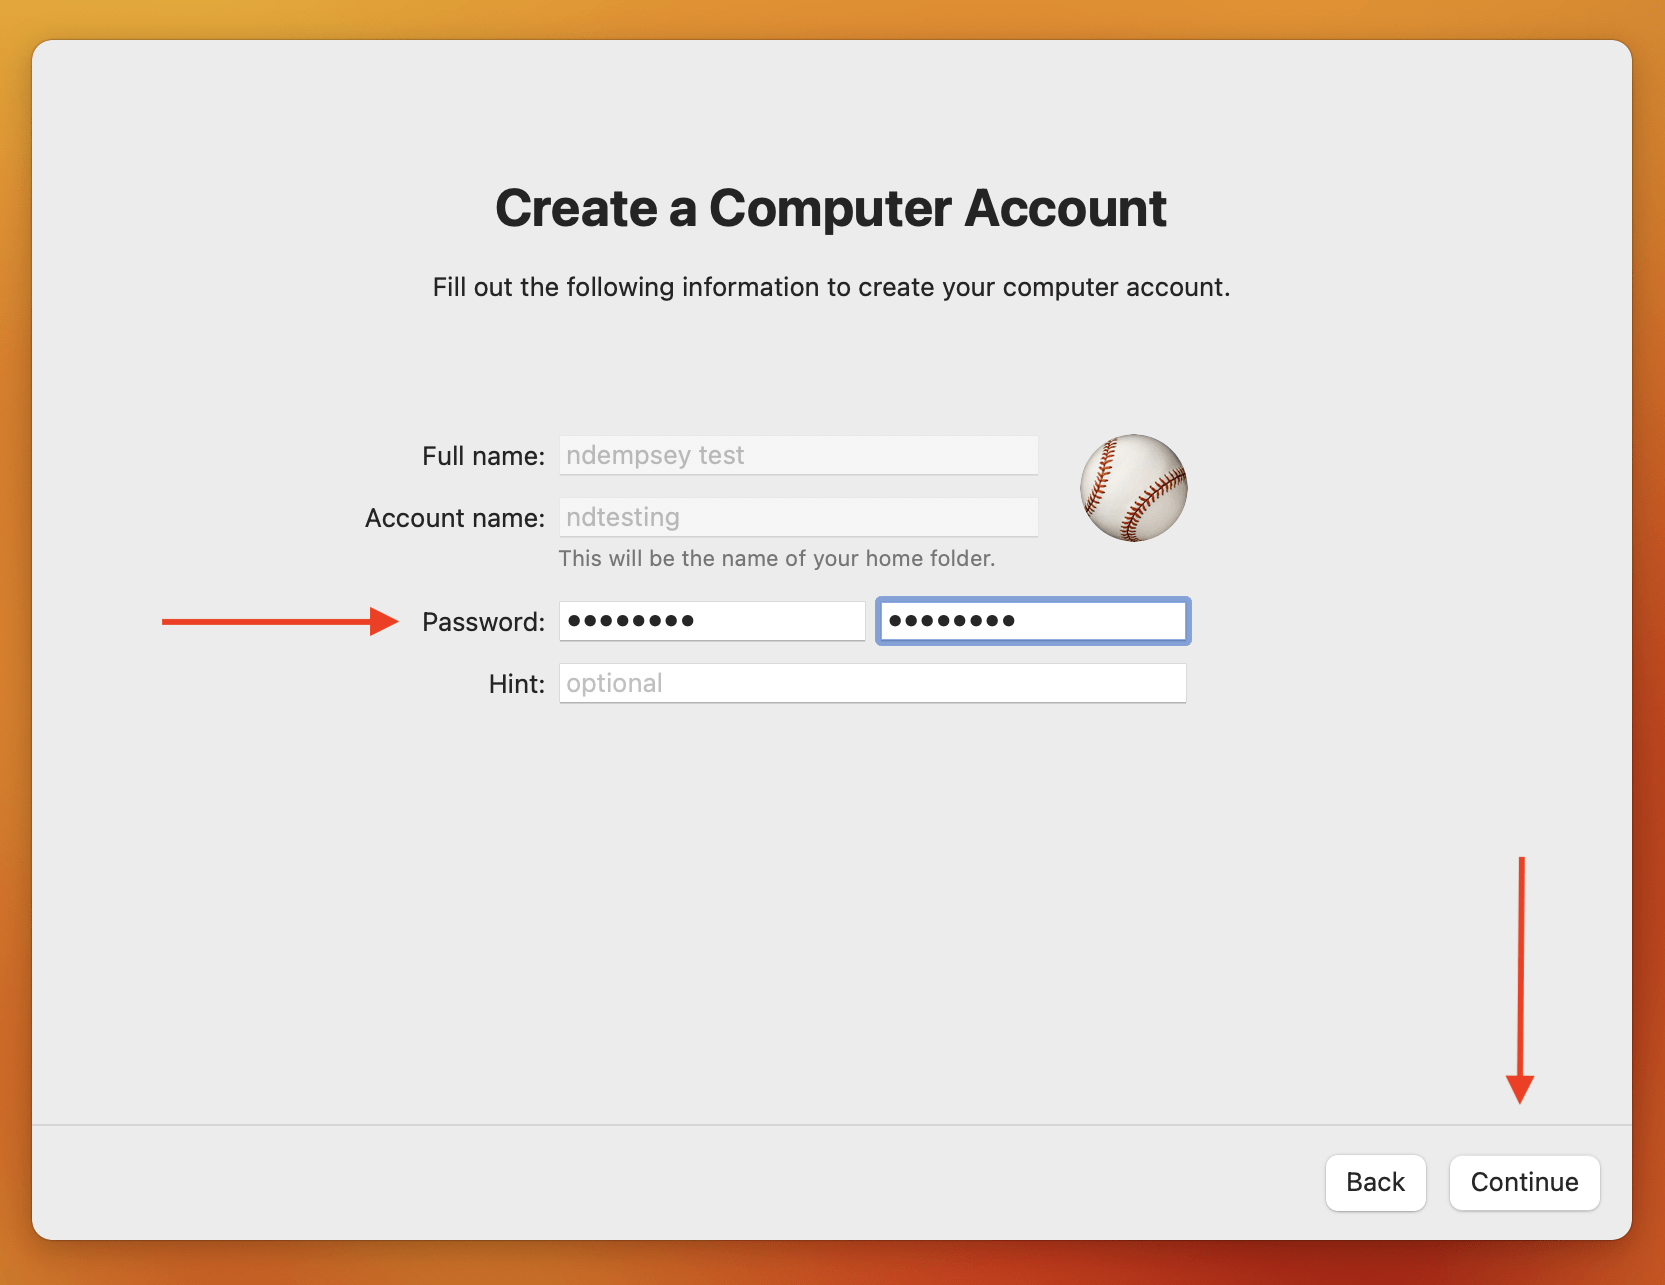
8) The “Full name:” and “Account name:” will be filled-in with your UW NetID information. Enter your UW NetID password twice, edit the icon to your liking, click Continue.

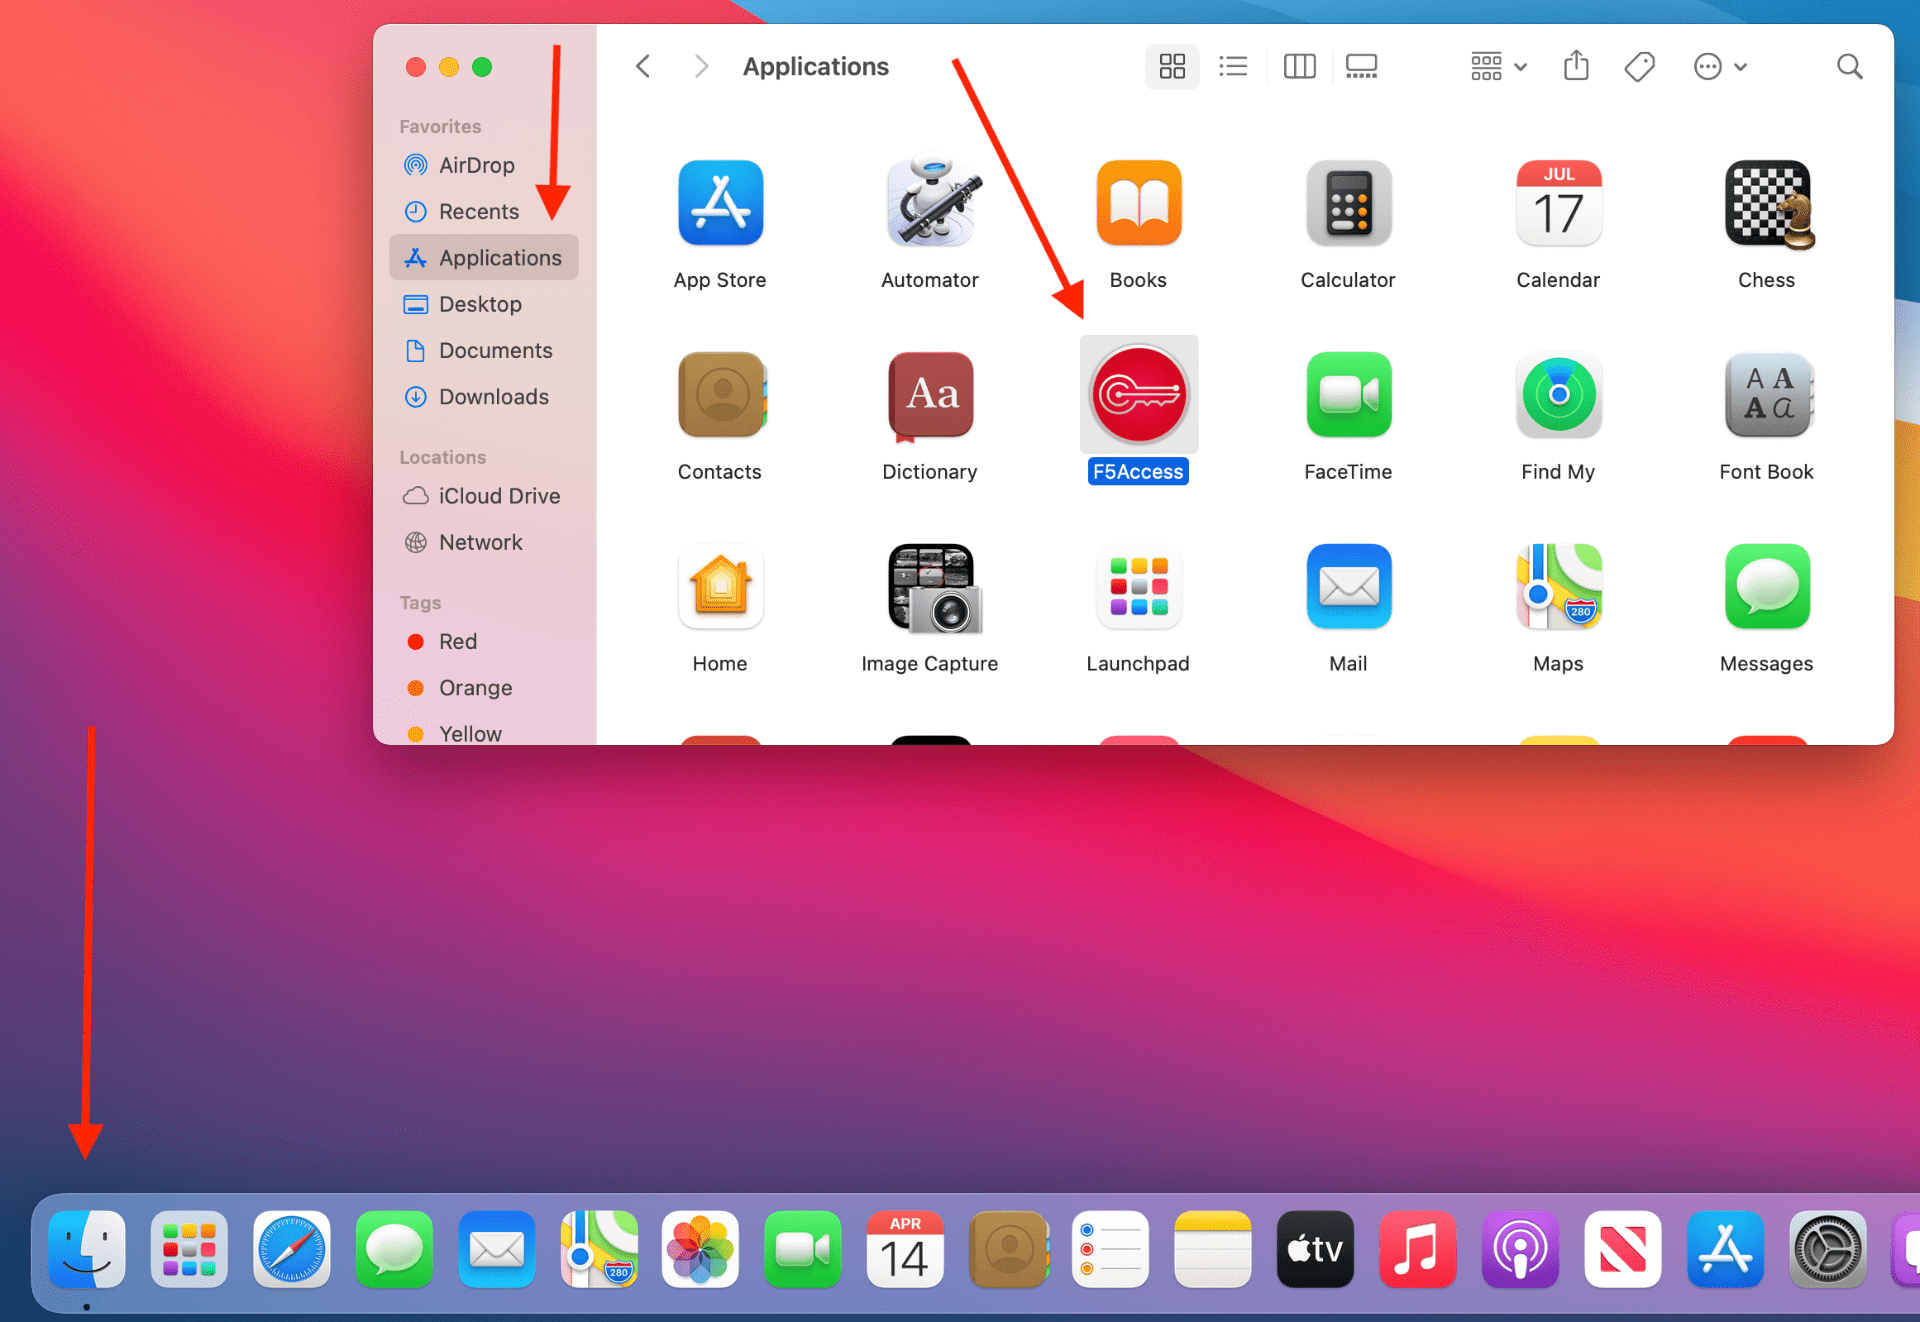
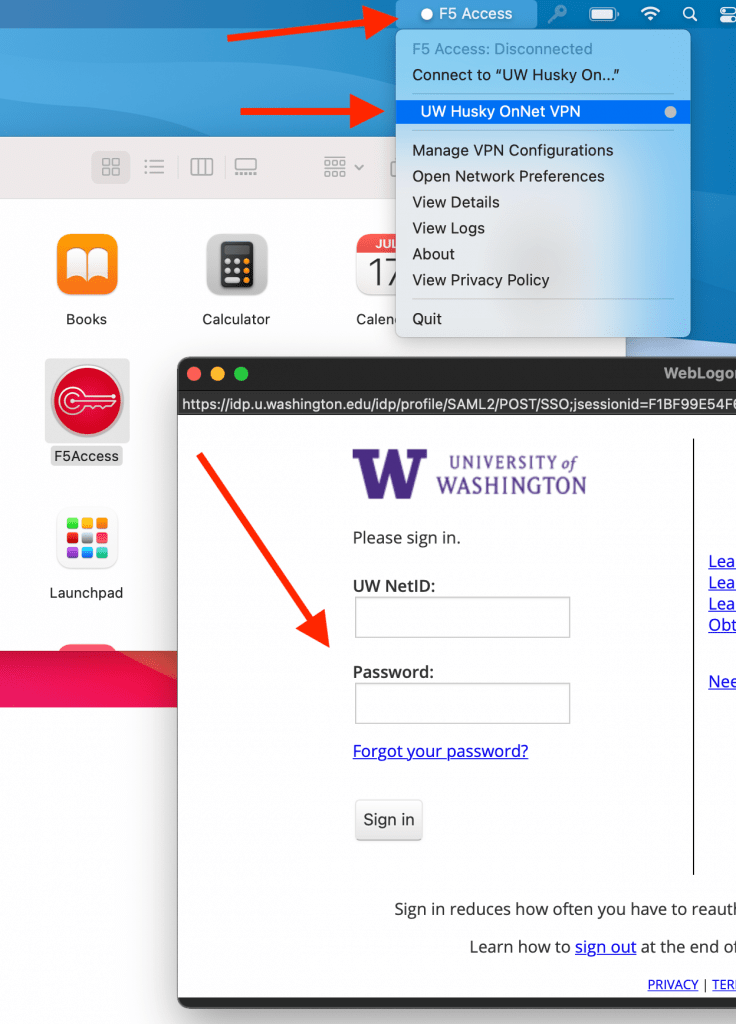
9) If you and the computer are on the University of Washington campus, skip to step 11. Open a Finder window, go to the Applications folder, start the “F5Access” application. (The “F5Access” application should appear within a few minutes if it is not already in the Applications folder.)

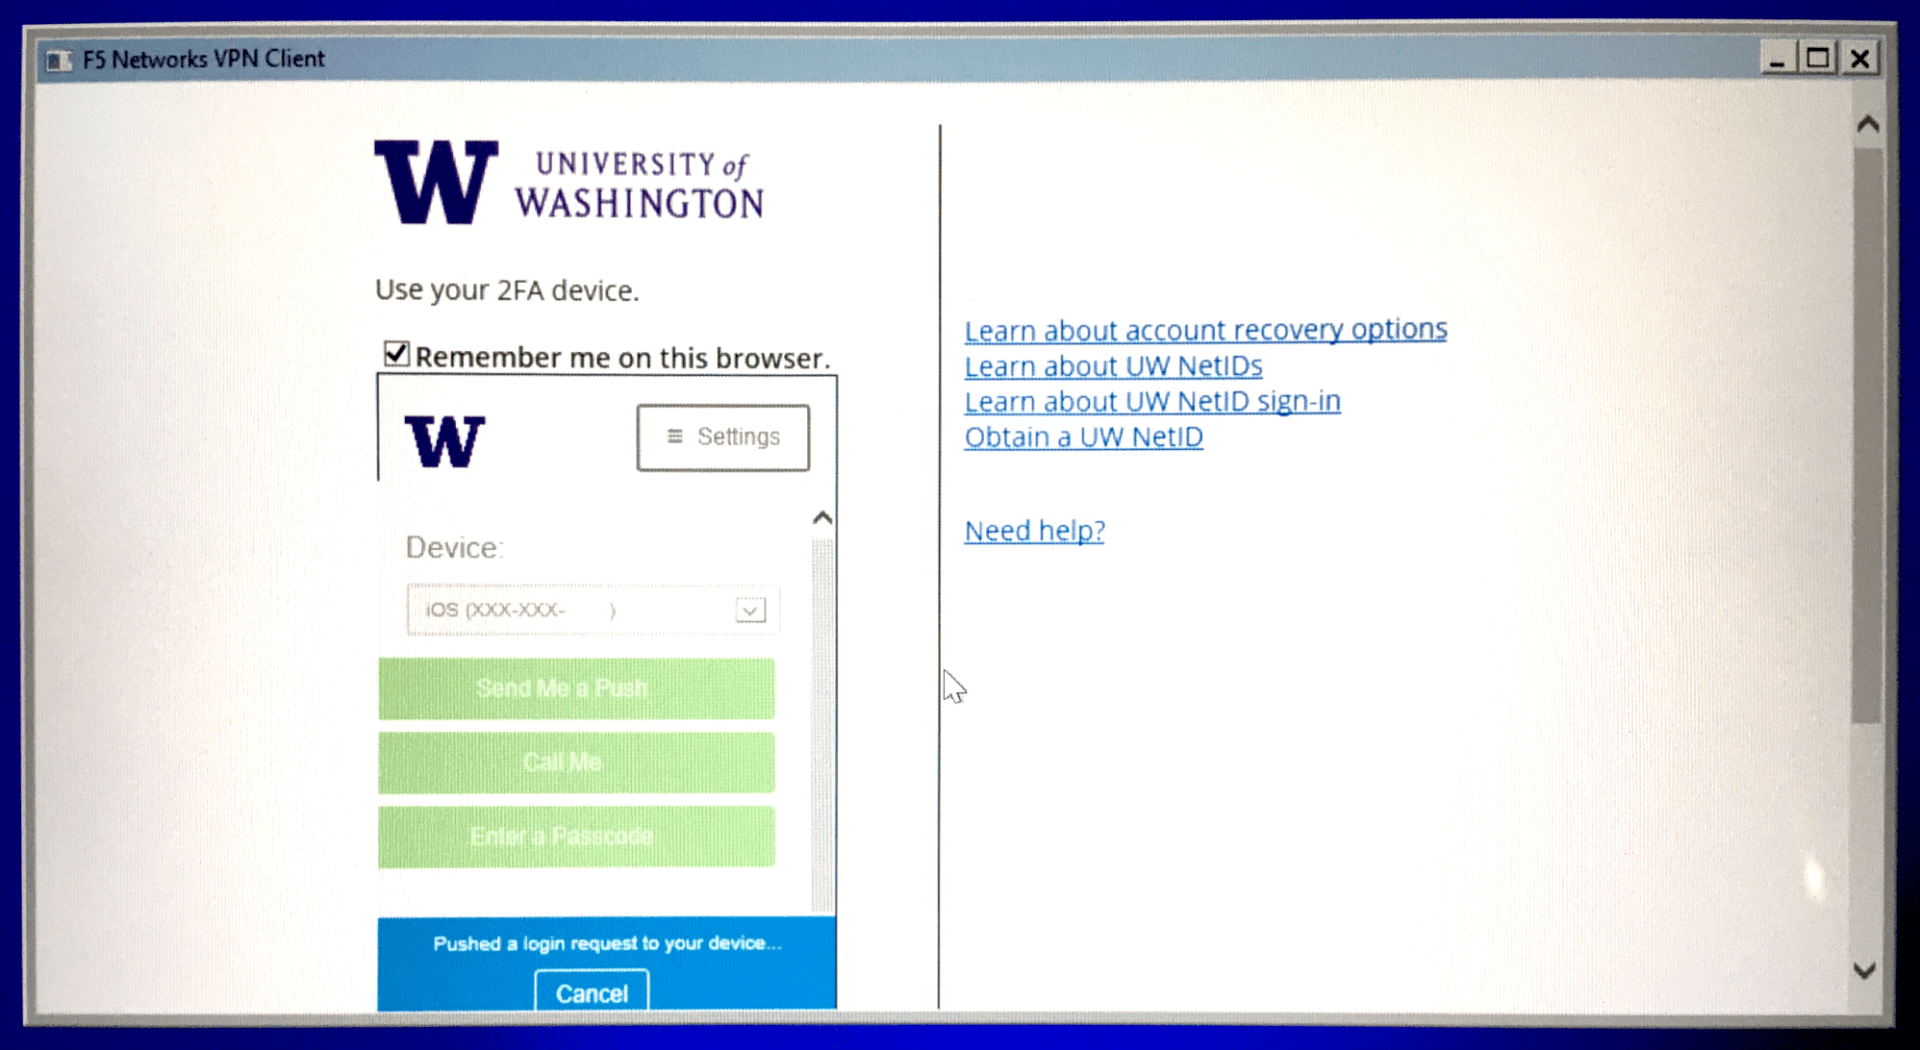
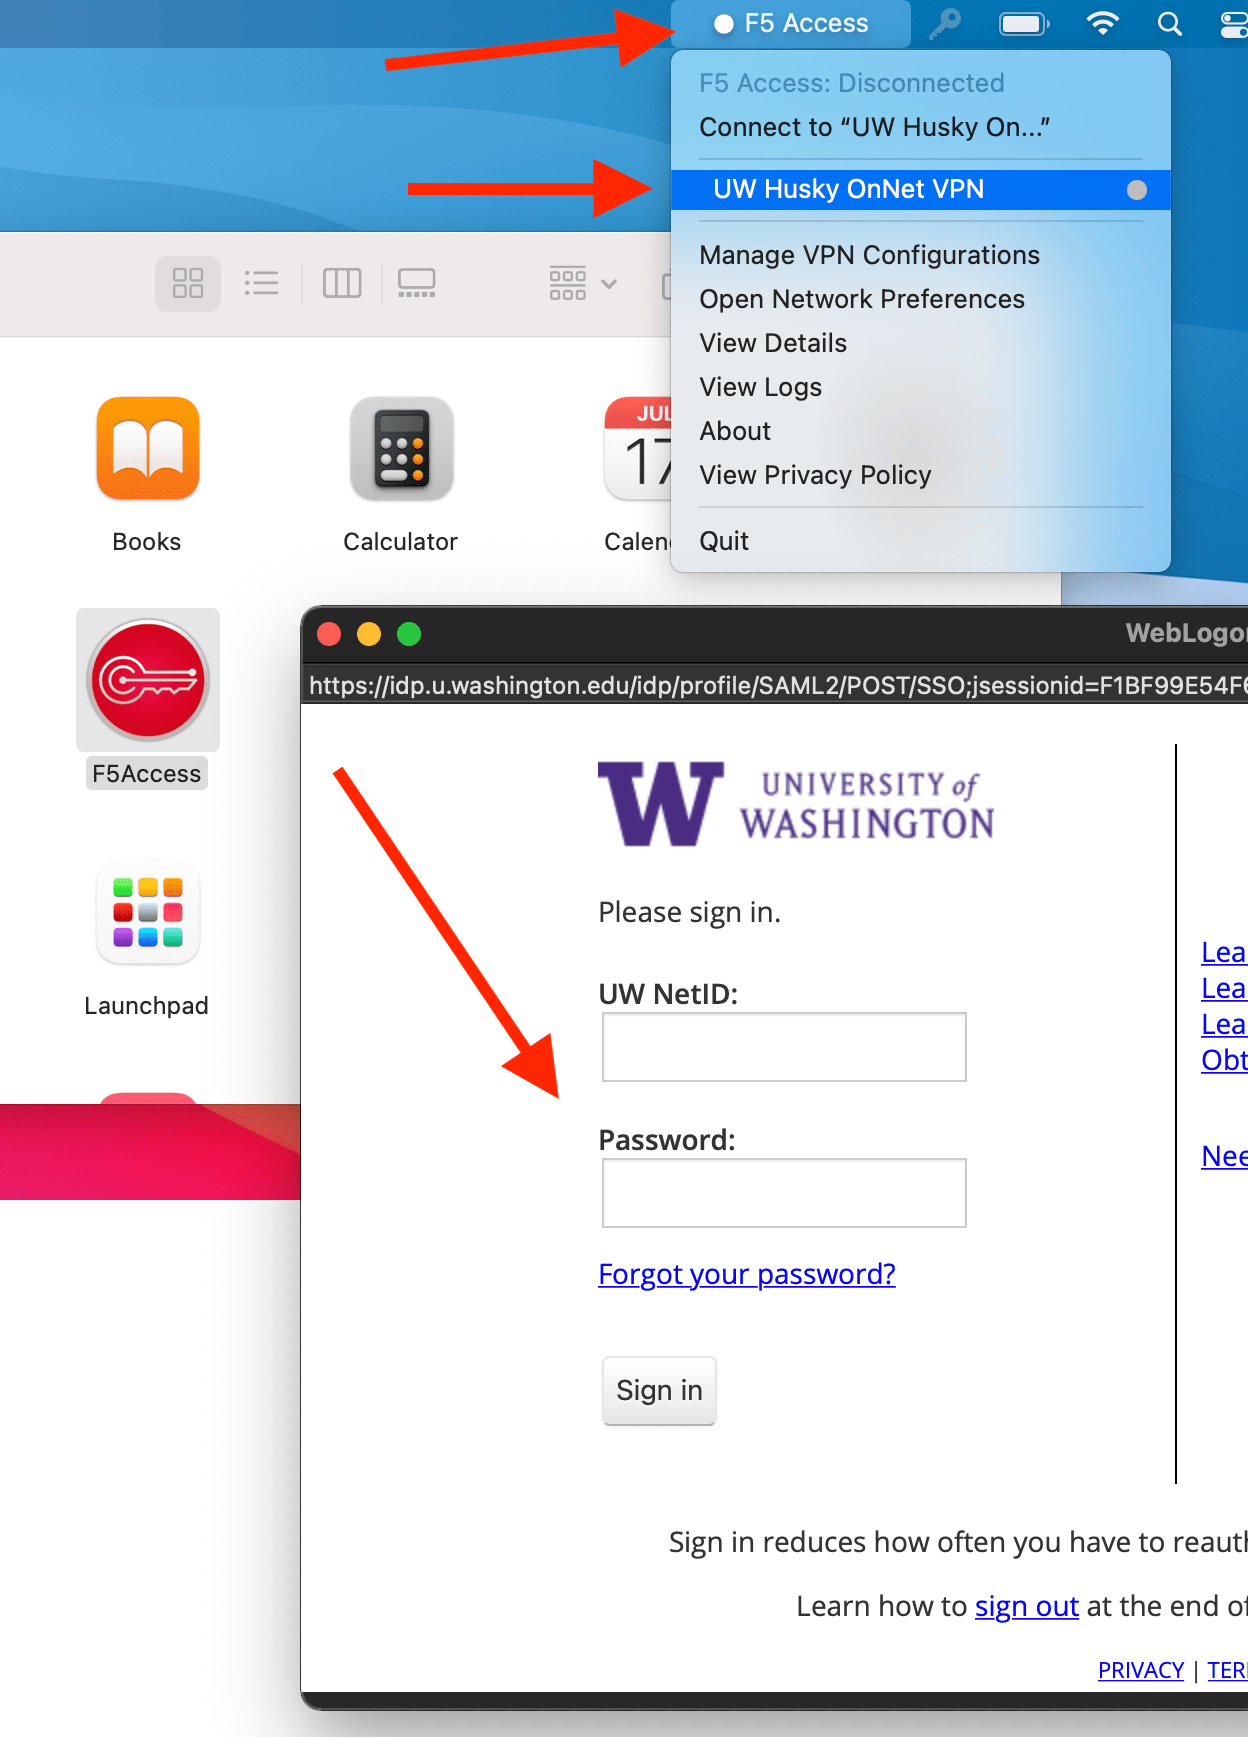
10) Click “F5 Access” in the top-right menu bar, click “UW Husky OnNet VPN”, authenticate using UW NetID credentials in the University of Washington WebLogon screen. (This action is connecting you to the UW network via Virtual Private Network (VPN) to make the next few steps possible.)

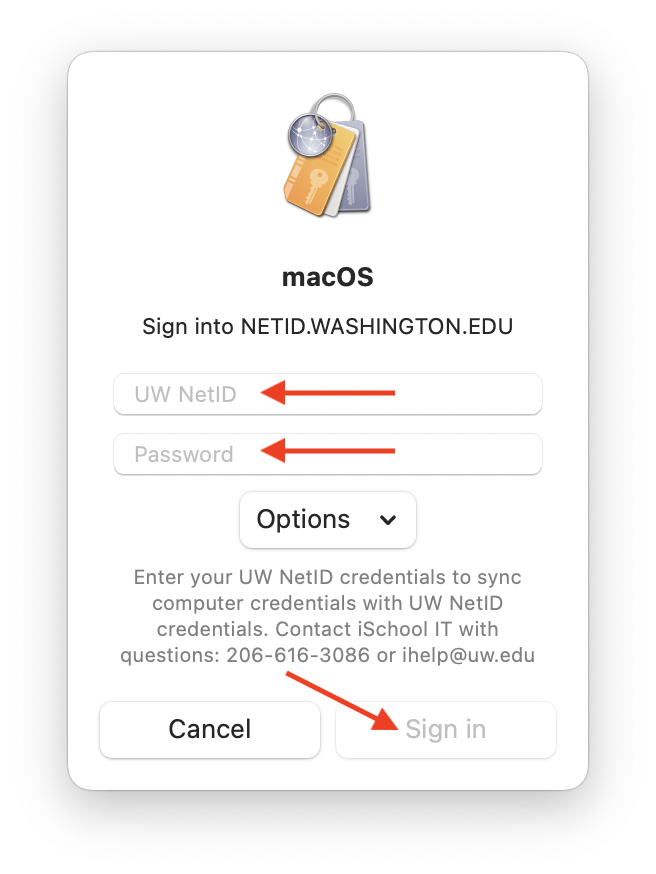
11) Enter your UW NetID credentials in the “Sign into NETID.WASHINGTON.EDU…” box, click Sign in.

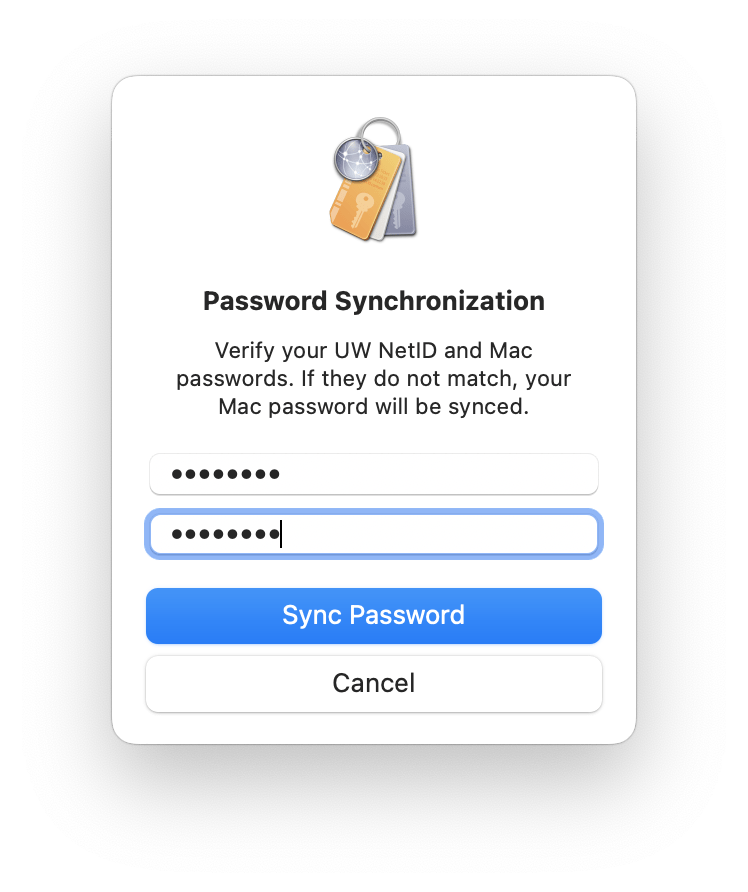
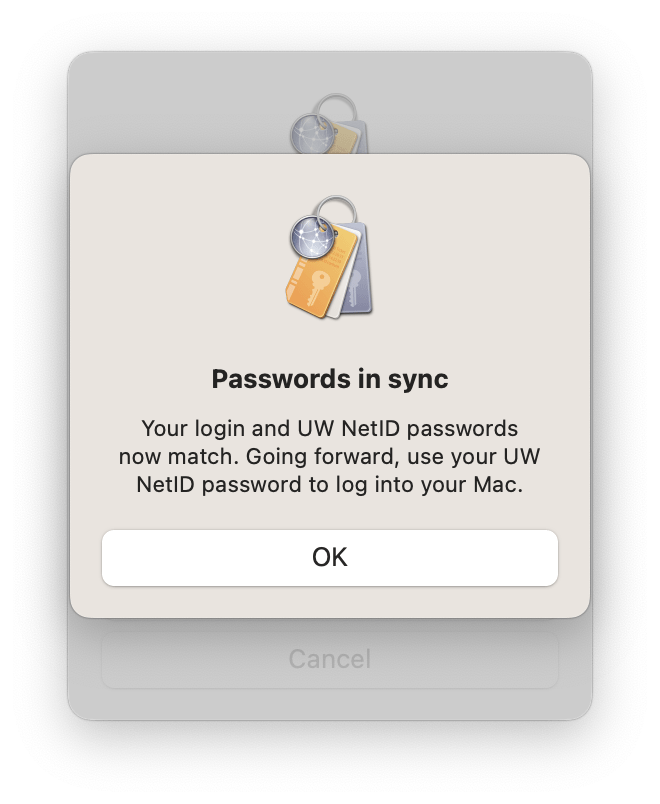
12) In the “Password Synchronization” box enter your UW NetID password in both fields, click Sync Password. Note the “Passwords in sync” message. Click OK. You will be using your UW NetID credentials for the username/password combination for your macOS device.

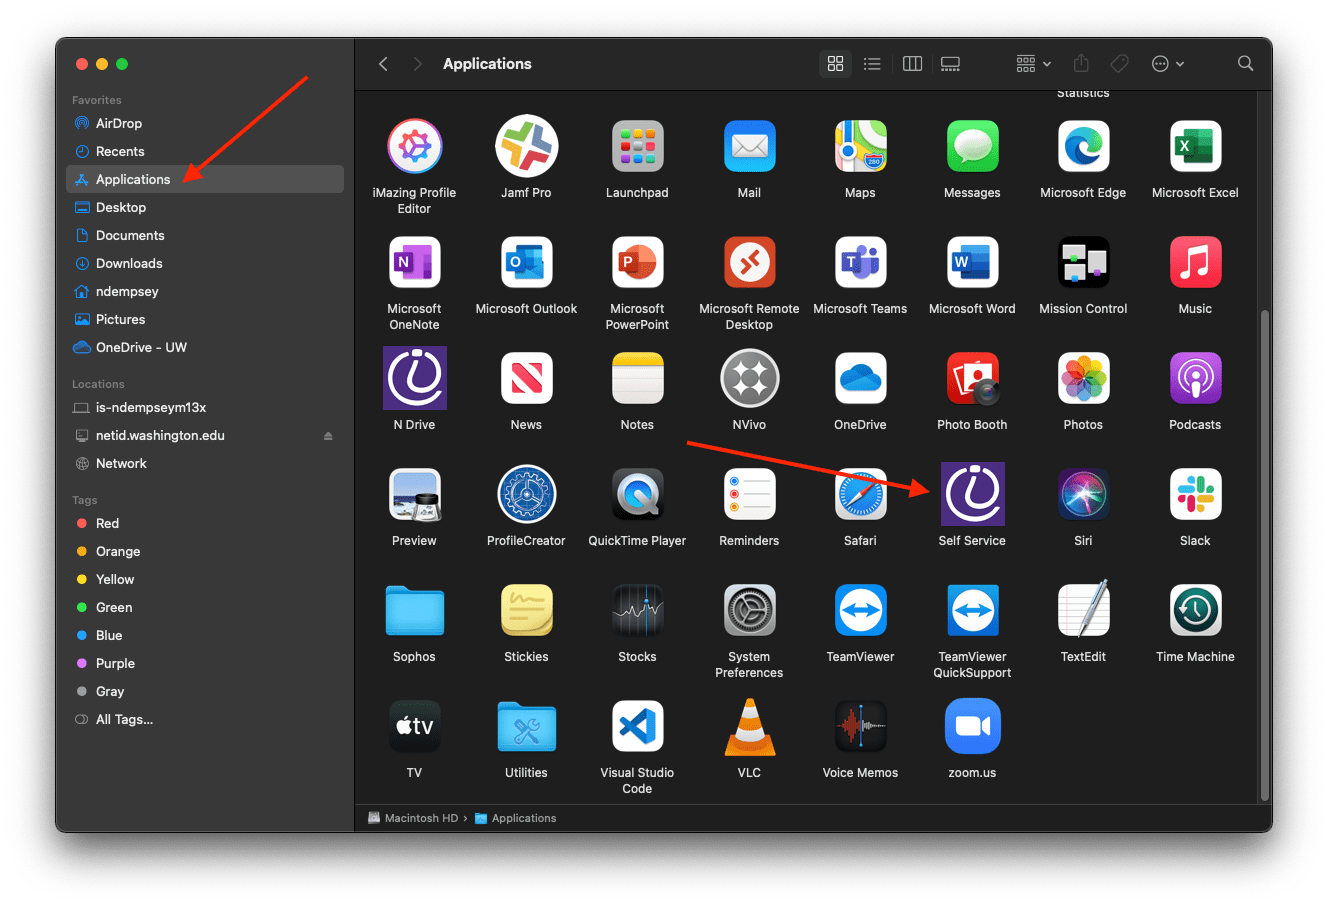
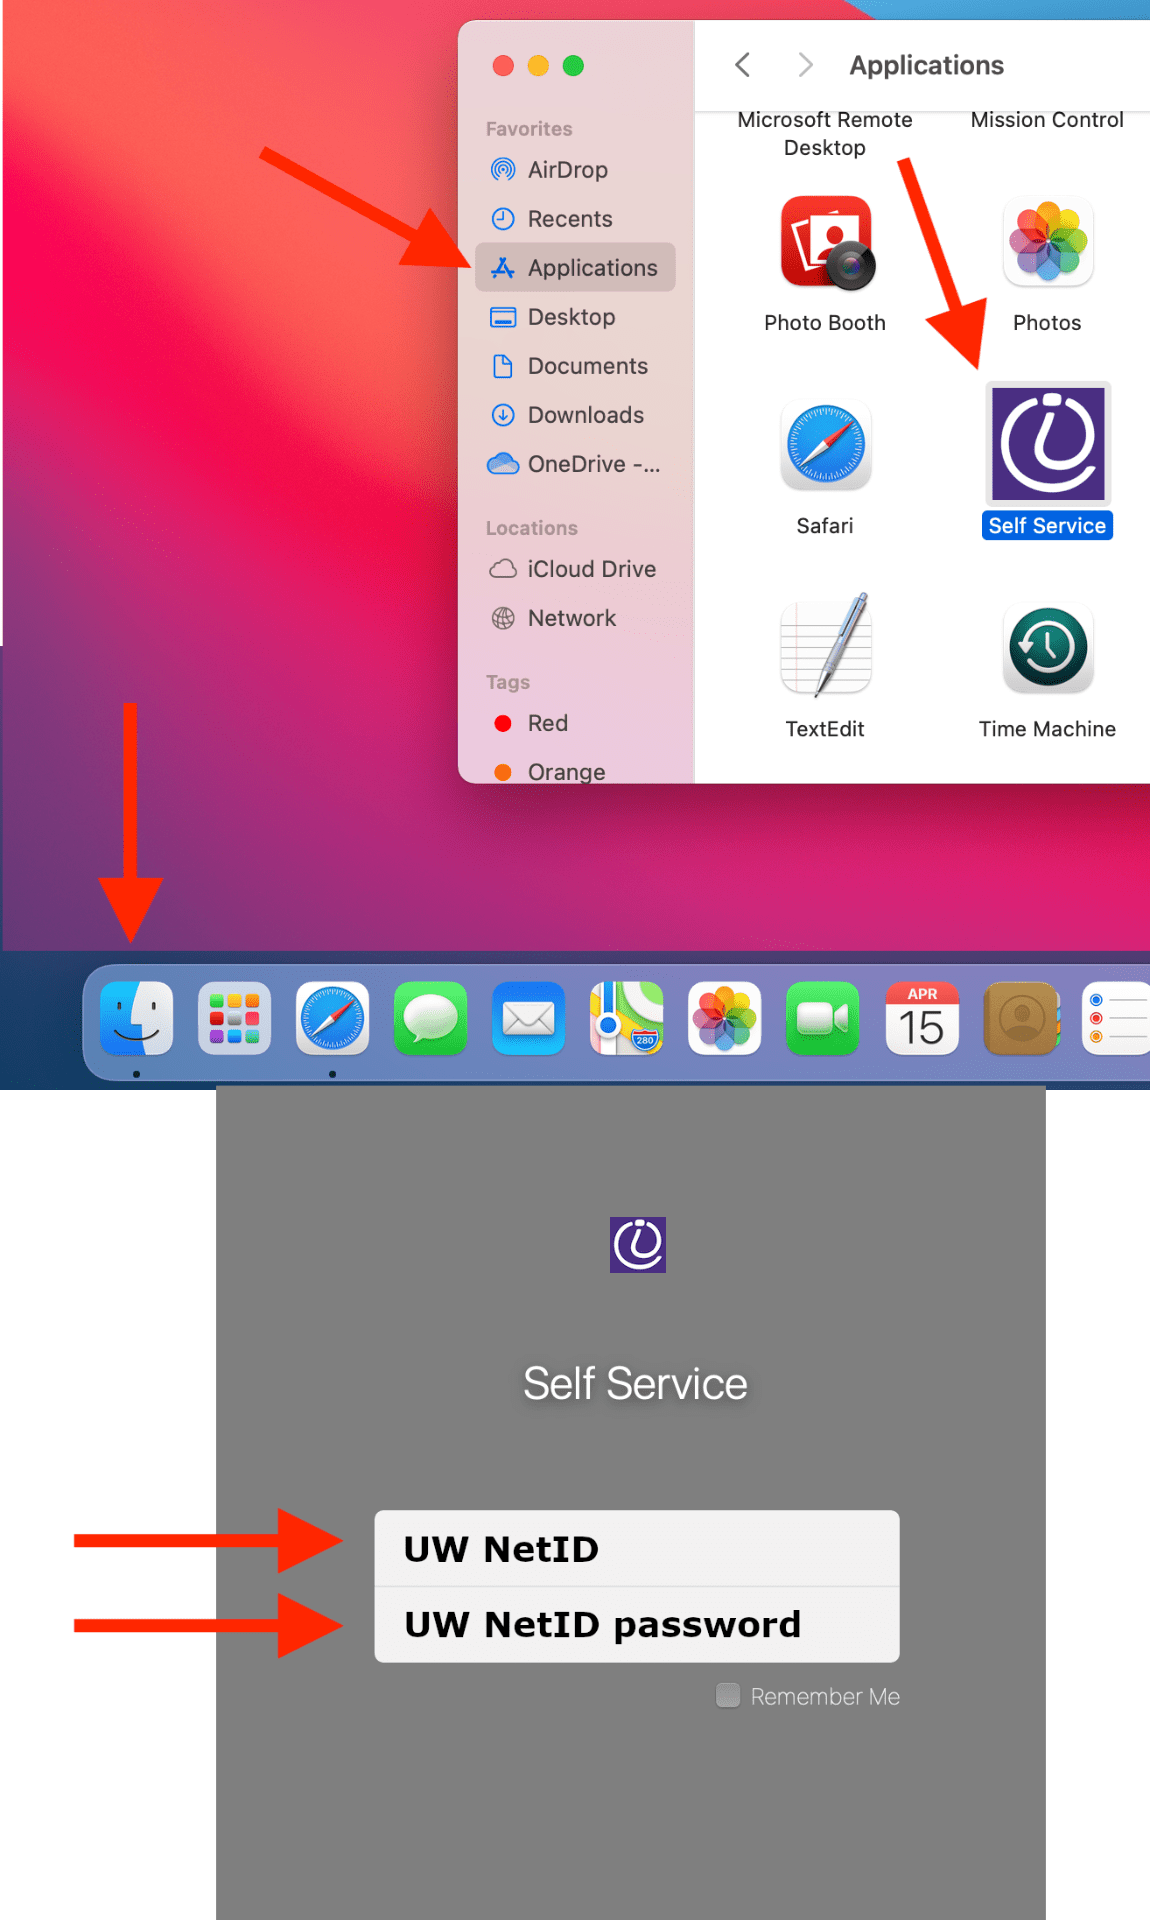
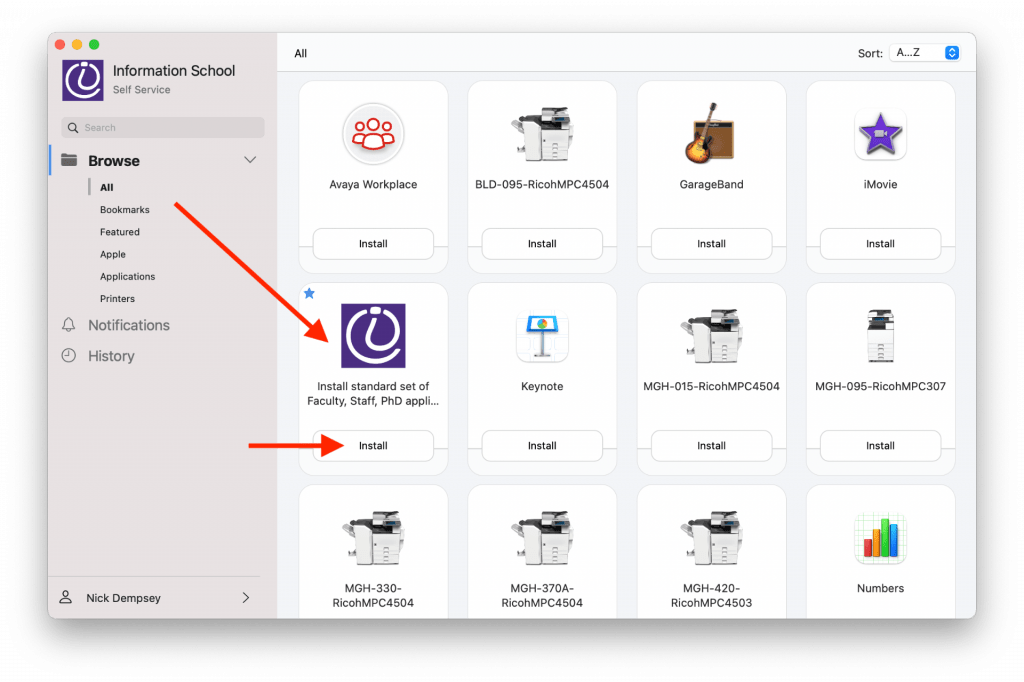
13) Open a Finder window, go to the Applications folder, start the Self Service application, sign in with UW NetID credentials if prompted.

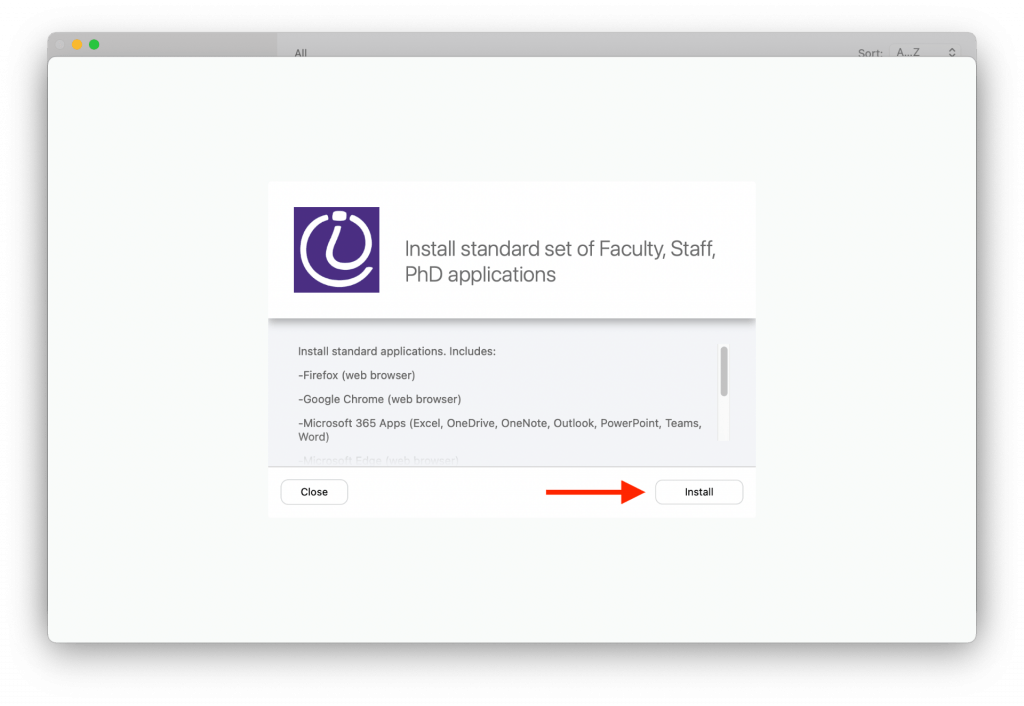
14) Look for the item named “Install standard Faculty, Staff, PhD applications”, click Install, click Install.

Note well: The total installation time could take ~30 minutes or more depending on your network connection. “Self Service” will give you the messages “Executing” and “Installing” and “Running” while installation is happening. “Done!” will appear briefly when installation is complete. If you do not see any glaring “failure” messages, the installation happened correctly. The Applications folder will be populated with the software titles mentioned in Self Service. There are other miscellaneous applications and printers you may install if you wish before exiting the Self Service application.

15) Install the Code42/CrashPlan file backup software by following the steps on this web page: Install the CrashPlan file backup software

Use the Code42/CrashPlan software to restore files from a previous computer if necessary. Detailed directions are on this web page:

How to restore files using the Code42/CrashPlan application

Restoring files via Code42/CrashPlan is not necessarily a trivial step. Please contact the iSchool IT Help Desk if there are any questions about restoring files via Code42/CrashPlan.

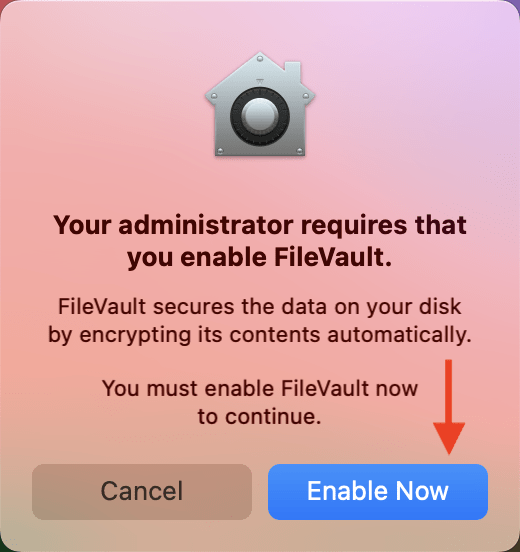
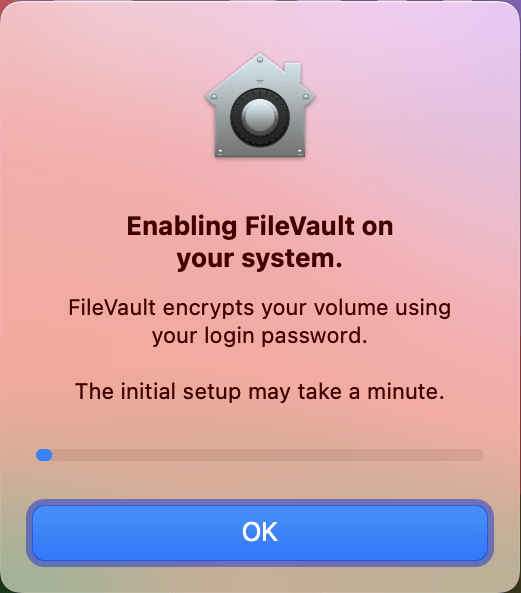
16) Restart the computer. After the first time the computer is restarted, you will be met with the setup of “FileVault” disk encryption.

When you see the “…enable FileVault” message click Enable Now, click OK.

At this point, your iSchool macOS computer has completed the necessary one-time-setup-steps and is ready to use but may not have all of the customizations you need. Some examples of further actions you may need to take:

If Microsoft Outlook is your email application of choice, find and start the Microsoft Outlook application. Follow the instructions provided by Outlook to add your @uw.edu email address.

If you have access to a shared @uw.edu email account and need to add the account to Outlook: https://www.kb.ischool.uw.edu/how-to-add-shared-netid-email-account-to-outlook/

If you need to install Zoom: https://zoom.us/download

If you need to install SecureCRT (to access The UW Student Data Base): https://itconnect.uw.edu/uware/securecrt/

You may need or want to sign in to your web browser of choice to sync bookmarks:

Google Chrome sync directions

Firefox sync directions

Microsoft Edge sync directions

Please contact the iSchool IT Help Desk, 206-616-3086 or ihelp@uw.edu, if there are any questions or issues during this setup process.

Outlook shared calendar synchronization errors

Outlook shared calendar synchronization errors

The steps below can be done if you see multiple “synchronization errors” due to adding a shared calendar to Outlook on a Windows computer.

“Synchronization errors” found in the “Sync Issues” folder:

will indicate some wording about:

“Synchronizing server changes in folder ‘Colleague Name – Calendar’
Downloading from server ‘https://outlook.office365.com/’
Error synchronizing folder
[80070005-508-80070005-560]
You do not have sufficient permission to perform this operation on this object. See the folder contact or your system administrator”

Steps to take to attempt to resolve this issue:

1) Quit Outlook.

2) Right-click the lower-left Windows Start icon, click Run.


3) In the “Open:” field of the “Run” window, type:

Outlook.exe /resetnavpane

click OK.

4) Outlook will open. Let Outlook remain open for a while; 20, 30 seconds. Quit Outlook.

5) Right-click the lower-left Windows Start icon, click Run.

6) In the “Open:” field of the “Run” window, type:

Outlook.exe /cleanviews

click OK.

7) Outlook will open. The synchronization errors should clear up.