Outlook sign in/login issue

If you are experiencing the following, with Microsoft Outlook on a Windows computer:

– Outlook is reporting it is “disconnected”

– Outlook flashes a small window and the window disappears repeatedly

– Outlook displays the behavior as seen in the video below:


Take the following actions:

– Quit/close/exit Outlook and all other Microsoft Office applications; Word, Excel, Powerpoint, etc.

– Start Word, click Account, click Sign Out, click Yes/Sign Out

– Quit/close/exit Word

– Start Outlook, click Sign in, proceed with the sign-in process


After doing the sign out/sign in actions above Outlook should work as expected. If it does not work as expected, please try restarting your computer.

Outlook shared calendar synchronization errors

Outlook shared calendar synchronization errors

The steps below can be done if you see multiple “synchronization errors” due to adding a shared calendar to Outlook on a Windows computer.

“Synchronization errors” found in the “Sync Issues” folder:

will indicate some wording about:

“Synchronizing server changes in folder ‘Colleague Name – Calendar’
Downloading from server ‘https://outlook.office365.com/’
Error synchronizing folder
[80070005-508-80070005-560]
You do not have sufficient permission to perform this operation on this object. See the folder contact or your system administrator”

Steps to take to attempt to resolve this issue:

1) Quit Outlook.

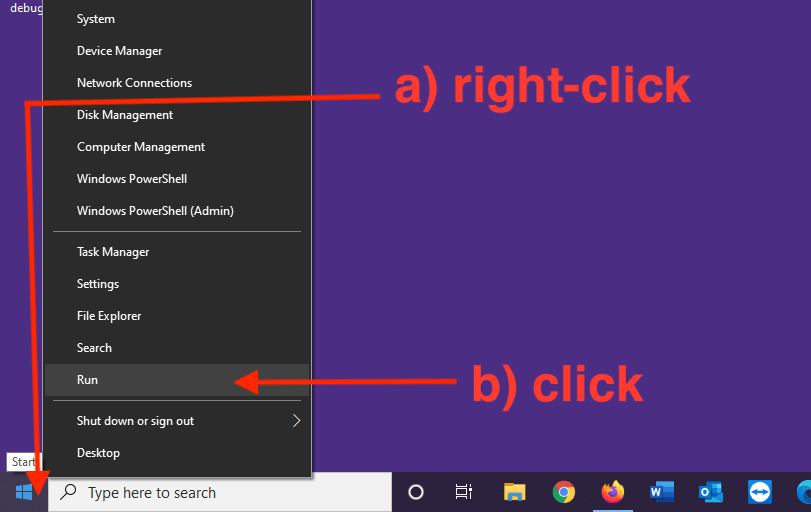
2) Right-click the lower-left Windows Start icon, click Run.


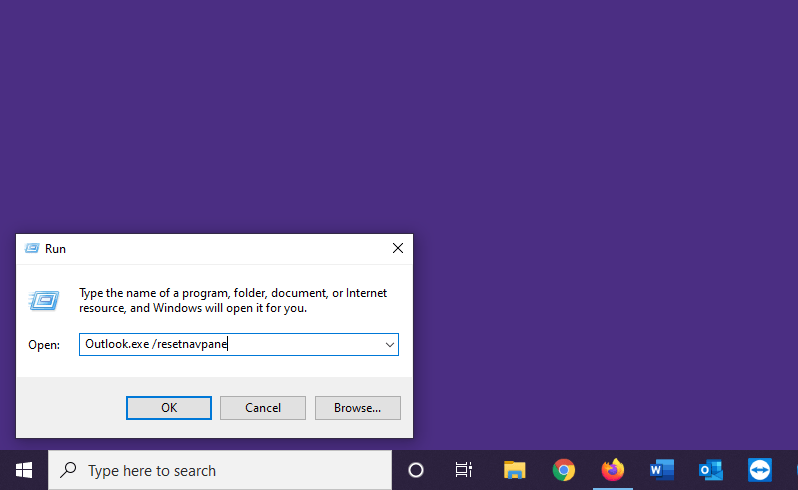
3) In the “Open:” field of the “Run” window, type:

Outlook.exe /resetnavpane

click OK.

4) Outlook will open. Let Outlook remain open for a while; 20, 30 seconds. Quit Outlook.

5) Right-click the lower-left Windows Start icon, click Run.

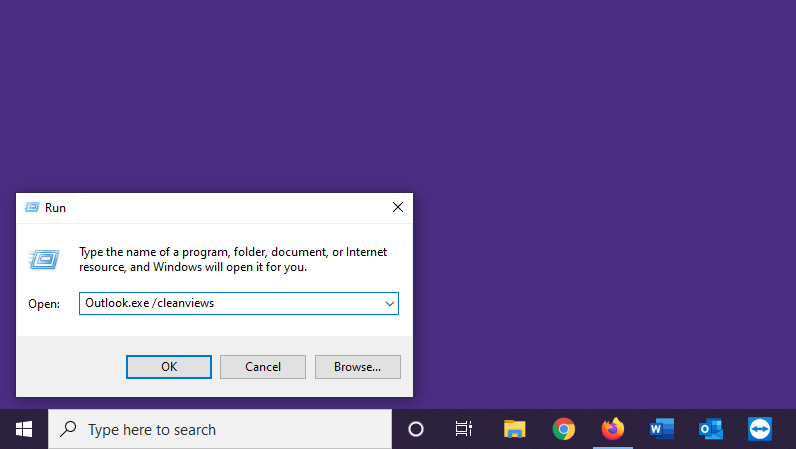
6) In the “Open:” field of the “Run” window, type:

Outlook.exe /cleanviews

click OK.

7) Outlook will open. The synchronization errors should clear up.

Microsoft Office Outlook default mail client error message

Microsoft Office Outlook default mail client error message

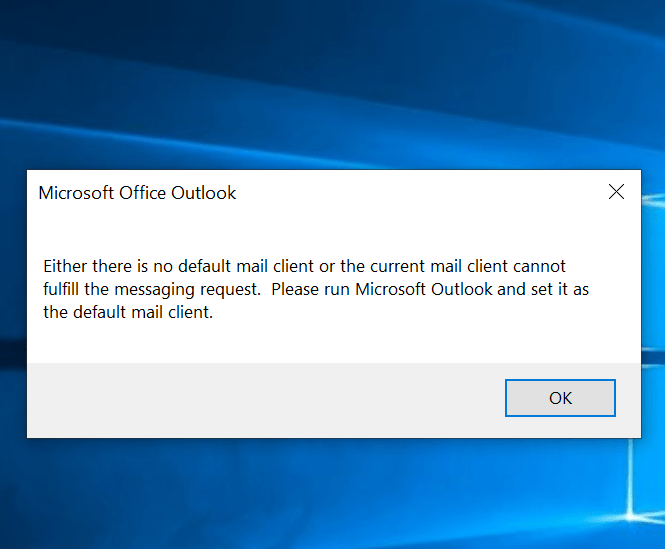
If you are using an iSchool-issued Windows laptop and continually seeing a pop-up message, with the wording “Either there is no default mail client or the current mail client cannot fulfill the messaging request. Please run Microsoft Outlook and set it as the default mail client.”, follow the steps below:


1) Quit Outlook.


2) If you are off campus, connect to the Husky OnNet VPN by following these steps:

https://itconnect.uw.edu/connect/uw-networks/about-husky-onnet/use-husky-onnet/#windows


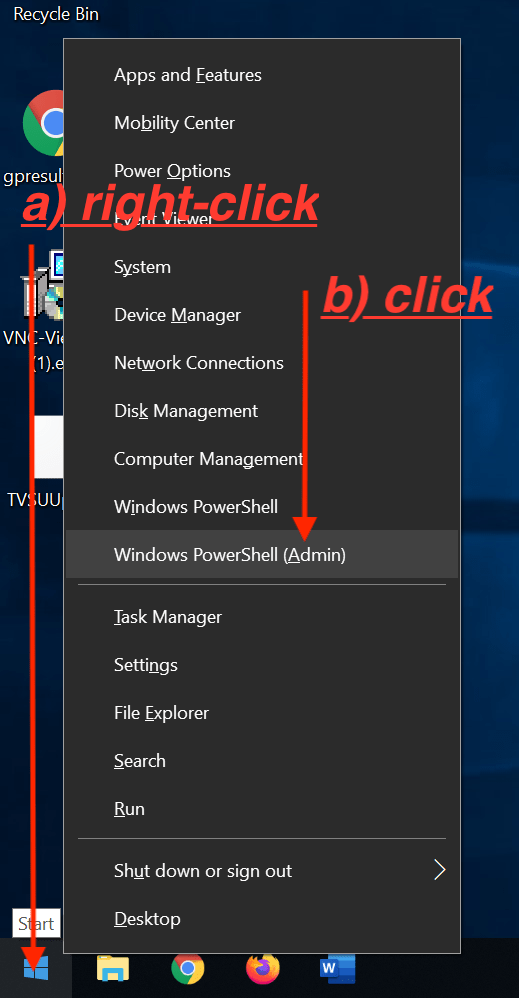
3) Right-click the lower-left Windows icon, click Windows PowerShell (Admin), click Yes.


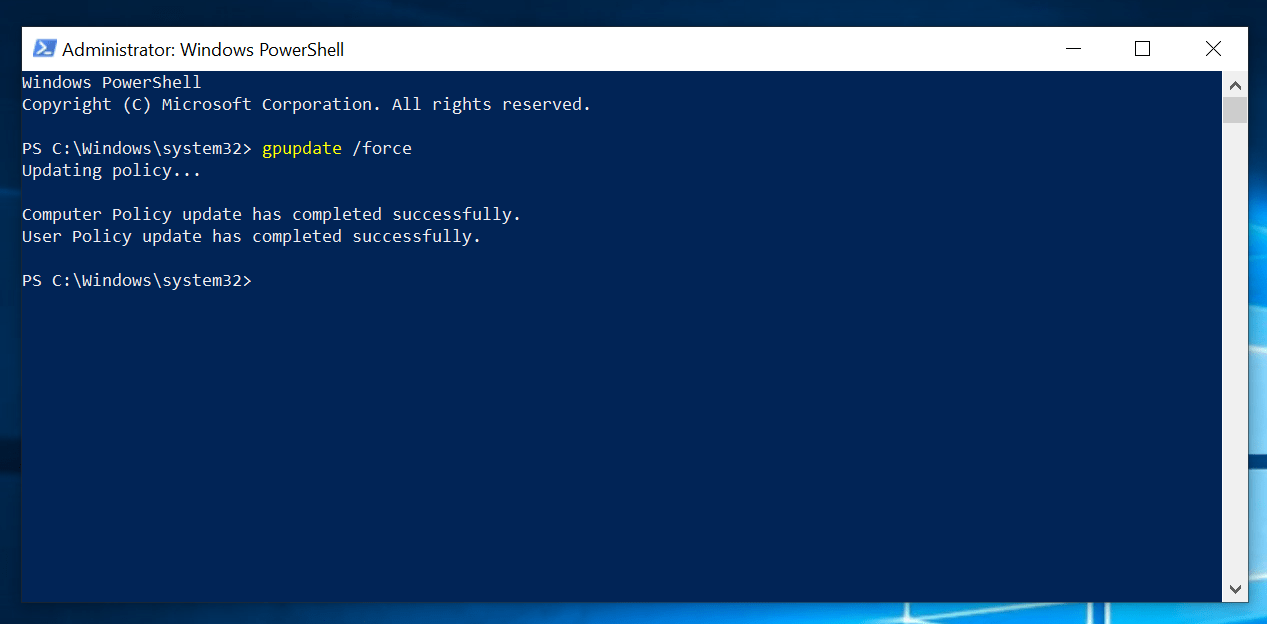
4) In the “PowerShell” application window that opens, type:

gpupdate /force

press “Enter” on your keyboard

after a few seconds, you should see wording indicating “Computer Policy” and “User Policy” updated successfully.


If you see wording that the “Computer Policy” and “User Policy” updated successfully, the Outlook “…no default mail client…” message should stop appearing.

Focused Inbox

Microsoft introduced “Focused Inbox” for Outlook. The idea of “Focused Inbox”, is that Outlook will “learn” to automatically sort emails into two “tabs” in your inbox: “Focused” and “Other.” “Important” emails will be sorted into the “Focused” tab of your Inbox. Less important emails will be sorted into the “Other” tab of your Inbox.

Full documentation about Focused Inbox can be found at the link below:

Microsoft Focused Inbox documentation

A previous version of this feature, named “Clutter”, should be turned off. Steps to turn off “Clutter” can be found at the link below:

Microsoft documentation for turning off “Clutter”

How to Create a Rule for Outlook or OWA

Sorting email into folders automatically can be a huge time saver and can keep you focused on the messages that demand your immediate attention. You can create rules to let Outlook or OWA (Outlook Web App) sort them into the folder of your choice. Rules can sort messages based on the sender, the subject, the recipient or a combination of various characteristics. When you are creating a rule for Outlook, make sure that:

RULES

  • If you have a UW Spam Gauge rule applied, always move the Spam rule to the top of your list of rules so that it is processed first;
  • All your rules are server-side unless you are creating rules for client only actions, such as coloring your emails or otherwise personalizing your email. You can make your rules on OWA to ensure it’s server-side.

Here is an article from Microsoft about how to make rules in Outlook:

https://support.office.com/en-us/article/manage-email-messages-by-using-rules-c24f5dea-9465-4df4-ad17-a50704d66c59

And one about how to make rules in OWA:

https://support.office.com/en-us/article/inbox-rules-in-outlook-edea3d17-00c9-434b-b9b7-26ee8d9f5622

UNREAD MAIL

Once you have rules in place that sort your email you need the ability to find them. This is best done using the Unread Mail Search Folder:

https://support.office.com/en-us/article/View-only-unread-messages-F2C8450C-9CD0-4037-A5D3-26F6946727CA

Create SharePoint List from Excel Spreadsheet

The advantages of using a SharePoint list instead of just uploading an Excel file to SharePoint is that multiple people can edit the file simultaneously, you avoid version sprawl by only having one centrally located version of the list and you can always download the list as a file if needed.

Here are the steps.

  • Make sure your Excel file is saved in the newest format, it needs to have a .XLSX extension. If it does not, simply save it in this newer format. The old format is .XLS.
  • Browse to your SharePoint site using Internet Explorer. This task requires IE as it is the only browser that works with ActiveX controls.
  • Follow these steps here using Internet Explorer:

https://support.office.com/en-us/article/Create-a-list-based-on-a-spreadsheet-380cfeb5-6e14-438e-988a-c2b9bea574fa

Powerpoint

The Online Learning Team maintains a guide about Powerpoint, which is available on Canvas via the iSchool Online Learning Support site. You can access the guide here.

The guide specifically addresses ways instructors can use Powerpoint for their lectures, and provides a tutorial on how to embed audio in Powerpoint slides.

If you have any questions, you may reach out to the Online Learning Team by emailing olt@uw.edu.


Locked printing with Ricoh printers

Locked printing with Ricoh printers

Instructions below are for using a security function on Ricoh printers allowing users to “lock” or hold their print until they are physically in front of the printer to “release” the actual printed piece of paper.

The instructions below are applicable to the following printers:

Ricoh in Bloedel Hall 095 (BLD-095-RicohMPC4504)
Ricoh in Gerberding Hall B054L (GRB-B054L-RicohIMC3500)
Ricoh in Mary Gates Hall 015 (MGH-015-RicohMPC4504)
Ricoh in Mary Gates Hall 095 (MGH-095-RicohMPC307)
Ricoh in Mary Gates Hall 330 (MGH-330-RicohMPC4504)
Ricoh in Mary Gates Hall 370A (MGH-370A-RicohMPC4504)
Ricoh in Mary Gates Hall 420 (MGH-420-RicohIMC4500)
Ricoh in Tower (TWR-RicohMPC4504)

Windows
Mac

locked printing in Windows

(Word is used in the example below. However, this option works with Excel and other programs.)

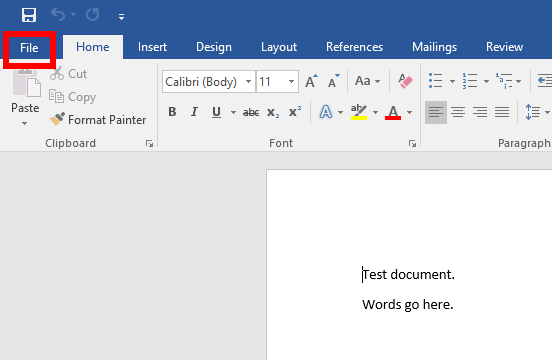
01) click File


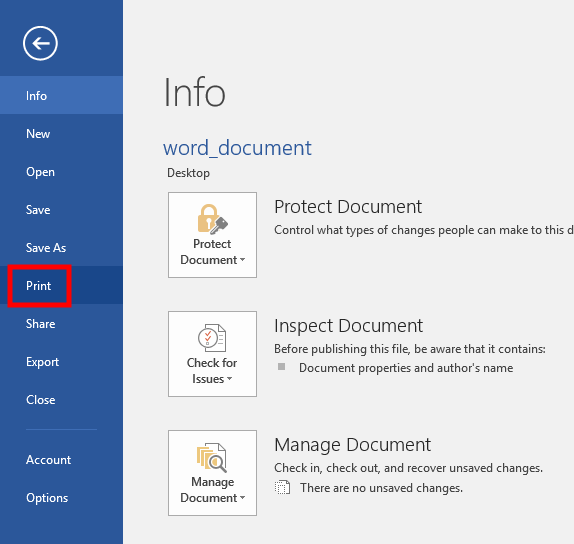
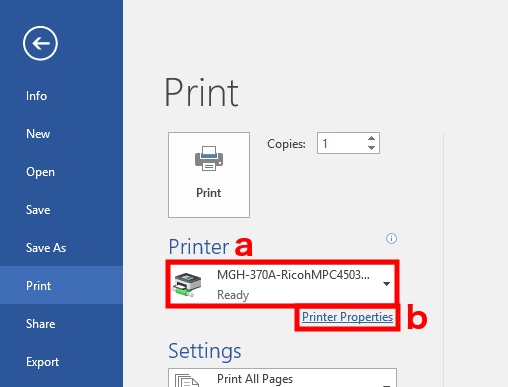
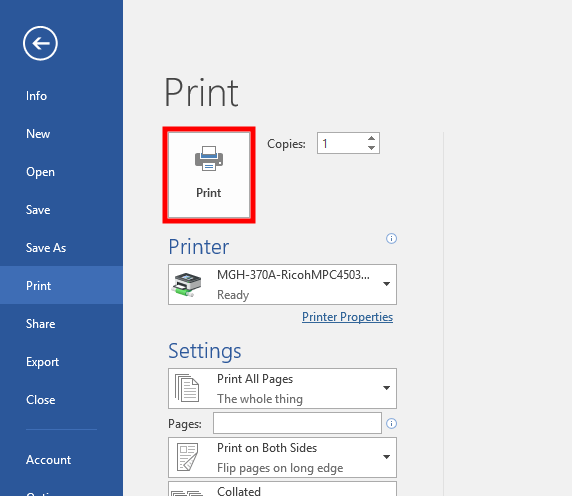
02) click Print


03) select one of the printers listed above, click Printer Properties


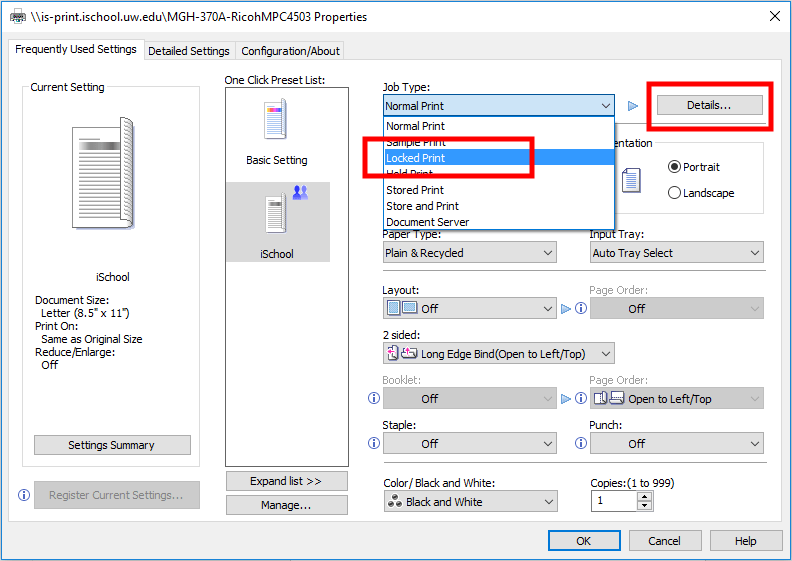
04) from the “Job Type:” drop-down, select Locked Print, click Details…


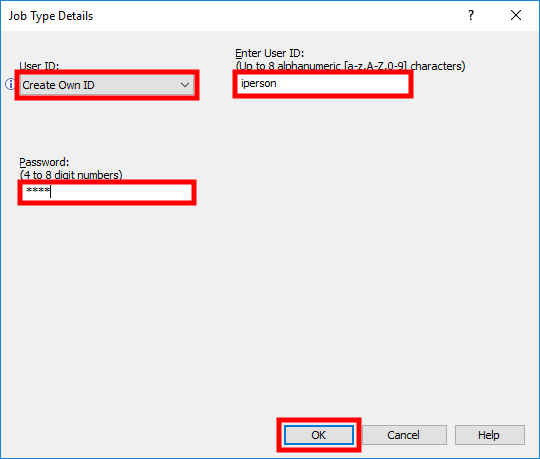
05) in the Job Type Details window, use the following settings:

User ID: use Create Own ID
Enter User ID: use your UW NetID
Password: use any number with 4 to 8 digits, it must be memorable to you, you will need to type in this number while physically at the printer

click OK


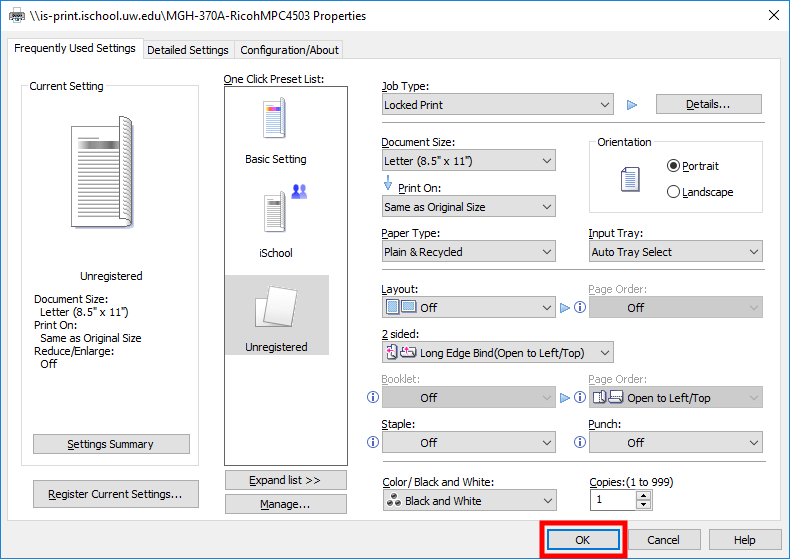
06) click OK


07) click Print


At this point, the rest of the steps need to be done while at the printer.

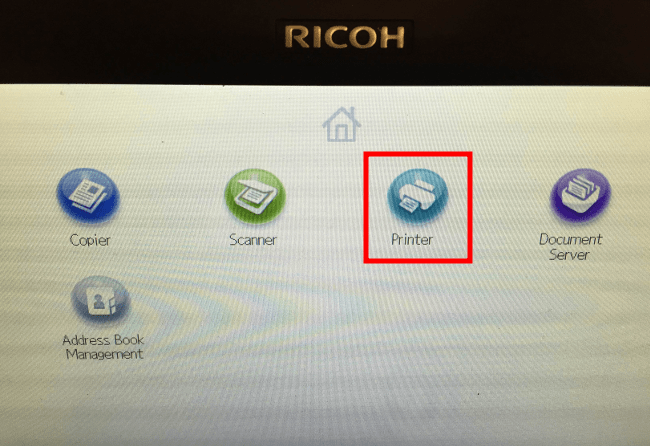
08) (on the Ricoh printer interface) press Printer

ricoh_printer_button


09) press Print Jobs

ricoh_print_jobs


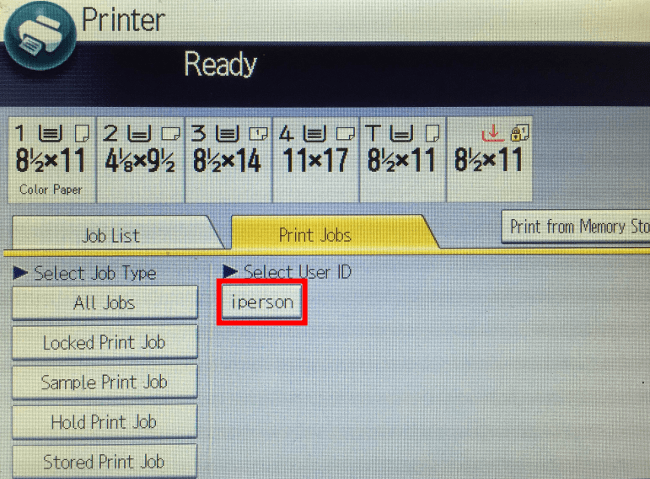
10) select the User ID you created in step 05

ricoh_user_id


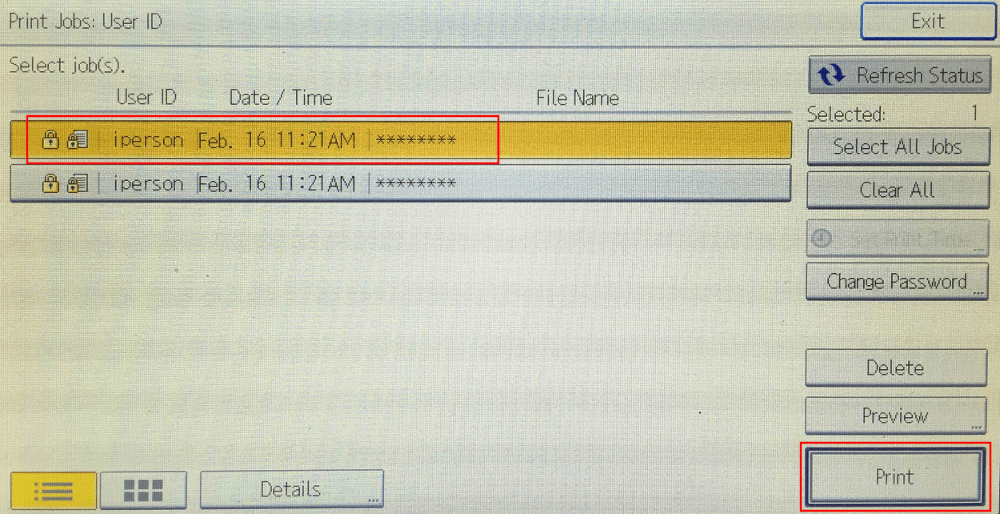
11) select the correct print job, press Print

ricoh_user_id_print_job


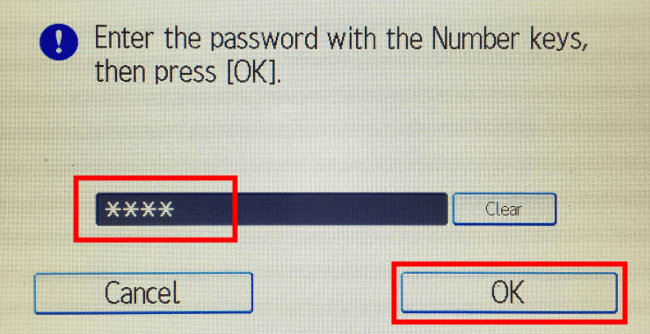
12) enter the password you created in step 05, press OK

ricoh_print_job_password


13) change the quantity of print copies desired if necessary (1 copy is default), press Print

ricoh_print_button


locked printing in Mac OS

(Word is used in the example below. However, this option works with Excel and other programs.)

01) click File, click Print…

mac_word_file_print


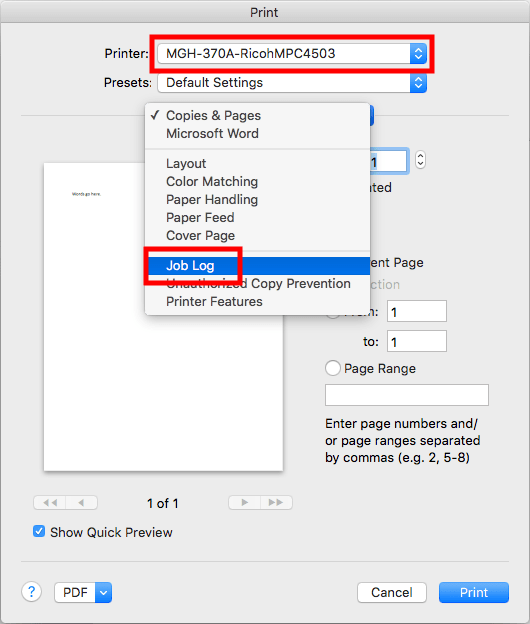
02) select any printer listed above from the “Printer:” drop-down, select Job Log from the third drop-down


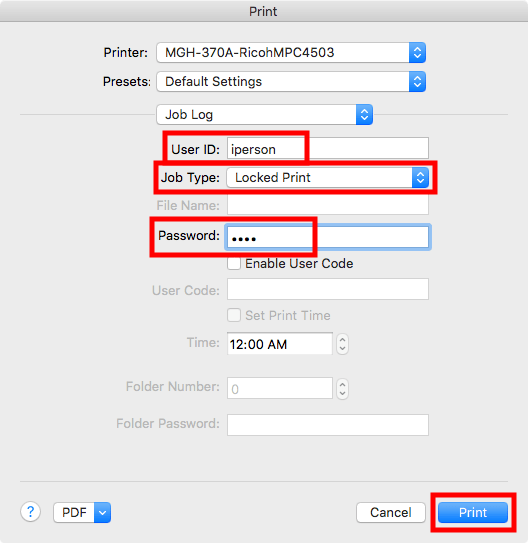
03) for “Job Type:” select Locked Print, use the following settings:

User ID: use your UW NetID
Password: use any number with 4 to 8 digits, it must be memorable to you, you will need to type in this number while physically at the printer

click Print


At this point, the rest of the steps need to be done while at the printer.

04) (on the Ricoh printer interface) press Printer

ricoh_printer_button


05) press Print Jobs

ricoh_print_jobs


06) select the User ID you created in step 03

ricoh_user_id


07) select the correct print job, press Print

ricoh_user_id_print_job


08) enter the password you created in step 03, press OK

ricoh_print_job_password


09) change the quantity of print copies desired if necessary (1 copy is default), press Print

ricoh_print_button

Alternatives to Adobe Acrobat Pro

Alternatives to Adobe Acrobat Pro

There are many tasks with PDF’s that can be performed without Adobe Acrobat Pro. Some of the most common tasks are:

Edit a PDF using Microsoft Word
Create a PDF from a Microsoft Office application
Saving an email as a PDF
Sign a PDF
Split or break up a PDF
Combine multiple PDFs
Create a PDF from a web page using Google Chrome
Use Optical Character Recognition (OCR) in Microsoft OneNote


How to edit a PDF with Microsoft Word

Windows 10

Word includes the ability to convert a PDF to a Word document, allowing you to then edit the content:

1) start Word

2) click File, click Open, navigate and find the PDF you wish to edit, click Open
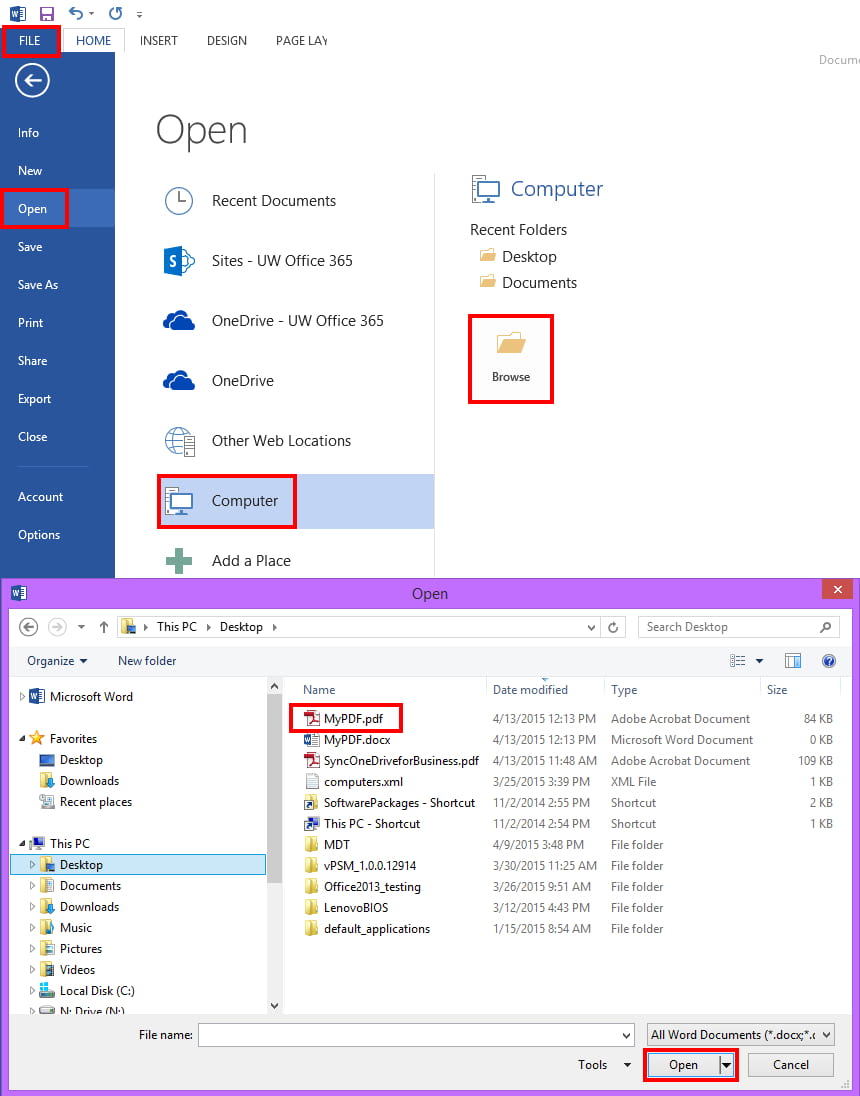
Open PDF Word 2013


3) a message will appear letting you know the converted-and-editable-document may not look perfectly like the original, but, you will be able to use and edit the original content

Open PDF Word 2013 Message

This works best with files that are mostly text. There are some elements that do not convert well.

More information about editing PDF’s in Word can be found at these websites:

Edit PDF content in Word
Unlock PDFs with Word 2013
Why does my PDF look different in Word?


How to create a PDF using a Microsoft Office application

Although the following instructions are specific to Word, they work for other Office applications like Excel, Visio, etc.

1) create the document in a Microsoft Office application

2) click File, click Save As, click the “Save as type:” drop-down, select PDF (*.pdf), click Save

Save As PDF


How to save an email as a PDF

Outlook does not include a way to save an email directly to PDF. You must first copy the contents of the email to a Word document, then save the document as a PDF.

1) open the message in Outlook

a. (optional) if you want to include the subject and “To” and “From” email address information: click Reply (you will not actually need to reply to the email)

2) on your keyboard, press CTRL and A to select all message content

3) on your keyboard, press CTRL and C to copy selected message content

4) start Word and create a new document

5) on your keyboard, press CTRL and V to paste selected message content

6) click File, click Save As, click the “Save as type:” drop-down, select PDF (*.pdf), click Save

Save As PDF


How to sign a PDF using Adobe Acrobat Reader (free application)

1) open the document you need to sign with Adobe Acrobat Reader

2) click Fill & Sign
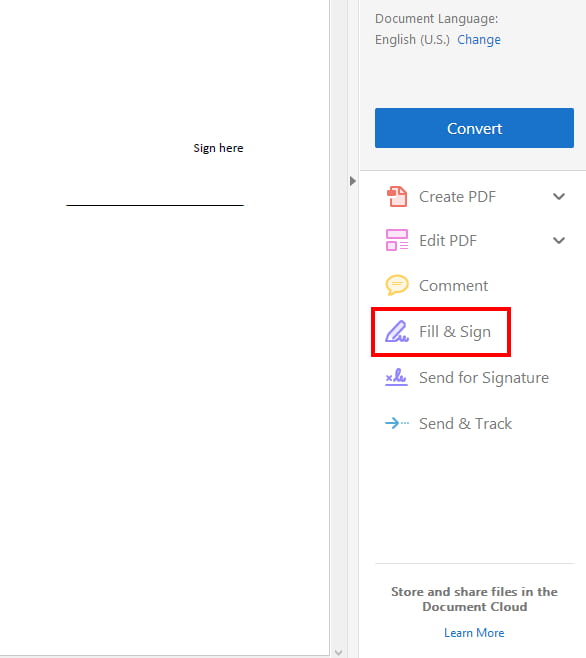
Adobe Reader Fill Sign Button


3) click Sign, click Add Signature

Adobe Reader Add Signature


4) select the option of typing or drawing your signature, enter your signature, select the option of saving your signature for later use, click Apply

Adobe Reader Apply Signature


5) position the signature, click File, click Save to save the document with your signature

Adobe Reader Position Signature


How to split or break up a PDF

There are a few ways to split or break up a PDF:

Split a PDF using Microsoft Word
Split a PDF using the Google Chrome web browser

How to split or break up a PDF using Word

1) open the PDF in Word

2) copy whatever content you need, paste content into a new Word document

3) save the new document as a PDF


How to split or break up a PDF using the Google Chrome web browser

1) start the Google Chrome application

2) find the PDF in a Windows Explorer folder, click and drag the PDF into Google Chrome to open it
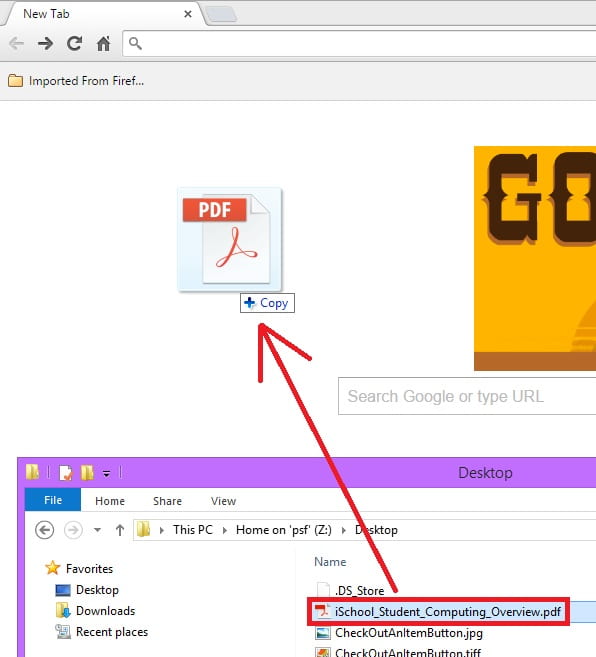
Open PDF in Google Chrome


3) bring your mouse to the bottom of the screen to bring up the menu buttons, click the Print button

Menu Google Chrome


4) click Change… (destination), click Save as PDF
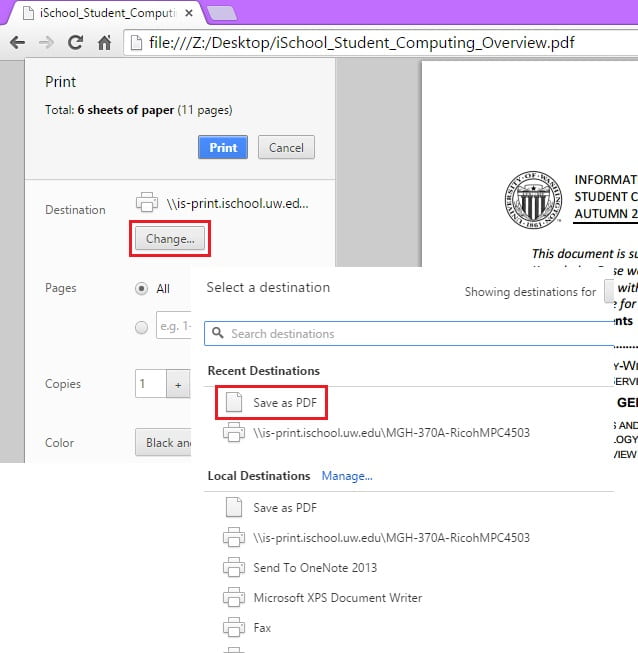
Save As PDF Google Chrome 01


5) enter the specific pages or range of pages you need, click Save
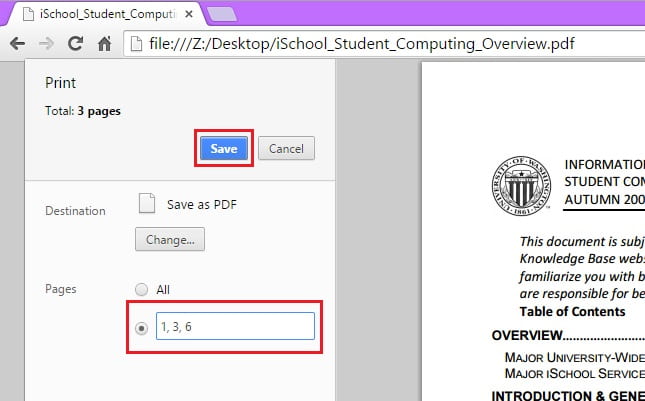
Save As PDF Google Chrome 02


How to combine PDFs

1) open the PDFs in Word

2) copy and paste the contents of each PDF into a new Word document

3) save the new document as a PDF


How to create a PDF from a web page using Google Chrome

1) use Google Chrome to navigate to the web page you intend to create a PDF of

2) click the top-right Chrome menu button, click Print…
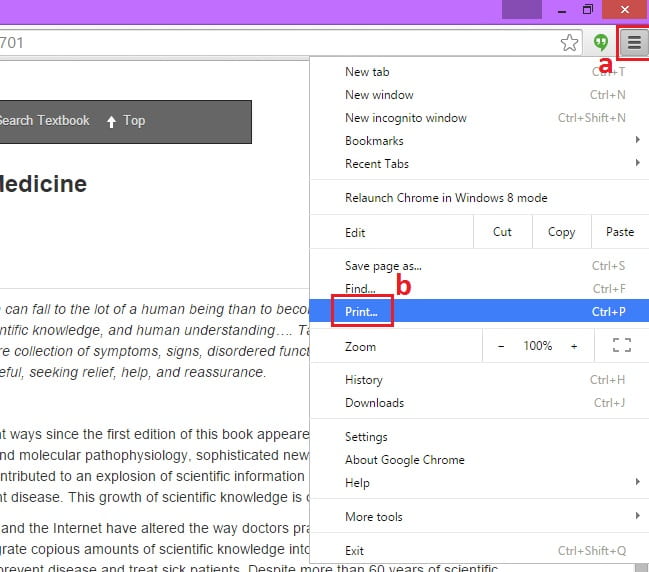
Save Web Page As PDF Google Chrome 01


3) for Destination click Change…, select Save as PDF, click Save

Save As PDF Google Chrome 01


How to use Optical Character Recognition (OCR) in Microsoft OneNote, Windows Version

Microsoft OneNote, Windows version, has the ability to extract text from scanned images.

1) Scan the document you intend to use as a TIFF/JPEG image. On iSchool Ricoh scanners, this option can be set in the Scanner menu -> Send File Type / Name… -> Single Page -> TIFF / JPEG
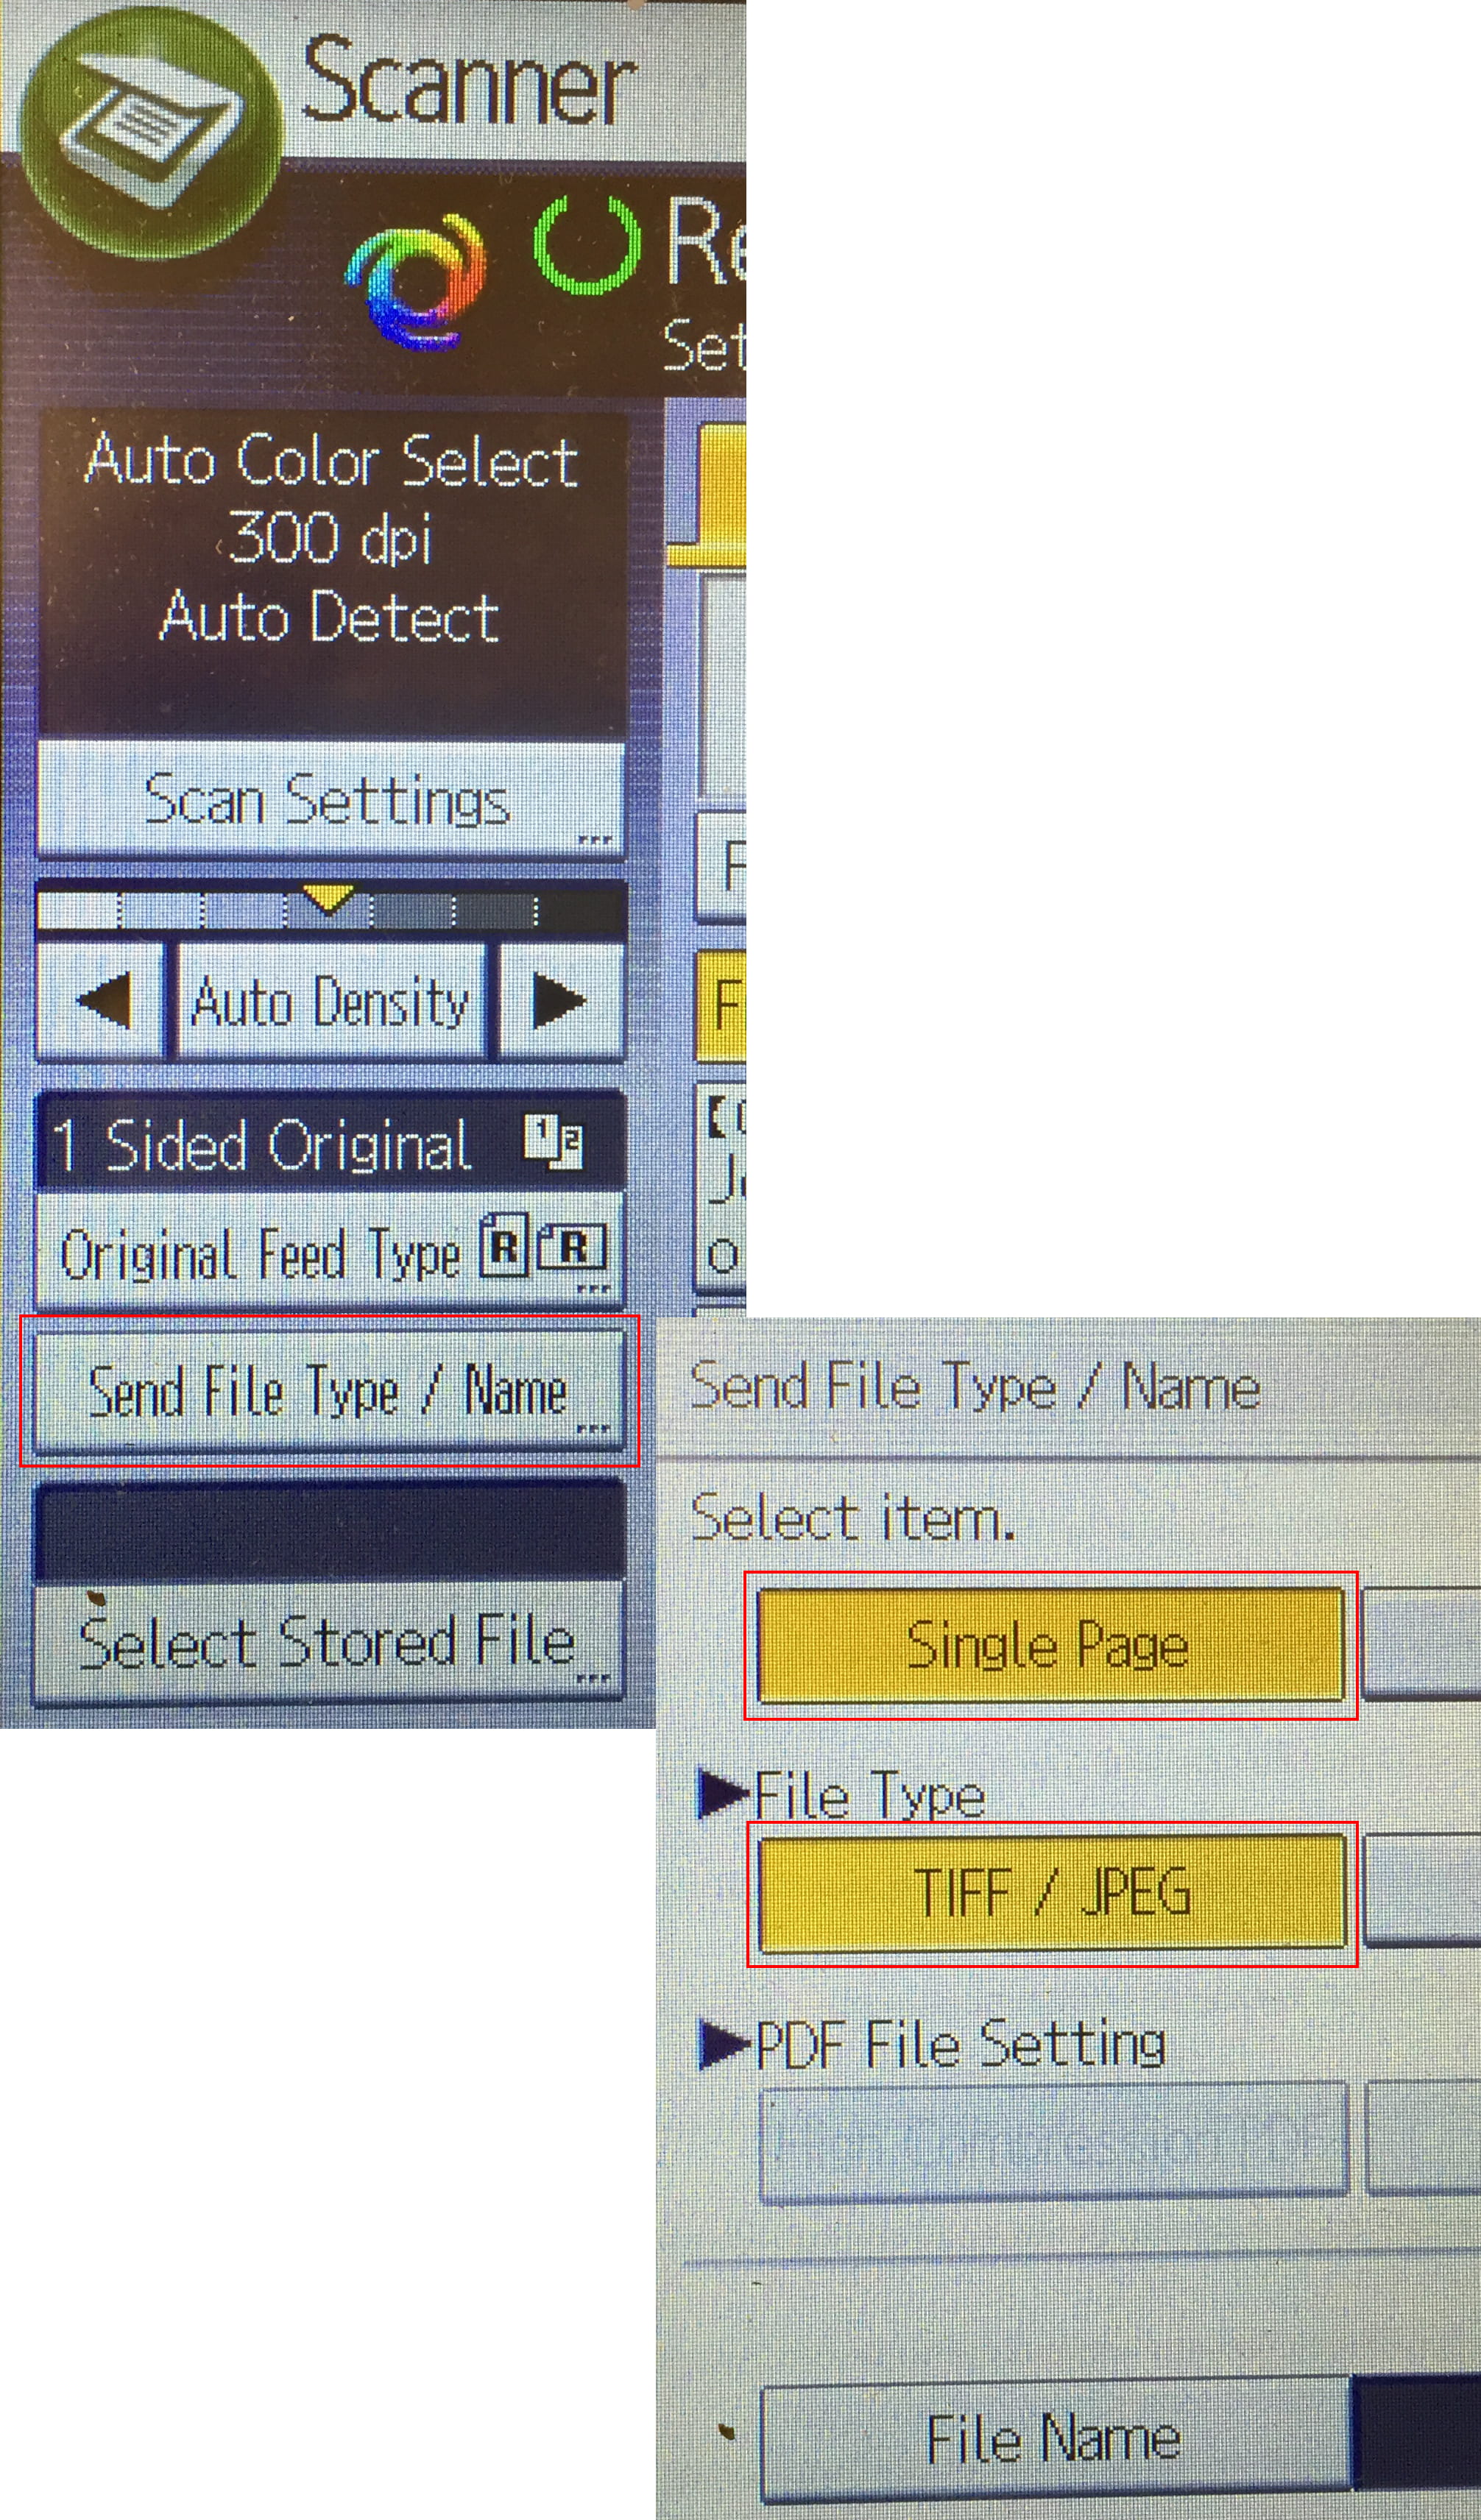
Ricoh Scan To TIFF/JPEG


2) start Microsoft OneNote in Windows, create a new notebook

OneNote, Windows, Create Notebook


3) click the plus sign to create a new section

OneNote, Windows, Create Section


4) click Insert, click Pictures, find and select the image you scanned in step 1
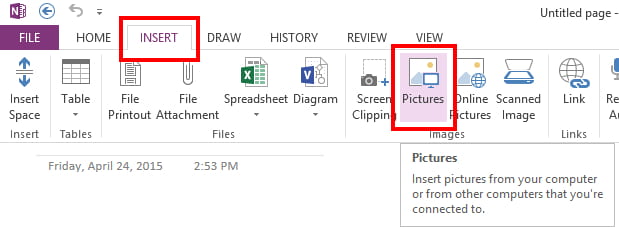
OneNote, Windows, Insert Picture


5) right-click the document, select Make Text in Image Searchable, select the language
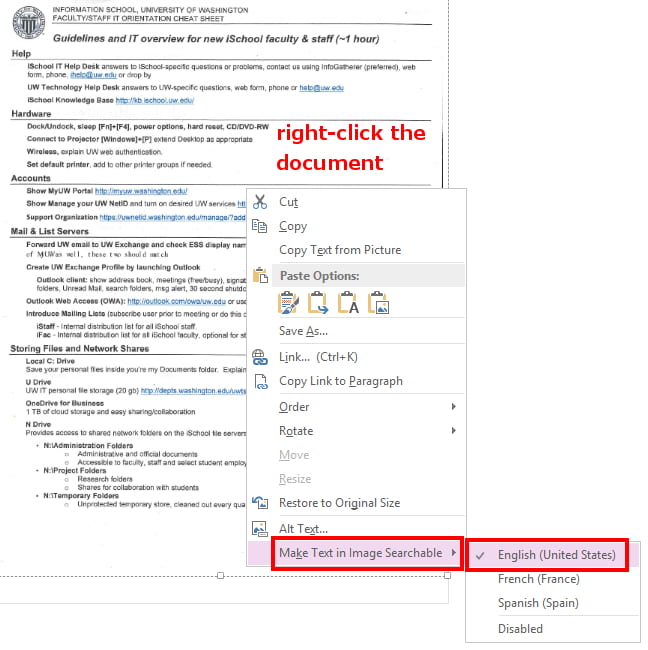
OneNote, Windows, Make Image Text Searchable


6) right-click the document, click Copy Text from Picture
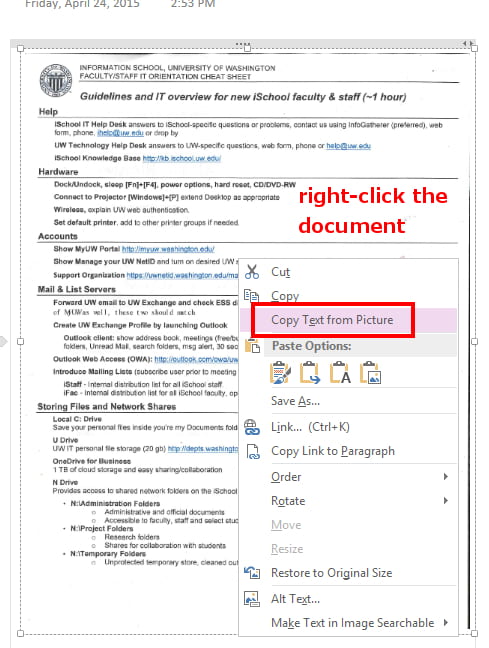
OneNote, Windows, Copy Image Text


7) start Word, paste the text into a document, whatever text was able-to-be-copied from the image will be available in the document
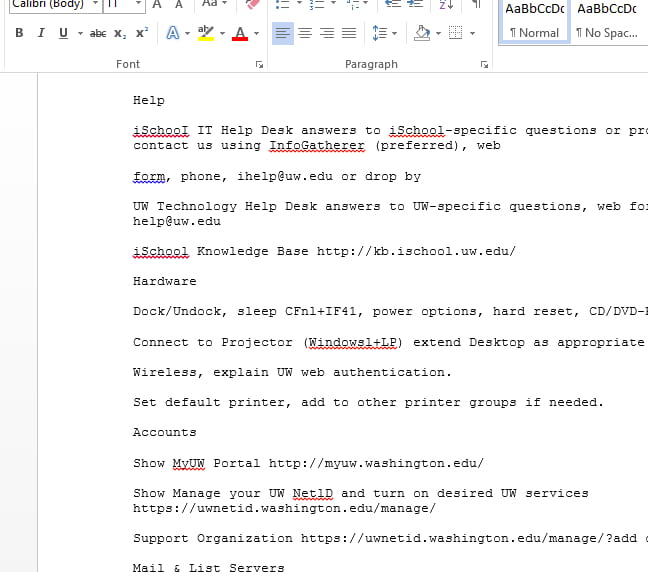
Paste Image-Text Into Word Document


Note: This method strips all formatting leaving you with only editable text.