Avaya VoIP Phone Software (softphone)

Avaya VoIP Phone Software (softphone)

The Avaya VoIP phone app (currently called “Avaya IX Workplace”, formerly called “Avaya Equinox” and “Avaya one-X Communicator”) is the recommended and supported softphone app for your Avaya VoIP telephone.

Here are the UW-IT instructions for installing the Avaya app:

https://itconnect.uw.edu/wares/uware/avaya-ix-workplace/

Be sure to install the app while you are on campus and connected to a UW wired or wireless network.

Here are some instructional videos provided by UW-IT:

https://itconnect.uw.edu/connect/phones/service/softphone/

If you are using a Mac, follow these additional steps once you have finished following the above instructions.

“Shared Device” Adobe Creative Cloud application login

The Adobe Creative Cloud suite of applications is installed on all computers in Mary Gates Hall rooms 430 and 440.

To use the Adobe Creative Cloud suite of applications you must supply login credentials. Users need to create what Adobe calls an “Adobe ID” out of any email address. Creating an “Adobe ID” is zero cost. Do not use your @uw.edu address to create an “Adobe ID.”

An “Adobe ID” can be created at the application login screen or at any time at the website: account.adobe.com

More information about creating an “Adobe ID” can be found on this website: https://helpx.adobe.com/manage-account/using/create-update-adobe-id.html

Focused Inbox

Microsoft introduced “Focused Inbox” for Outlook. The idea of “Focused Inbox”, is that Outlook will “learn” to automatically sort emails into two “tabs” in your inbox: “Focused” and “Other.” “Important” emails will be sorted into the “Focused” tab of your Inbox. Less important emails will be sorted into the “Other” tab of your Inbox.

Full documentation about Focused Inbox can be found at the link below:

Microsoft Focused Inbox documentation

A previous version of this feature, named “Clutter”, should be turned off. Steps to turn off “Clutter” can be found at the link below:

Microsoft documentation for turning off “Clutter”

OneDrive Files On-Demand

The newest version of OneDrive offers “Files On-Demand.”

With OneDrive Files On-Demand, you can:

– Save space on your device by storing files online only

– Set files and folders to be always available locally on your device

– See important information about files, such as whether they are shared

If you are running the latest version of Windows or macOS and the latest version of the OneDrive sync client application, OneDrive Files On-Demand is available to you.

Information about configuring OneDrive Files On-Demand is available on this web page:

Manage OneDrive sync options

Cyberduck

Cyberduck is the iSchool IT recommended application for Secure File Transfer Protocol (SFTP). It works on both Windows and macOS and can be downloaded from this website:

https://cyberduck.io

Typical reasons to use an SFTP application include connecting to UW Shared Webhosting servers to update website content or connecting to the UW U: Drive.

Once you install Cyberduck, bookmarks can be set up by using the following settings:

Homer/Ovid web hosting server (for employees (Faculty and Staff) and Shared NetIDs)
Hostname/Server: homer.u.washington.edu
Port: 22
Protocol: SFTP/SSH
Username: UW NetID
Password: UW NetID Password
Directory: Leave blank; if required, try public_html

Dante/Vergil web hosting server (for students and RSOs)
Hostname/Server: dante.u.washington.edu
Port: 22
Protocol: SFTP/SSH
Username: UW NetID
Password: UW NetID Password
Directory: Leave blank; if required, try public_html

UW U: Drive
Hostname/Server: sftp.udrive.uw.edu
Port: 22
Protocol: SFTP/SSH
Username: UW NetID
Password: UW NetID Password
Directory: udrive

Using Microsoft 365 for Shared UW NetIDs

Unless there is a specific reason not to, we recommend that all Shared NetIDs use UW Microsoft 365 (Office 365) for email. Some of the reasons are HIPAA and FERPA compatibility and the ability for us (or even you) to manage who has access to the email for this account. Here is how to make that happen.

  • Contact the iSchool IT Help Desk and tell us what your Shared NetID is and that you want to change the email forwarding to UW Microsoft 365 (Office 365).
  • We will then endorse this NetID for an UW Microsoft 365 (Office 365) license.
  • We will then ask you to make us an Admin for this NetID so that we can change the UW Email Forwarding.
  • Once the email forwarding has been changed, we will grant you access to the Exchange Online Mailbox for the NetID and walk you through the process of adding this account to Outlook or accessing it via OWA.
Self Service

Self Service

iSchool owned Apple computers have access to an application named Self Service. Self Service allows you to install things like applications and printers. To access Self Service:

1) If you are off campus, connect to the Husky OnNet VPN.

2) Start the Self Service application, found in the Applications folder.


3) Sign into Self Service using your UW NetID credentials.

self_service_sign_in_info


4) Self Service will present you with multiple options.

self_service

How to Create a Rule for Outlook or OWA

Sorting email into folders automatically can be a huge time saver and can keep you focused on the messages that demand your immediate attention. You can create rules to let Outlook or OWA (Outlook Web App) sort them into the folder of your choice. Rules can sort messages based on the sender, the subject, the recipient or a combination of various characteristics. When you are creating a rule for Outlook, make sure that:

RULES

  • If you have a UW Spam Gauge rule applied, always move the Spam rule to the top of your list of rules so that it is processed first;
  • All your rules are server-side unless you are creating rules for client only actions, such as coloring your emails or otherwise personalizing your email. You can make your rules on OWA to ensure it’s server-side.

Here is an article from Microsoft about how to make rules in Outlook:

https://support.office.com/en-us/article/manage-email-messages-by-using-rules-c24f5dea-9465-4df4-ad17-a50704d66c59

And one about how to make rules in OWA:

https://support.office.com/en-us/article/inbox-rules-in-outlook-edea3d17-00c9-434b-b9b7-26ee8d9f5622

UNREAD MAIL

Once you have rules in place that sort your email you need the ability to find them. This is best done using the Unread Mail Search Folder:

https://support.office.com/en-us/article/View-only-unread-messages-F2C8450C-9CD0-4037-A5D3-26F6946727CA

Connecting to SQL Server from an iSchool-provided computer

Connecting to SQL Server from an iSchool-provided computer

These instructions will allow you to connect to a Microsoft SQL Server using Windows Authentication (your UW NetID and password) from iSchool-provided faculty, staff, and lab computers, using SQL Server Management Studio (SSMS).

If you need to connect to a SQL Server from a personal computer, follow the instructions on this page.

How to connect to a SQL Server, using your UW NetID credentials, from an iSchool-provided computer (faculty, staff, lab computers):

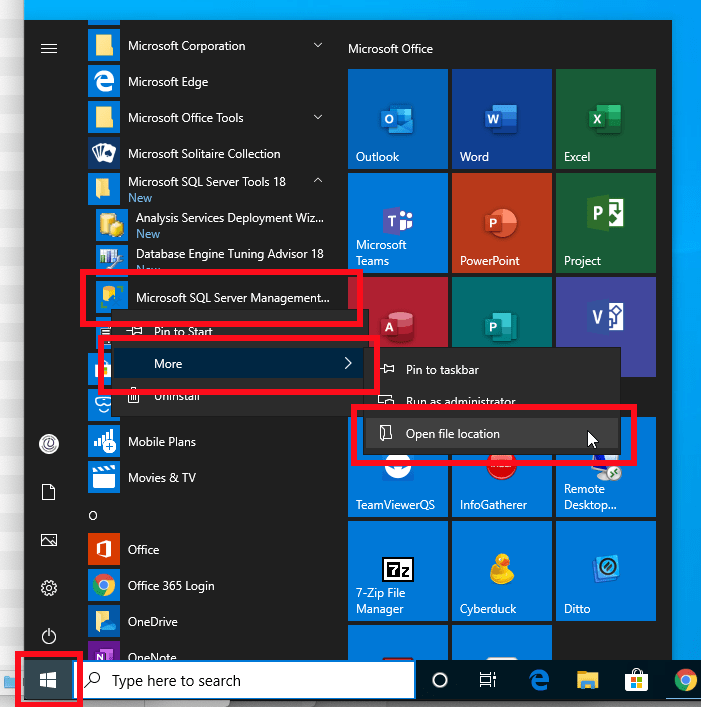
1) Click the lower-left Windows icon, under Microsoft SQL Server Tools, right-click Microsoft SQL Server Management, mouse over More, click Open file location

 ​

2) A new File Explorer window will open, hold the shift key (on the keyboard) then right-click shortcut to SQL Server Management Studio, click Run as different user

 ​

3) In the login window, use the following:

username: netid\your UW NetID
password: your UW NetID password

click OK

 ​

Note well: On lab computers, at this point, it may look like nothing is happening.  Wait.  It could be a few minutes before SSMS starts up.

When SSMS opens, for “User name”, you should see NETID\your UW NetID

 ​

Enter the server name to connect.

Connecting to a Microsoft SQL Server with UW NetID credentials from a personal computer

Connecting to a Microsoft SQL Server with UW NetID credentials from a personal computer

These instructions will allow you to connect to a Microsoft SQL Server using Windows Authentication (your UW NetID and password) from a personal computer, with SQL Server Management Studio (SSMS).

If you need to connect to a SQL Server from an iSchool-provided faculty, staff, or lab computer follow the instructions on this page instead.

You might need these instructions if you are taking, teaching, or TAing a course that requires you to connect to a SQL Server and you want to connect from your personal computer.

SSMS is available as a free download, from this website: SQL Server Management Studio (SSMS)

If you are connecting to a SQL Server that is not on the public network, please connect to the Husky OnNet VPN.

How to connect to a SQL Server, using your UW NetID credentials, from a personal computer:

1) Click the lower-left Windows icon, under Microsoft SQL Server Toolsright-click Microsoft SQL Server Management, mouse over More, click Open file location

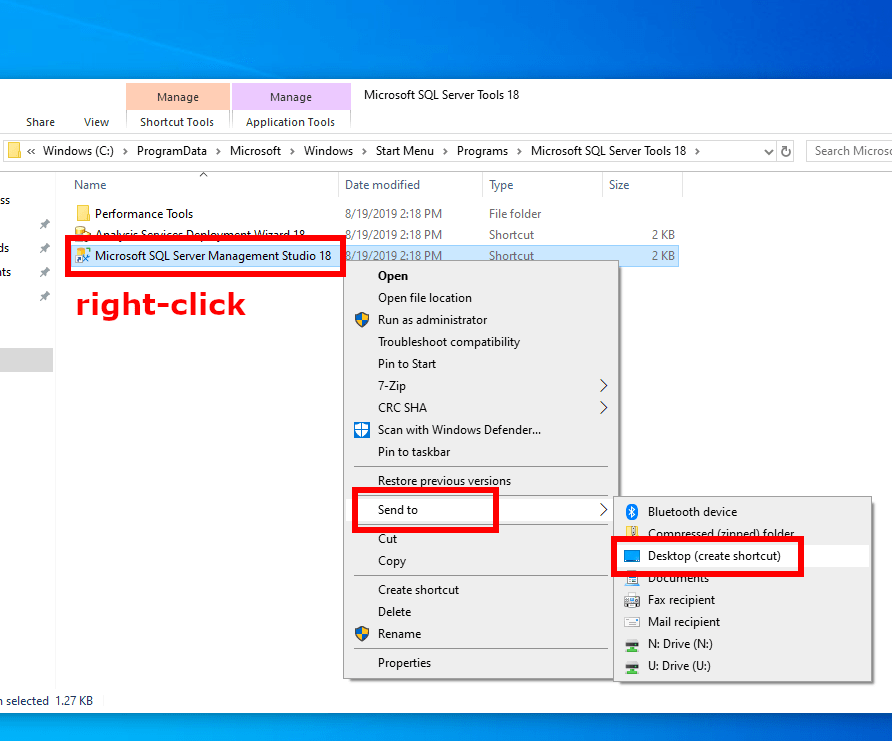
2) A new File Explorer window will open, right-click SQL Server Management Studio, mouse over Send to, click Desktop (create shortcut)

3) On your desktop, right-click the SSMS shortcut, click Properties

4) In the “Target” box, add the following to the beginning of what is already there:

runas /netonly /user:netid\your_UW_NetID 

Note well: There needs to be a space between your UW NetID and the “.

Click OK

5) The icon of the shortcut on the desktop will change.  This is expected.

Steps 1 – 5 are initial setup that only need to happen once.

6) Double-click the shortcut, a command window will open and ask for your UW NetID password, type it, then hit Enter or Return

SSMS should open with a “Connect to server” window.  The “User name:” field will display your computer’s name and username, but you can safely ignore that.  You will be connecting to the server, with the UW NetID credentials used when creating the shortcut above.

7) Enter the server address you want to connect to (your instructor needs to give you this information), click Connect