Many iSchool staff have supplemental/additional accounts in Outlook. At times it is useful to be able to send email using the Mail Merge feature from a supplemental account so that replies go to the supplemental account instead of to your personal account. This is also useful as the recipients might not recognize or be expecting an email from you but they do recognize the supplemental account.
Here is how to perform a Mail Merge using a supplemental Account running on Windows.
Be sure you have the proper access to the supplemental Account. If you do not or you do not know, ask iSchool IT.
The supplemental Account needs to be added to Outlook as an additional/separate account, not under the Advanced settings of your personal Account.
You need to set the supplemental Account as the Default Account in Outlook. Go to File > Account Settings > Account Settings. Click on the supplemental Account to select it and then click on “Set as Default”.
In Outlook, go to File > Options > Mail > Send messages, and make sure that the “Always use the default account when composing new messages” is checked.
Once you are finished using Mail Merge, be sure to uncheck “Always use the default…” and set your personal Account as the Default Account in Outlook.
This page includes detailed directions to add a supplemental, Shared NetID email account to Outlook. The following directions assume you have permissions to access a Shared NetID’s email account. If you need permissions to access a Shared NetID’s email account contact the iSchool IT Help Desk.
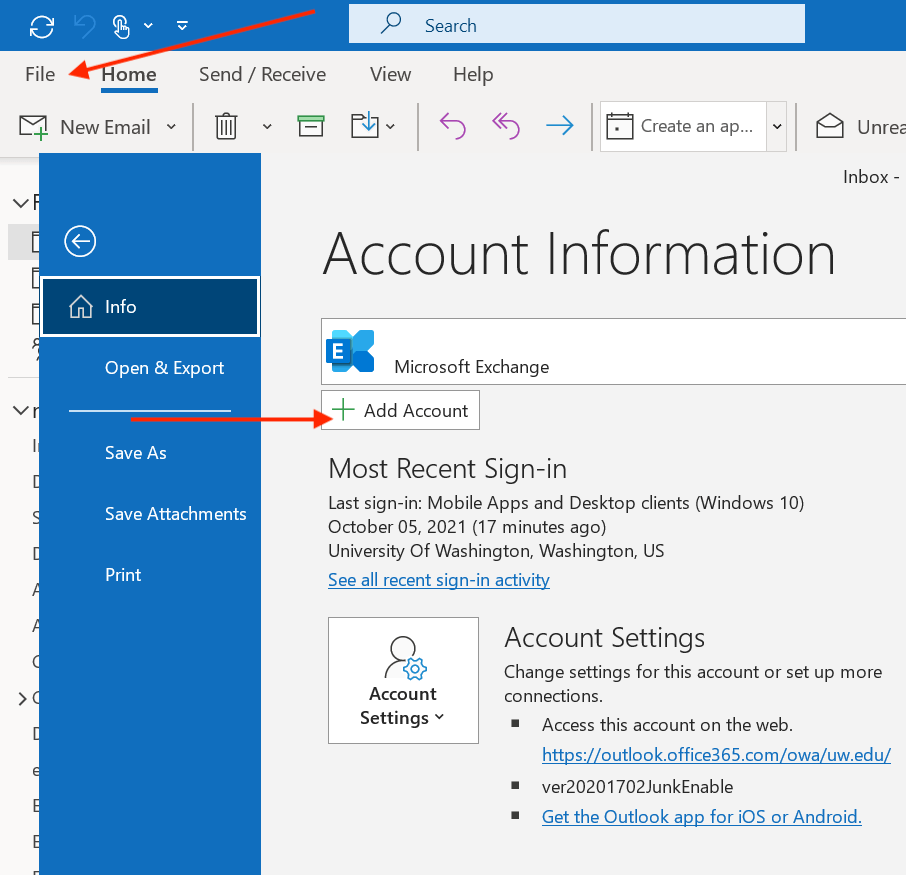
1. In the Outlook application, click File, click Add Account
2. Type in the Shared NetID email address (ihelp@uw.edu is used as an example), click Connect
3. Click Sign in with another account, enter your personal @uw.edu email address, click Next.
4. Use your UWNetID@uw.edu credentials at the “Sign in” prompt.
5. You should receive a “successful” message. Quit Outlook, wait a few seconds, start Outlook.
6. The Shared NetID email account will be added to Outlook. You should receive emails to the Shared NetID email account. You should be able to send emails from the Shared NetID email account.
Windows – New Outlook (These directions apply to what Microsoft calls “New Outlook.”)
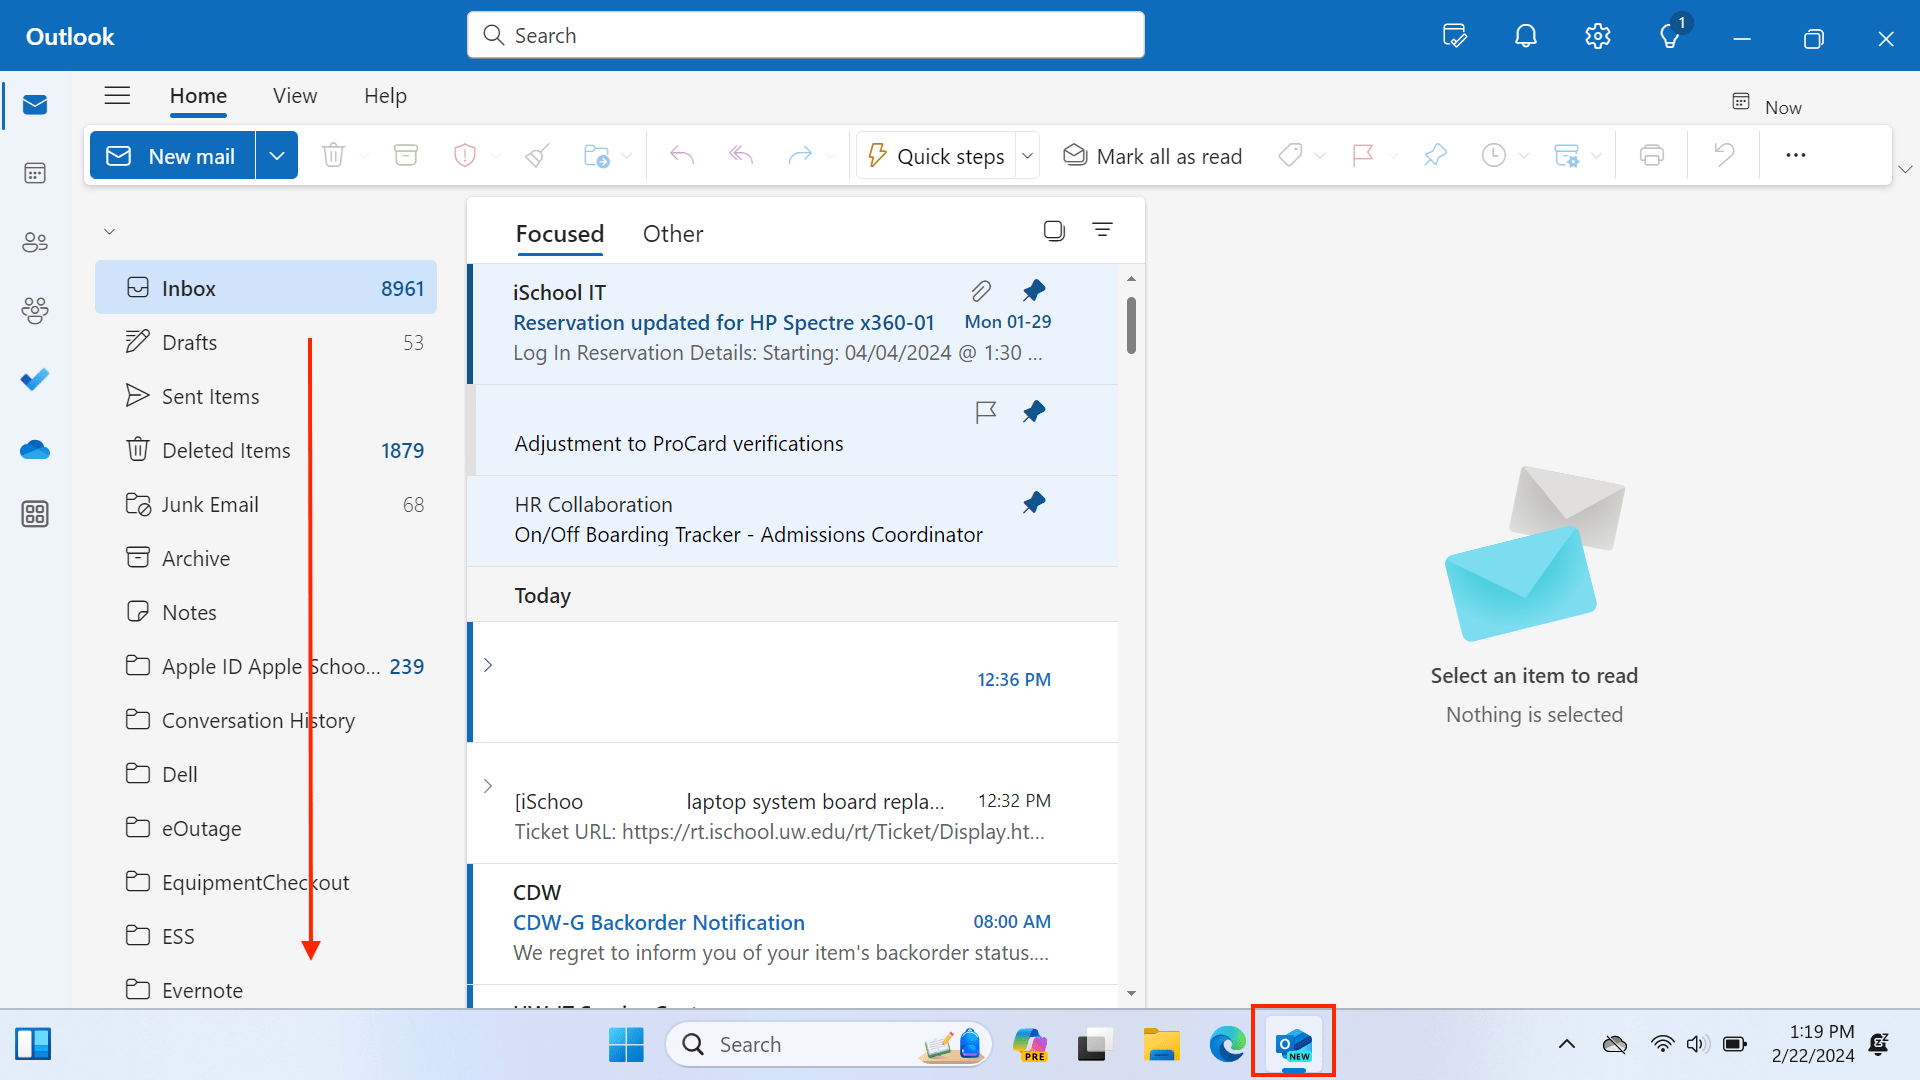
1. Scroll down the folder list to the “Shared with me” folder.
2. “Expand” the Shared with me folder to see and use shared email accounts you have access to. If you do not see any shared email accounts see step 3.
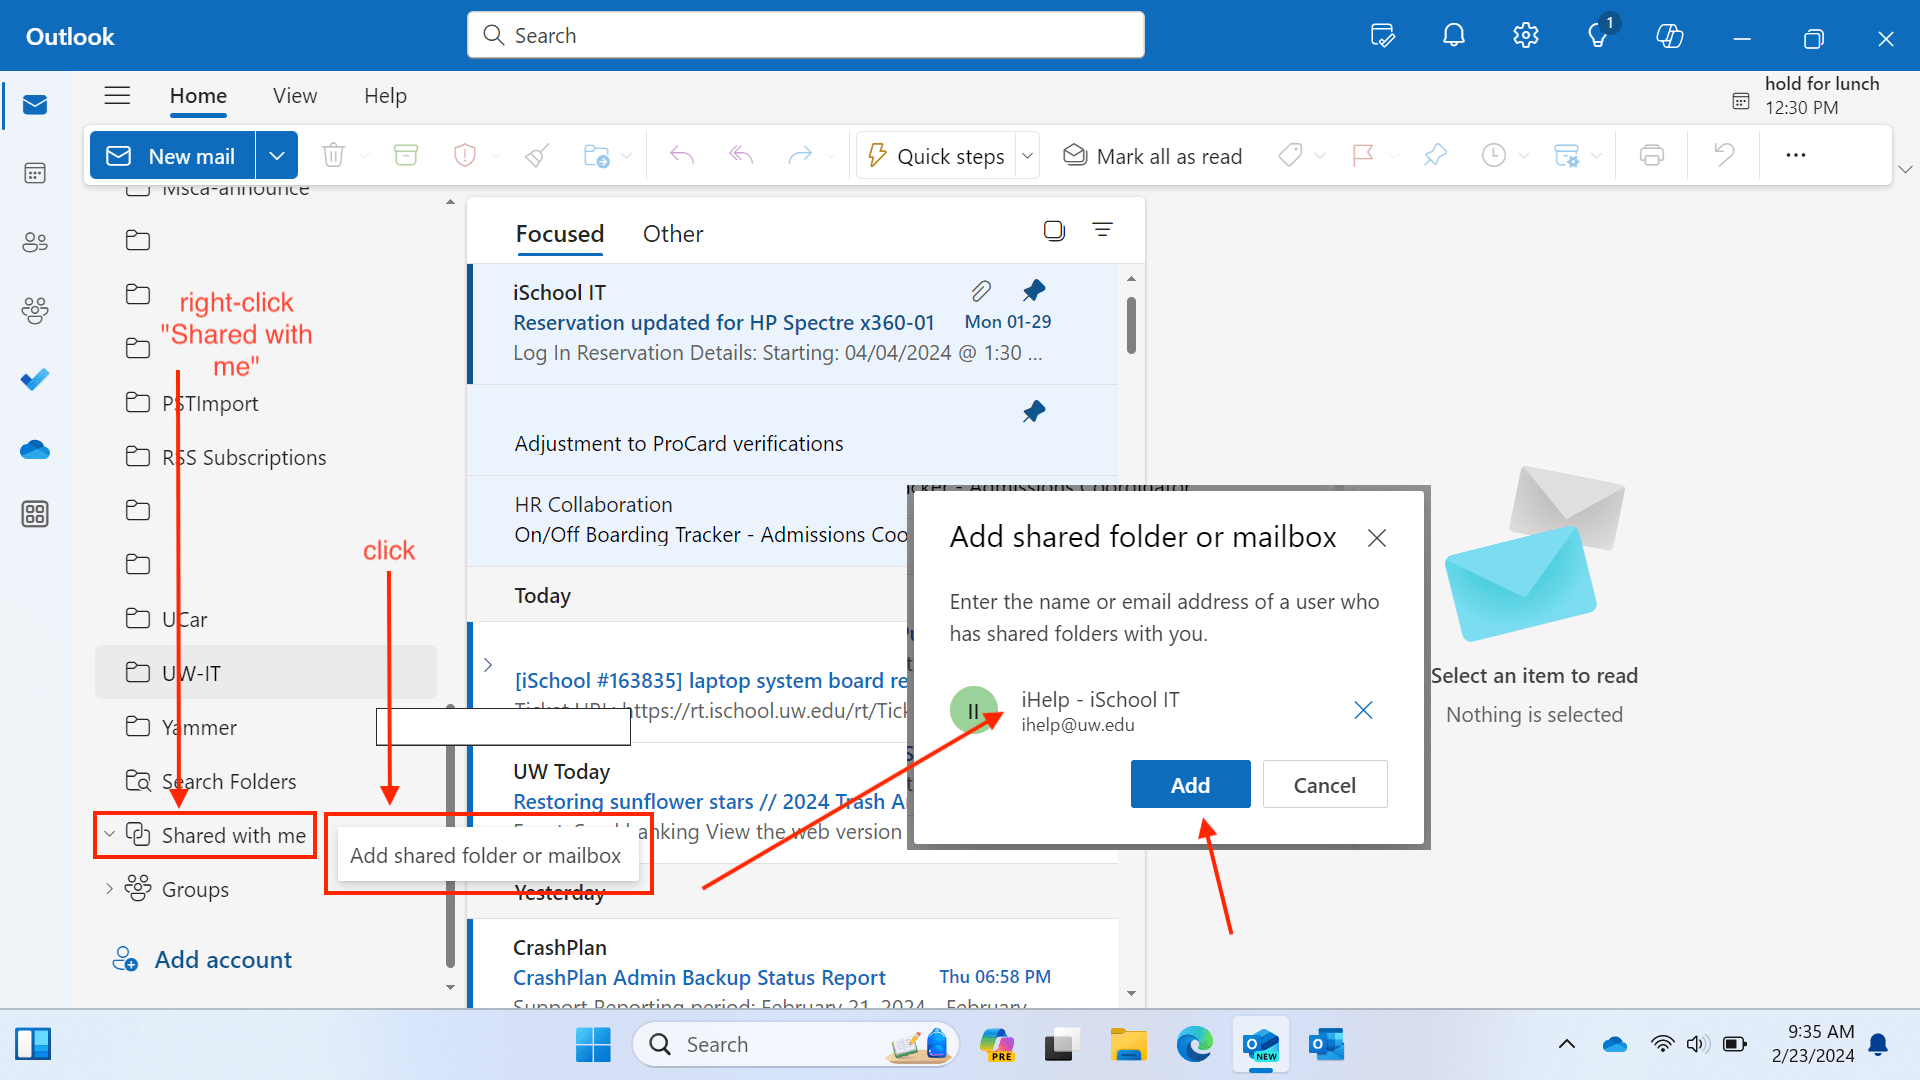
3. Right-click the Shared with me folder. Click Add shared folder or mailbox. Type in the Shared NetID email address (ihelp@uw.edu is used as an example). Click Add.
macOS – New Outlook (These directions apply to what Microsoft calls “New Outlook.”)
1. In the Outlook application, click File, mouse-over Open, click Shared Mailbox….
2. Type in the Shared NetID email address (ihelp@uw.edu is used as an example). Click Add.
3. After a few seconds the Shared NetID email account should appear in Outlook. You should receive emails to the Shared NetID email account. You should be able to send emails from the Shared NetID email account.
2. Right-click the word Folders, click Add shared folder or mailbox.
3. Search for the Shared NetID email address (ihelp@uw.edu is used as an example), click Open.
4. The Shared NetID mailbox will be available on the left as a new account as in the image below. You should receive emails to the Shared NetID email account. You should be able to send emails from the Shared NetID email account.
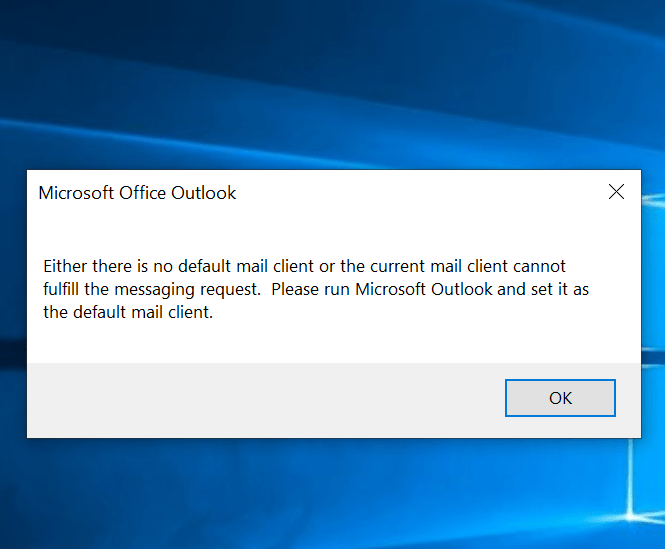
If you are using an iSchool-issued Windows laptop and continually seeing a pop-up message, with the wording “Either there is no default mail client or the current mail client cannot fulfill the messaging request. Please run Microsoft Outlook and set it as the default mail client.”, follow the steps below:
1) Quit Outlook.
2) If you are off campus, connect to the Husky OnNet VPN by following these steps:
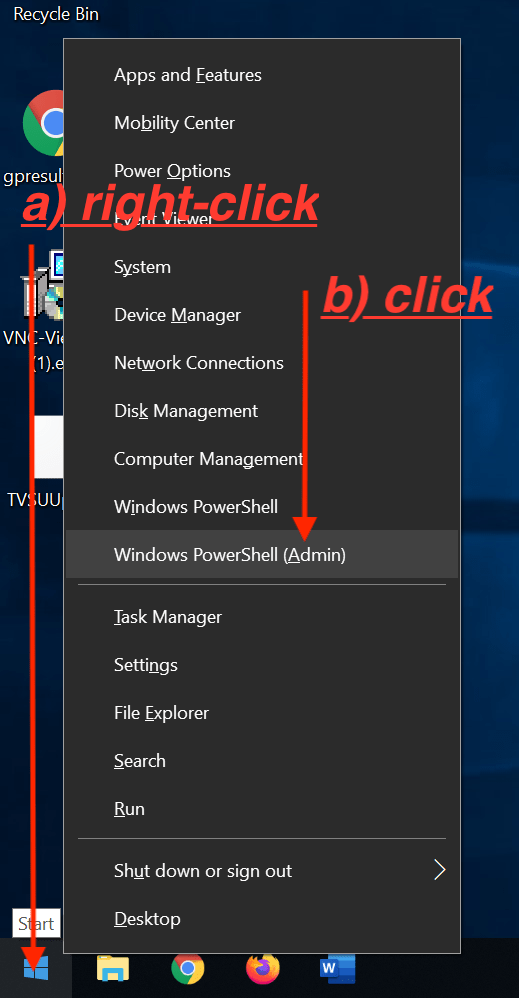
3) Right-click the lower-left Windows icon, click Windows PowerShell (Admin), click Yes.
4) In the “PowerShell” application window that opens, type:
gpupdate /force
press “Enter” on your keyboard
after a few seconds, you should see wording indicating “Computer Policy” and “User Policy” updated successfully.
If you see wording that the “Computer Policy” and “User Policy” updated successfully, the Outlook “…no default mail client…” message should stop appearing.
Microsoft introduced “Focused Inbox” for Outlook. The idea of “Focused Inbox”, is that Outlook will “learn” to automatically sort emails into two “tabs” in your inbox: “Focused” and “Other.” “Important” emails will be sorted into the “Focused” tab of your Inbox. Less important emails will be sorted into the “Other” tab of your Inbox.
Full documentation about Focused Inbox can be found at the link below:
Sometimes we delete things accidentally and sometimes we even empty the Deleted Items folder before we figure out what we did. Fortunately, if you realize what you have done within a few days, there is a recourse.
Before you proceed, note that by default everyone at the iSchool (and everyone else at the UW that uses the UW Microsoft 365/Office 365 service) can already see the default free/busy info of everyone else. This means people can already see when you are free, when you are busy, what your working hours are and when you are out of the office.
“Advanced” sharing options are possible, for example, if you want to give someone access to more details, if you want to give someone outside of the UW a view to your calendar, or if you want to give someone “delegate” (edit) rights to your calendar.
It is recommended that you configure “advanced” sharing options using the Outlook Web App. Detailed directions from Microsoft are available on this web page:
iSchool IT recommends following the steps in the “Enable” and “Maintain” sections of the web page linked above.
Even after configuring settings as recommended on the web page linked above, it is still possible for spam and phishing emails to make it to your inbox. When you do receive suspicious emails, follow the guidance in the “What you can do” section of this web page:
This article is designed specifically to assist people who are involved in a Records Request but is helpful for anyone who wants to save or transfer any amount of Outlook email (or any other Outlook folders).
If a Records Request asks for email, it must be saved as a PST (Personal Storage) file. We recommend that you create a unique Folder for the Records Request and then copy (not move) all the messages that were requested to this Folder. Then you can export just this Folder to a PST.
NOTE
Prior to starting this process, we recommend that you use the Search feature in Outlook to narrow/refine the results as much as possible. Here are instructions for searching in Outlook.
This process can only be done on Windows. If you are using Outlook on a Mac, please export your email to an OLM file following these instructions and then contact iSchool IT so we can convert the OLM file to a PST file.
If you are using Windows but are not using Outlook and are using Outlook on the web instead, you will need to install Outlook and then follow these steps.
To export (archive) a folder using Outlook on Windows do the following.
Open Outlook.
Click File -> Open & Export.
Choose Import/Export, select Export to a file and click Next.
Select Outlook Data File (.pst) and click Next.
Select the folder you created for this Records Request and check the Include subfolders box and click Next.
Decide where to save the exported file using the Browse button if that makes it easier to find or just accept the default location and click Finish.
We usually do not recommend adding a password to the data file. You can just leave the password fields blank and click OK.
If you saved the data file to the default location it is here:
\Documents\Outlook Files\backup.pst
To import a data file using Outlook on Windows do the following.
Save the Data File to your computer.
Open Outlook.
Click File -> Open & Export.
Click Import/Export, select Import from another program or file, and click Next.
Select Outlook Data File (.pst) and click Next.
Click the Browse button to select the data file and click Next.
Make sure the Include subfolders box is checked, select Import items into the same folder in and click Finish.
You should now see this data file connected to Outlook in the left-hand pane of Outlook.
NOTE – this process can take anywhere from 30 minutes to 2 hours to complete (depending on the size of your Mailbox), so please allow enough time.
Microsoft Outlook stores data (E-mail, Calendar items, Contacts, etc.) in a file. If you use Outlook at home and like many users are not connected to an Exchange server, the file is called a PST (Personal Storage) file and is stored on your computer. If you are faculty or staff at the iSchool or some other business and do connect to an Exchange server, the file is called an OST (Offline Storage) file and contains copies of all the data which is actually stored on the server.
Regardless of what type of file you have, the size of this file is limited if you want good performance and reliability. Although the absolute maximum size of OST files keeps growing (at the UW the limit is currently 100GB), for optimal performance we recommend you keep your OST file much smaller, less than 10GB is ideal
These instructions will explain some best practices so that your mail store (read: Mailbox size) never grows too much and shows you how to determine the size of your mail store.
General Best Practices
Regularly empty your Junk E-Mail and Deleted Items folders.
Don’t save attachments in Outlook. Instead, save the files to your cloud storage, your computer (or some other media), and then delete the message. At the iSchool your computer is backed up so all the files saved locally will be safe.
Do not send messages to yourself.
Do not send large (read: bigger than a couple of MB) attachments via email, instead put the file in the cloud and send a link to the location so the recipient can view or download it.
If you do forward a message with a large attachment, delete the item from your Sent Items. There is no need to keep the file in your Inbox and your Sent Items folder.
Outlook Microsoft 365
1) Check to see how big your mail store is.
– In the left pane of Outlook, right-click your account and select Data File Properties.
– Under the General tab click Folder Size.
2) Sort mail by size.
– In the left pane of Outlook expand Search Folders.
– Click on Large Mail to activate it. By default, your large mail items will be sorted by size with the largest on top. Since large items always contain attachments now you can easily save the files and delete the messages.
3) Using the Mailbox Cleanup tool.
– Click the File menu > Tools > Mailbox Cleanup
– We recommend all the options in the Mailbox Cleanup tool except AutoArchive. We do not ever recommend archiving your email and instead always recommend keeping all of it in your Exchange Mailbox.
– The Cleanup tool can remove redundant messages in any folder or any conversation. Cleaning up redundant items in conversations is a great way to free up space. Here is a video demo of the Cleanup tool, the “Clean Up Conversation” feature is mentioned at 5:12:
Outlook on the web
1) Check to see how big your mail store is.
– Click the gear icon (Settings) > View all Outlook settings > General > Storage
2) Clean up your Mailbox.
– While in Storage, empty your Deleted Items folder.
3) Apply Retention Policies.
– Right click every top level/parent folder and select Assign policy. We recommend choosing 6 Month or 1 Year.
iSchool faculty, staff, and PhD students have access to several, physical rooms, for meeting purposes. Some rooms have Exchange Mailboxes and Calendars. Said rooms can be scheduled/reserved directly via an Outlook Meeting Request, similar to scheduling a meeting with a person.
.
A list of rooms and information about the rooms can be found on this webpage:
01) Click the arrow button next to New Email, click Meeting. (“1” in the screenshot below)
02) Click Meeting. (“2” in the screenshot below)
03) Click Required. (“3” in the screenshot below)
04) Search for the room you want to reserve/schedule. The most accurate way to search for a room is by using either the email address or the “display name” from the list above. (“4” in the screenshot below)
05) Add the room you wish to schedule/reserve to “Required“; double-click the room from the list or click “Required”. Click OK. (“5” in the screenshot below)
06) Click Scheduling Assistant to see when the room is available, add other attendees’ NetIDs as necessary, and adjust meeting times.
07) Click Appointment, add meeting information as necessary, click Send.
All attendees will receive the meeting request including the room itself. The request for the room will be accepted or rejected based on room availability.
macOS, Outlook
01) Click New Items, click Meeting.
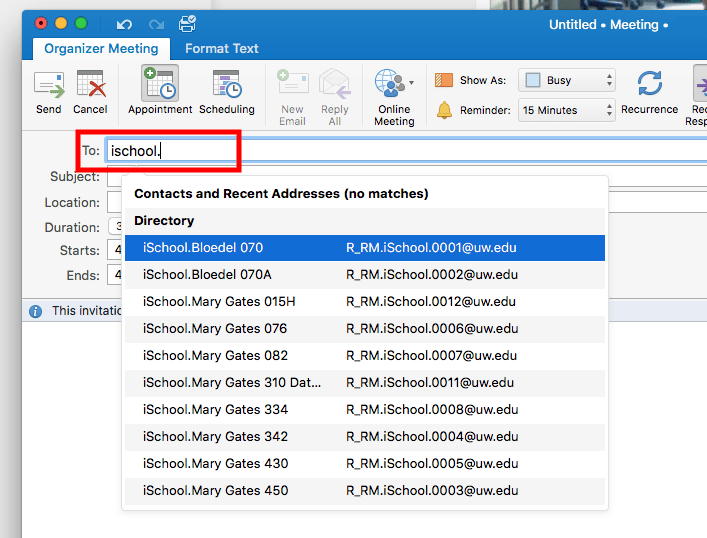
02) In To: field, the most accurate way to search for a room is using either the email address or the “display name” from the list above. Select the desired room.
03) Click Scheduling to see when the room is available and adjust meeting times.
04) Click Appointment, add other attendees’ NetIDs in the To: field as necessary, click Send.
All attendees will receive the meeting request including the room itself. The request for the room will be accepted or rejected based on room availability.
Outlook Web App
1) Sign into the Outlook Web App, use your @uw.edu email address and UW NetID credentials when prompted.
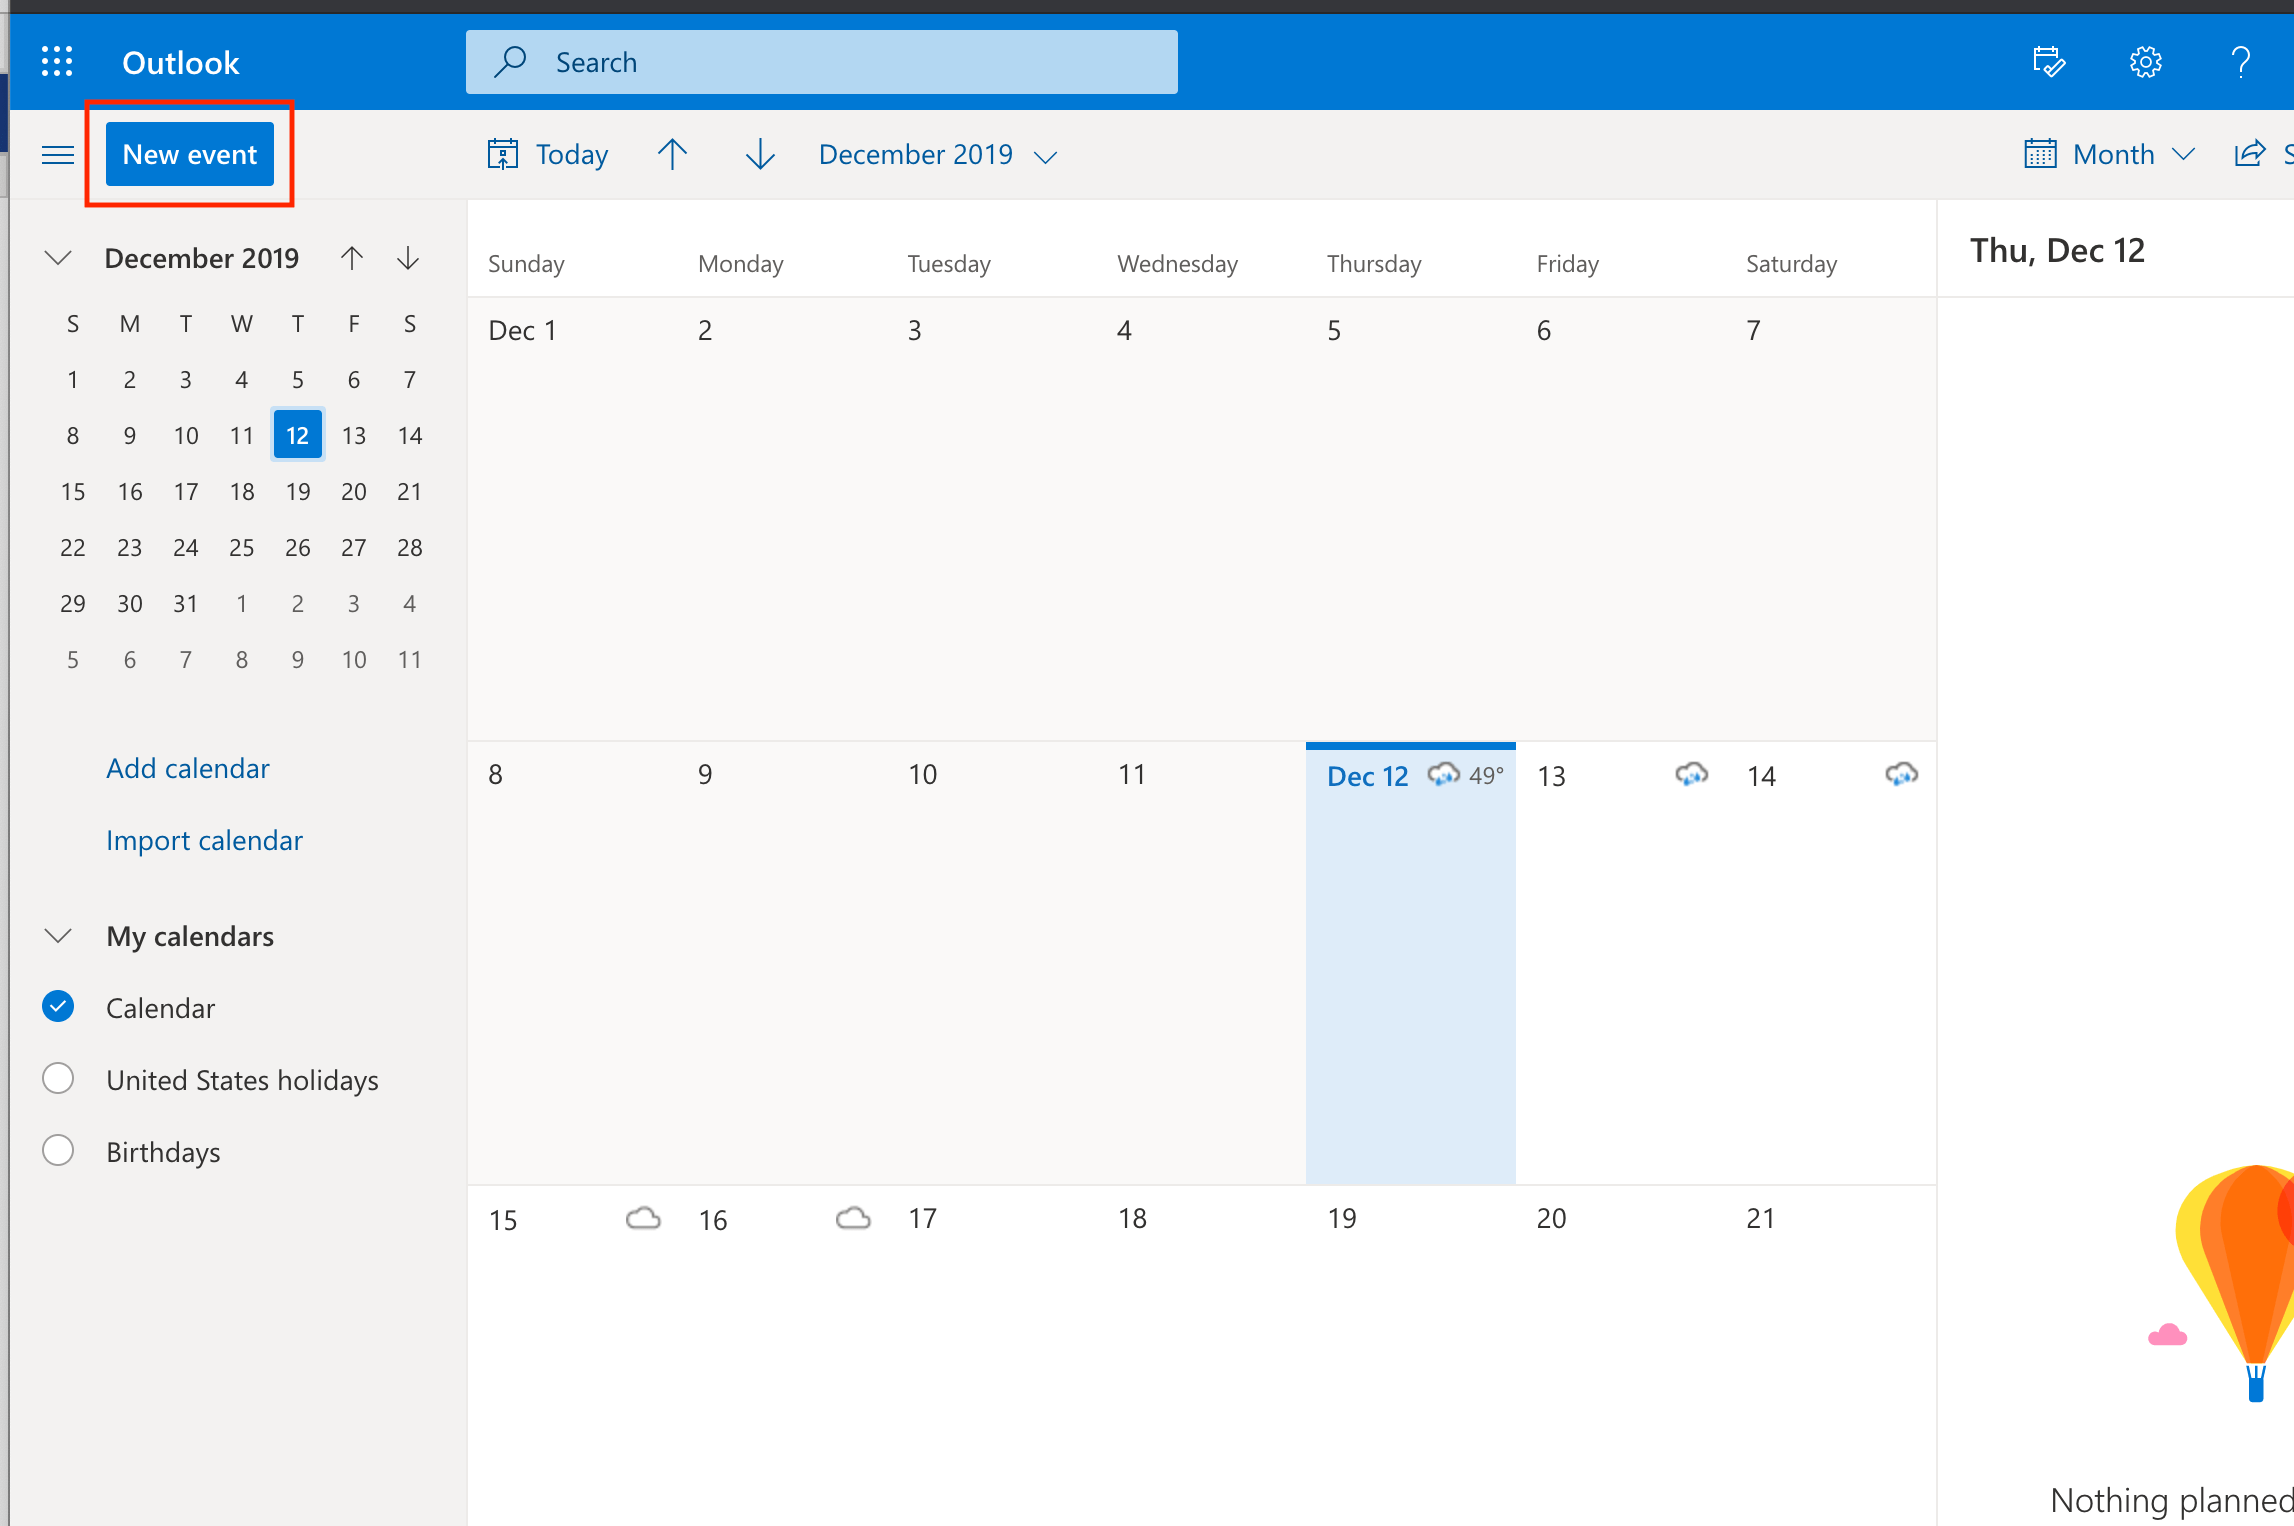
2) Click the Calendar icon in the bottom-left corner.
3) Click New event.
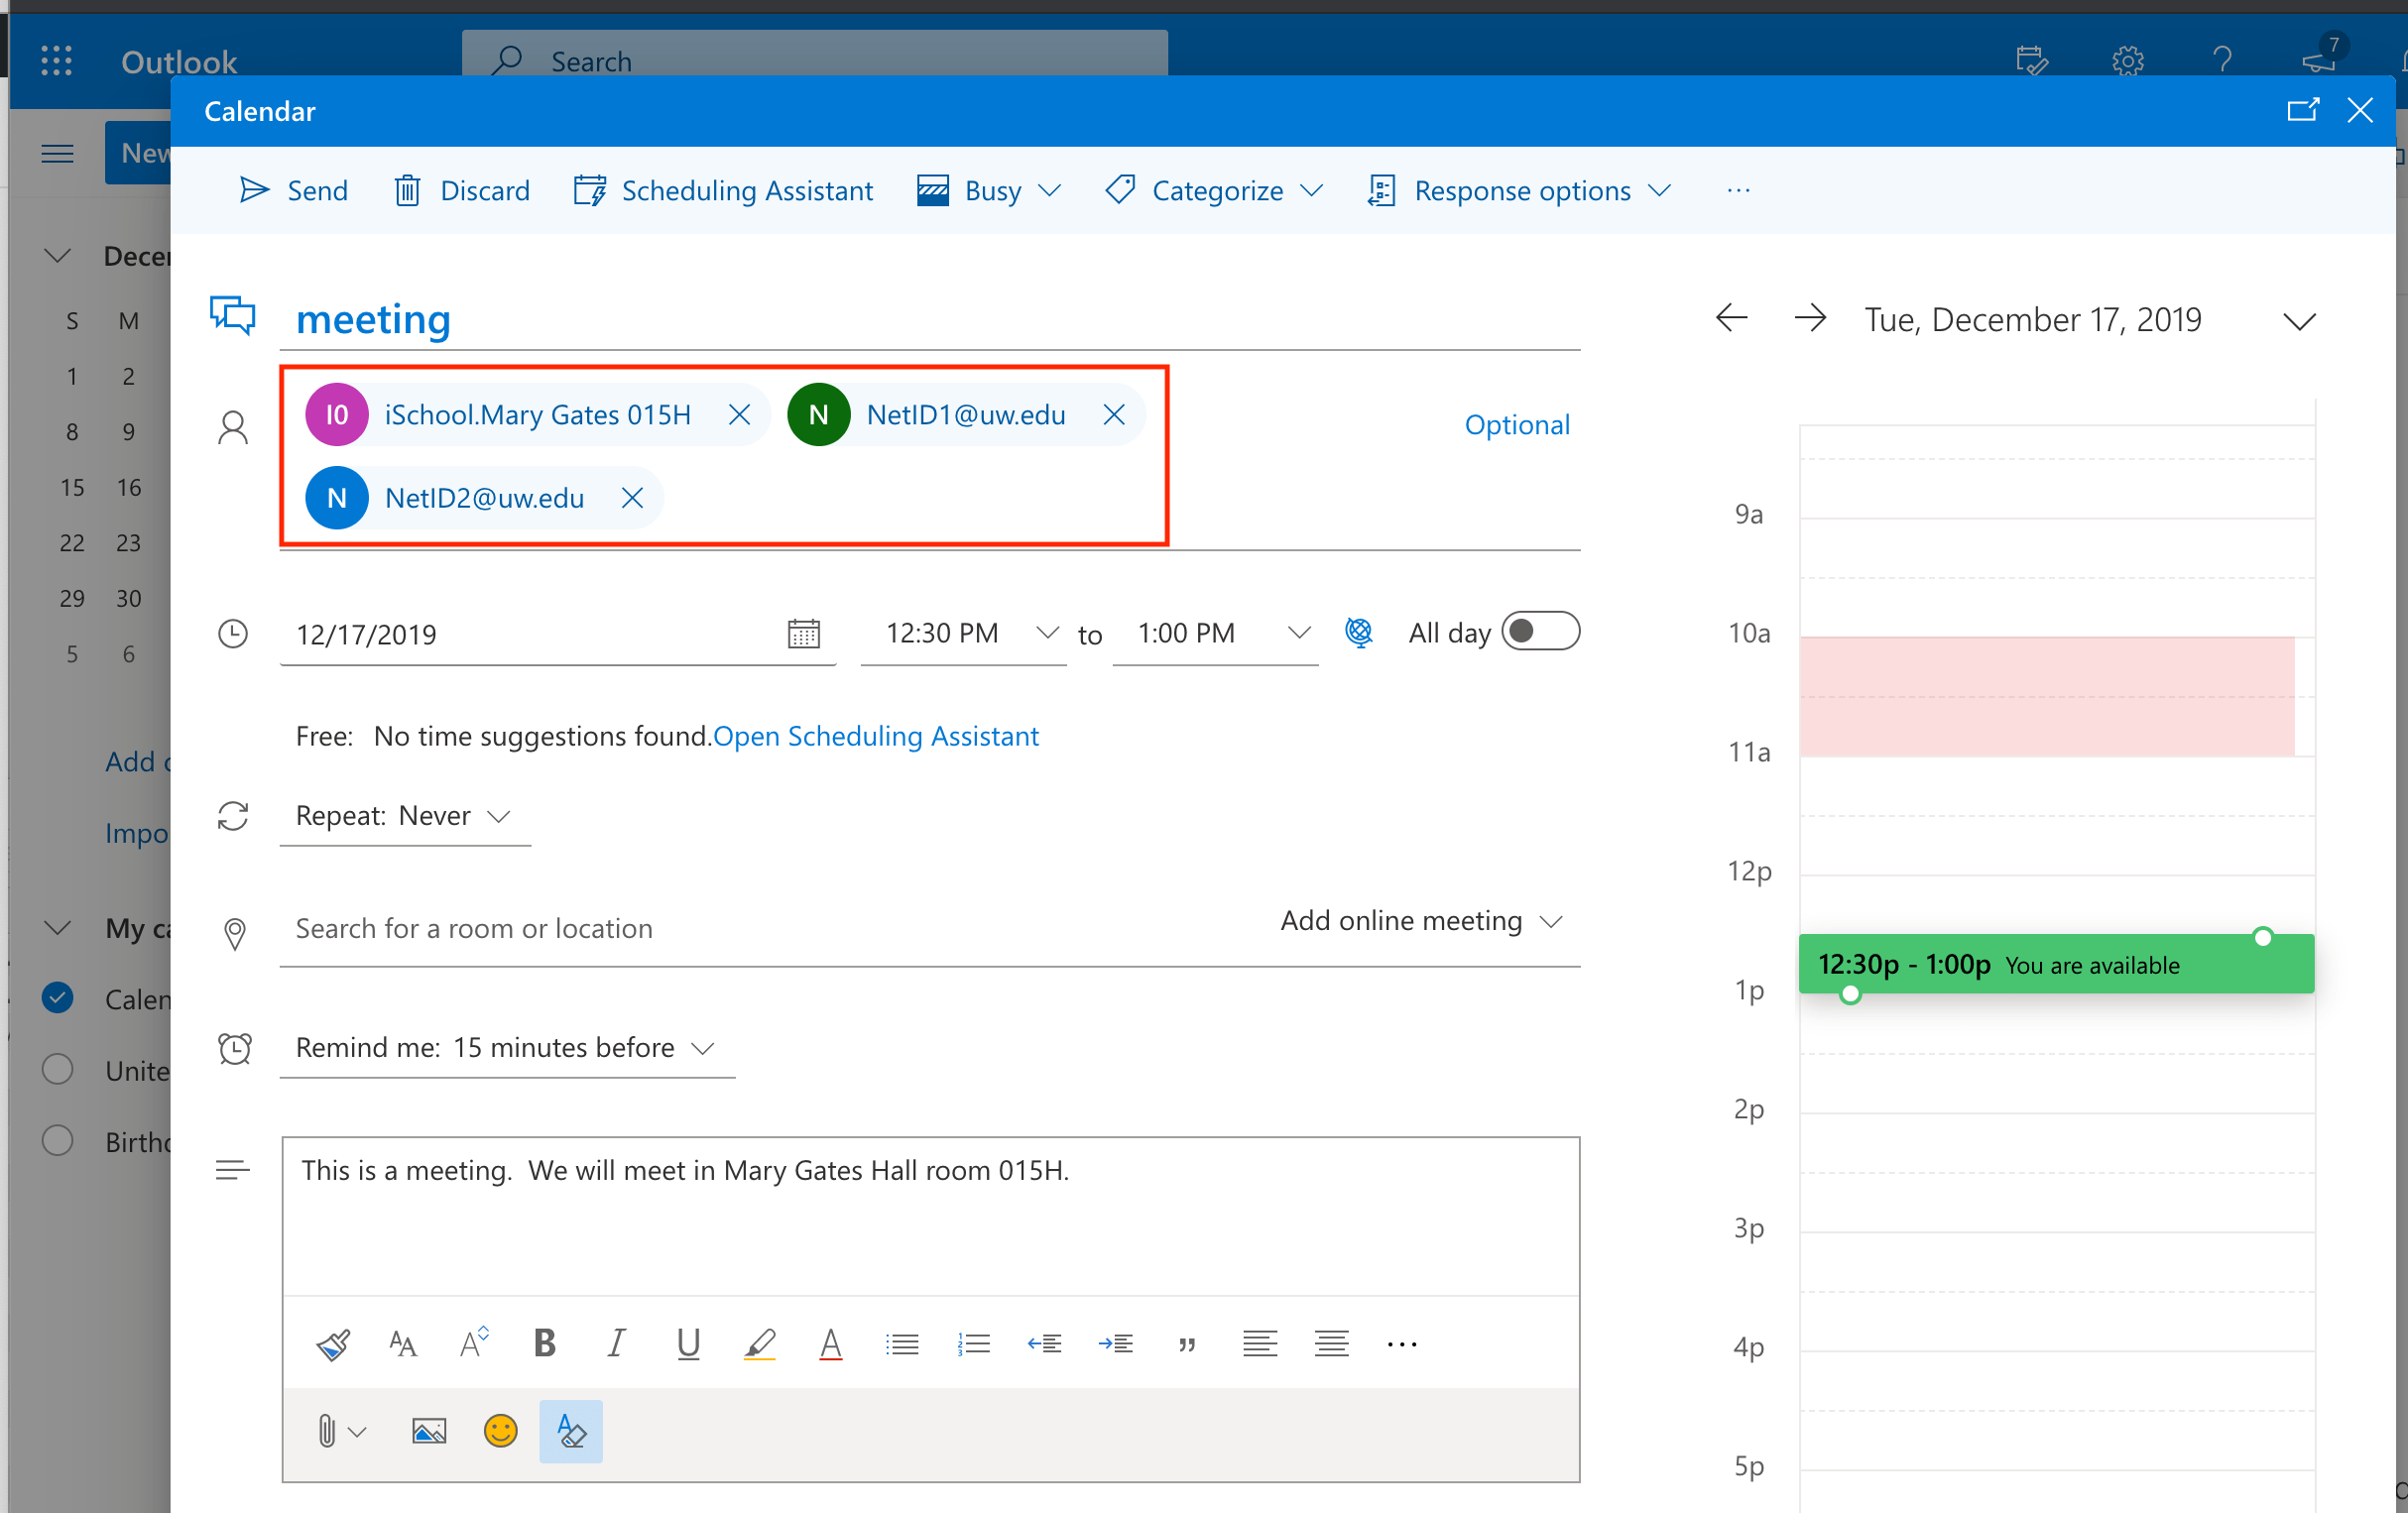
4) In the Invite attendees field, add desired room using email address from the list above. Add other @uw.edu email addresses as necessary. Use the Scheduling Assistant to confirm all attendees, including the room itself, are available. Click Send once all other meeting details are finalized.
All attendees will receive the meeting request including the room itself. The request for the room will be accepted or rejected based on room availability.
If you have any questions after reading this article or if you need any help, please don't hesitate to contact the iSchool IT Help Desk.
https://ischool.uw.edu/help
(206) 616-3086


 Calendar with others at the UW and with External Users")