Microsoft Office Outlook default mail client error message

Microsoft Office Outlook default mail client error message

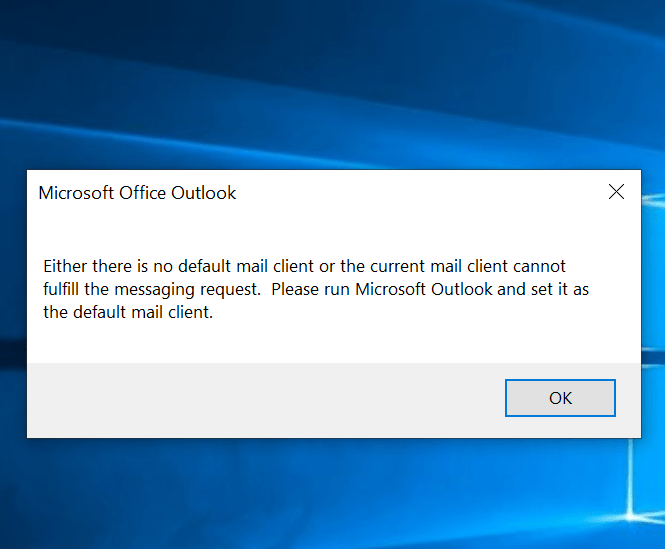
If you are using an iSchool-issued Windows laptop and continually seeing a pop-up message, with the wording “Either there is no default mail client or the current mail client cannot fulfill the messaging request. Please run Microsoft Outlook and set it as the default mail client.”, follow the steps below:


1) Quit Outlook.


2) If you are off campus, connect to the Husky OnNet VPN by following these steps:

https://itconnect.uw.edu/connect/uw-networks/about-husky-onnet/use-husky-onnet/#windows


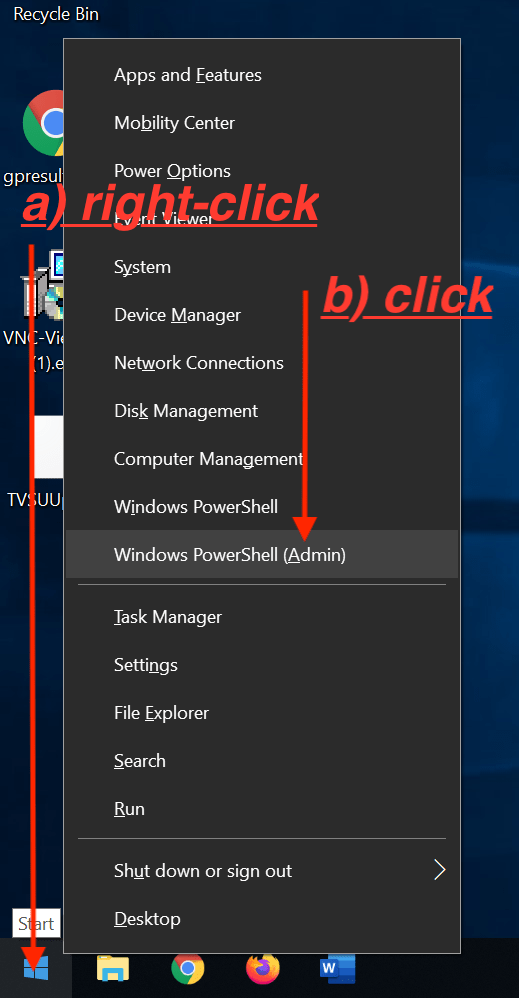
3) Right-click the lower-left Windows icon, click Windows PowerShell (Admin), click Yes.


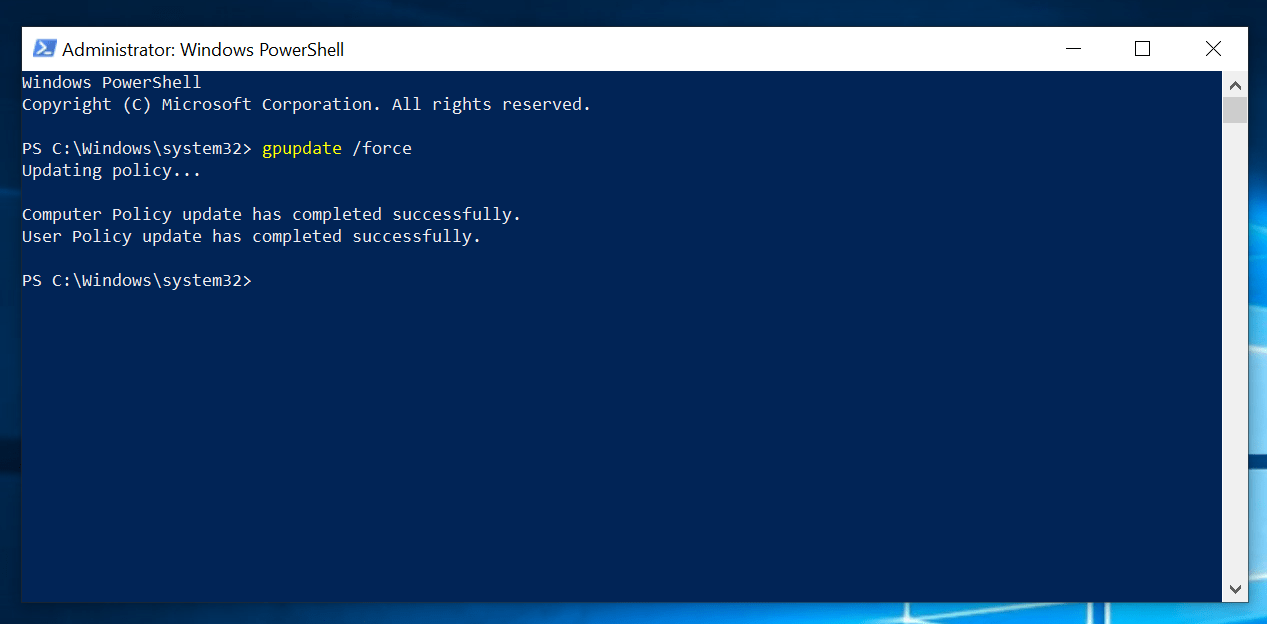
4) In the “PowerShell” application window that opens, type:

gpupdate /force

press “Enter” on your keyboard

after a few seconds, you should see wording indicating “Computer Policy” and “User Policy” updated successfully.


If you see wording that the “Computer Policy” and “User Policy” updated successfully, the Outlook “…no default mail client…” message should stop appearing.

Add or edit multiple SharePoint In/Out Board entries

Add or edit multiple SharePoint In/Out Board entries

This page includes directions for adding or editing multiple SharePoint In/Out Board entries.

01) go to the SharePoint In/Out Board:

https://uwnetid.sharepoint.com/sites/ischoolnew/sites/HumanResources/Lists/InOutBoard/

02) click edit

A screenshot of a cell phone

Description automatically generated

03) click the box next to a row to select the entire row (you can click-and-drag to select/highlight multiple rows), copy the row(s) using keyboard commands (Windows – Ctrl+C) (macOS – command+C)

A screenshot of a cell phone

Description automatically generated

04) scroll down to the bottom of the page/list to find an empty row entry, click the far-left-box next to the empty row, paste the row(s) using keyboard commands (Windows – Ctrl+V) (macOS – command+V)

A screenshot of a cell phone

Description automatically generated

05) click the calendar icon to edit the date as necessary, click the drop-down button next to other entries to edit as necessary

A screenshot of a cell phone

Description automatically generated

A screenshot of a cell phone

Description automatically generated

06) when edits are complete, scroll to the top of the page/list, click Stop to save your edits

A screenshot of a cell phone

Description automatically generated

Avaya VoIP Phone Software (softphone)

Avaya VoIP Phone Software (softphone)

The Avaya VoIP phone app (currently called “Avaya IX Workplace”, formerly called “Avaya Equinox” and “Avaya one-X Communicator”) is the recommended and supported softphone app for your Avaya VoIP telephone.

Here are the UW-IT instructions for installing the Avaya app:

https://itconnect.uw.edu/wares/uware/avaya-ix-workplace/

Be sure to install the app while you are on campus and connected to a UW wired or wireless network.

Here are some instructional videos provided by UW-IT:

https://itconnect.uw.edu/connect/phones/service/softphone/

If you are using a Mac, follow these additional steps once you have finished following the above instructions.

Security while Traveling

Traveling abroad, especially to countries where free access to the Internet is restricted, can be tricky and safeguards should be taken. The UW Office of the Chief Information Security Officer (CISO) has some good recommendations here:

https://ciso.uw.edu/education/risk-advisories/travel-tips/

The iSchool IT Help Desk also has a fleet of checkout equipment you are welcome to use if you don’t want to take your iSchool device abroad. WE have mobile devices/phones as well as laptop computers:

https://ischool.uw.edu/technology/equipment-checkout

“Shared Device” Adobe Creative Cloud application login

The Adobe Creative Cloud suite of applications is installed on all computers in Mary Gates Hall rooms 430 and 440.

To use the Adobe Creative Cloud suite of applications you must supply login credentials. Users need to create what Adobe calls an “Adobe ID” out of any email address. Creating an “Adobe ID” is zero cost. Do not use your @uw.edu address to create an “Adobe ID.”

An “Adobe ID” can be created at the application login screen or at any time at the website: account.adobe.com

More information about creating an “Adobe ID” can be found on this website: https://helpx.adobe.com/manage-account/using/create-update-adobe-id.html

Lenovo laptop reset button

Lenovo laptop reset button

Lenovo laptops with non-removable batteries have a “power/battery reset” button that is useful to use when troubleshooting problems with:

– laptop not powering on
– external devices (including monitors) not being recognized by the laptop
– power adapters (battery chargers) not being recognized by the laptop
– messages about the power adapter

The actions below do not affect any software or settings.

—-

Follow these steps to use the “power/battery reset” button:

– Disconnect computer from all cables, including monitors and power adapters.
– Shutdown computer.
– Find a paperclip, toothpick, or other small pointy object.
– Turn computer upside down.
– Stick the paperclip (or other object) in the small hole on the bottom of computer. You should feel a click.

– Click the button a few times.
– Click the button and hold it down for 60 seconds.
– Turn the computer back on.
– Plug external devices and/or cables back into the computer.

Focused Inbox

Microsoft introduced “Focused Inbox” for Outlook. The idea of “Focused Inbox”, is that Outlook will “learn” to automatically sort emails into two “tabs” in your inbox: “Focused” and “Other.” “Important” emails will be sorted into the “Focused” tab of your Inbox. Less important emails will be sorted into the “Other” tab of your Inbox.

Full documentation about Focused Inbox can be found at the link below:

Microsoft Focused Inbox documentation

A previous version of this feature, named “Clutter”, should be turned off. Steps to turn off “Clutter” can be found at the link below:

Microsoft documentation for turning off “Clutter”


OneDrive Files On-Demand

The newest version of OneDrive offers “Files On-Demand.”

With OneDrive Files On-Demand, you can:

– Save space on your device by storing files online only

– Set files and folders to be always available locally on your device

– See important information about files, such as whether they are shared

If you are running the latest version of Windows or macOS and the latest version of the OneDrive sync client application, OneDrive Files On-Demand is available to you.

Information about configuring OneDrive Files On-Demand is available on this web page:

Manage OneDrive sync options