Accessing SharePoint Documents Through OneDrive

Accessing SharePoint Documents Through OneDrive

This document is intended for iSchool endpoints, such as Windows or macOS laptops that are owned and managed by the iSchool. We do not recommend storing work-related files on personal devices. Should you need to work on a work-related file on a personal device, we always suggest you do so on the cloud, via a browser.

Should be have an iSchool managed device, this document serves as a guide for using SharePoint through OneDrive by creating shortcuts in OneDrive to your SharePoint folders. It outlines the processes for setting up Shortcuts, discusses best practices, and addresses common issues when using OneDrive to access SharePoint.

SharePoint on the Web v.s. SharePoint via OneDrive

Using a web browser to create, edit, and manage SharePoint files in the cloud works most of the time (and is recommended whenever it works) but sometimes you need to use the more advanced features of apps like Excel (Pivot Tables, etc.) or Word (Tables, etc.) that are not supported in the online versions. Or you might have a workflow that requires your files to be local instead of in the cloud.

OneDrive – which is available for both Windows and macOS – lets you create shortcuts to your SharePoint Document Libraries, enabling you to access and work with your SharePoint files easily. Follow these instructions to get set up:

https://support.microsoft.com/en-us/office/add-shortcuts-to-shared-folders-in-onedrive-for-work-or-school-d66b1347-99b7-4470-9360-ffc048d35a33

Once a shortcut has been created, the  “Files On-Demand” feature in OneDrive also lets you keep all your files in the cloud where they are accessible securely from anywhere in the world, even from your mobile device. Click this to learn more:

https://support.microsoft.com/en-gb/office/sync-files-with-files-on-demand-88d0ebed-bbd7-4d00-8c1c-0d18a5543b43

NOTE – you will need a recent version of OneDrive. If your iSchool issued computer has not been imaged in over a year and/or you have never used OneDrive, please update it first. This can be done by downloading the latest version via the link below and then logging in to the client with your UW email address.

https://www.microsoft.com/en-us/microsoft-365/onedrive/download


Best Practices

— Please read below to understand the following issues you will no doubt encounter. —

  1. Organizing and managing your SharePoint Shortcuts: When you add shortcuts to OneDrive of SharePoint folders, these folders often end up with identical or similar names, such as “budget,” “budget 1,” and “budget 2.” This similarity arises because the original structural context of SharePoint—the site and library where each folder is located—is not retained in the shortcuts that are created in your OneDrive folder. Suppose you need to upload a file to the budget folder on the MSIM SharePoint site. Which ‘budget’ one do you choose? Even if you don’t have multiple folders named “budget,” it’s easy to lose track of the original SharePoint structure of the folder or the person who shared it with you. Where do these folders come from? Who shared them with you?
      1. Consolidate Shortcuts: Move all SharePoint shortcuts to a folder named “SharePoint Shortcuts” and all OneDrive shortcuts to “OneDrive Shares.” This will instantly help you know when you are working on documents from SharePoint vs your personal OneDrive
      2. .Mirror SharePoint Structure: Organize your shortcuts in the “SharePoint Shortcuts” folder to reflect their structure on the SharePoint site. For example, make subfolders and place the “budget” folder from the MSIM SharePoint into “SharePoint Shortcuts/MSIM/Finance.”
      3. Organize OneDrive Shares: Group OneDrive shares by the person who shared the shortcut with you, and the relevant project in subfolders, making them easier to navigate
      4. Unlink unused Shortcuts: To keep your space organized, unlink unnecessary shortcuts. To do so, right-click a shortcut and choose ‘Remove Shortcut‘ from the OneDrive menu. This also helps manage local disk space and prevents your system from being bogged down, as described in the next section.
  2. Manage Your Local OneDrive Storage:
When syncing multiple large SharePoint document libraries with OneDrive, you might notice your hard drive filling up or your system performance slowing down due to high CPU usage. 

It’s advisable to avoid setting shortcuts linked from SharePoint folders to “Always keep on this device.” This setting will result in continuous synchronization and can consume a lot of disk space and CPU resources.  This is especially true if you choose to “Always keep on this device” for entire SharePoint Document Libraires instead of selected folders.

Use “Always keep on this device” sparingly: Only enable this option for folders you need offline. If there are specific documents you will need even without internet connectivity, only then does it make sense to selectively pre-download folders you are working on and will need. 

Keep in mind that any document you open will automatically download to your device the first time you access it, potentially accumulating a large number of files over time.

Manage your storage effectively:  Periodically review your OneDrive folder. For files that don’t need to be stored locally use the “Free up space” option on the folder. This action removes local copies while keeping the files accessible in the cloud, freeing up disk space and improving system performance.

Potential Issues

  1. Nested Sharing from SharePoint is not allowed. Nested sharing from SharePoint is not permitted. If a top-level folder has been linked, SharePoint does not allow the creation of individual OneDrive shortcuts for its subfolders. This restriction also applies in reverse. For instance, if a subfolder has already been linked, SharePoint will not permit the creation of a OneDrive shortcut for the parent folder. However, it does allow you to replace the shortcut of the child folder with a shortcut to the parent folder.
  2. Monitor OneDrive for Errors
As you come to rely on OneDrive to access your SharePoint files, you should get in the habit of monitoring OneDrive on your system tray in Windows or the similar OneDrive icons on the menu bar on MacOS. Errors in OneDrive are more common than one might think. Failure to address them could mean that your files are not being synchronized. 

The cloud icon used by OneDrive is usually grayed out if OneDrive is unable to log in or needs you to re-login. Similarly, you might see a red X if OneDrive is having issues synchronizing certain files.  Synchronization issues can happen if there are filenames with unsupported characters, or if a file was altered in multiple locations simultaneously and OneDrive is unable to determine the authoritative version of this file.

Free/Low Cost Azure Resources for Research and Learning

Azure provides two ‘free account’ options:

  • Azure for students doesn’t require any credit card, but only offers $100 free credit, and is only available to persons with a verified ‘edu’ email account.
  • The general Azure free account offers $200 in credits, but appears to require a credit card as part of the verification process (though they claim you don’t get charged for anything until you upgrade the account).

It appears to be acceptable to use both account types by using a different (non-UW) email for the general account. Free credit is often only valid for a limited duration, so you have to ‘use it or lose it.’

Once the account is set up, there are a number of free services that can be set up on the account. Keep in mind that often what makes a service ‘free’ is simply staying within certain configuration/usage limits–so if you need more performance, you can do so, but it will consume some of the free credit.

Example: You can set up a free Linux VM by starting with the ‘free VM’ config as a starting point, and configuring it according to your needs (Quickstart guide).

AWS NetID Authentication

AWS NetID Authentication

Setup

iSchool IT can set up NetID authentication for UW AWS accounts. The process requires an AWS account number, so new AWS accounts will have to be created first:

  1. Once the AWS account # is created, iSchool IT sends a request for UW-IT to create a ‘stem’ in the UW groups service.
  2. iSchool IT uses the AWS group stem to create one or more ‘role-based’ groups and corresponding roles (with matching names) in AWS IAM.
    1. iSchool IT always creates an ‘admin’ role group that contains the project admins and iSchool IT, and allows these members to have full rights on the AWS account. This group also doubles as an email list for AWS communications.
    2. Project ‘owners’ (e.g. faculty associated with the AWS account) are also added as ‘member managers’ of the UW groups. This allows the project owners to directly add/remove members from the access role groups for the AWS account.
    3. Other roles that only grant selective access (e.g. ”ProjectA-viewer”) can also be created based on specifications from the AWS project admins. 

If you need to make create/remove roles after the initial setup, or transfer ownership of an AWS account, please send an email to ihelp@uw.edu

Usage

Login

Once the UW groups are set up, users should use this AWS NetID login link:https://idp.u.washington.edu/idp/profile/SAML2/Unsolicited/SSO?providerId=urn:amazon:webservices

  • If a user is a member of more than one AWS groups in the UW groups service, then the UW authentication server will display a menu of the available AWS accounts/roles that the user can login to.

Adding / Removing Users

AWS project owners can add/remove users from the UW groups that represent the access roles for their AWS account(s).

To find AWS groups associated with your NetID, login to your UW groups listing and use your browser’s search function (CTRL+F in Chrome) to find the phrase “u_weblogin_aws”… You can also use the UW groups search function and type your own netid into the “Find Administrators” section:

Any AWS role-based access groups in the results will be listed in the following format of “u_weblogin_aws_AWSACCT###_AWSAccountName-RoleName“. Example:

  • u_weblogin_aws_1234567890_awsawsomeproject-admins

To verify who can modify the membership, click on the link below the group name and look near the bottom of the “General Information” page for “Member managers.”

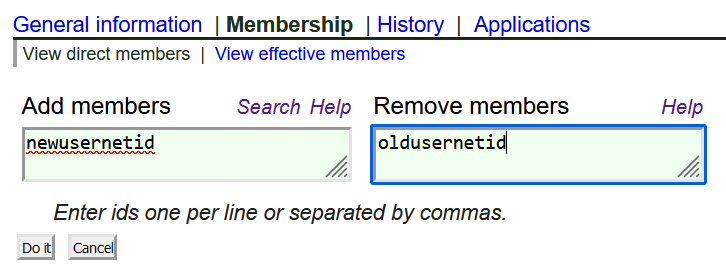
Anyone list in the “Member managers” section may add/remove users by selecting the ‘membership’ link near the top and entering one or more NetIDs in the Add or Remove boxes:

AWS Account Setup or Transfer

This process applies to new AWS account setup or transfer an existing AWS account for use on iSchool research or projects. In other words, if the iSchool is involved in paying the bill, you need to use this process for setup of AWS resources.

To get started, send a request to ihelp@uw.edu. iSchool IT staff will need coordinate with you to complete the transfer process. It may help to review the role responsibilities listed in the AWS overview to better understand how each party is involved. Below are the steps that iSchool IT will work through with you to complete the AWS setup/transfer process:

Step 1: Obtaining a BPO (linked to the correct budget) is a necessary prerequisite. This is done by the finance specialist assigned to the project budget. Further info for the BPO requestor: https://itconnect.uw.edu/wp-content/uploads/2016/02/AWS-BPO-How-to-V1.pdf

Step 2a: The requestor must provide iSchool IT info about the AWS account:

  • Will this be a “STRIDES Workload Application?” (more info)
  • Will this account contain HIPAA data?
  • Will this account be used as ‘dev/test’ or ‘production’ environment?
  • What is the anticipated use case?
  • Will additional selective-access roles (e.g. ‘database-reader’) be needed for individuals/groups?
    • If so, describe the required roles, and who will be assigned to them…
  • What is the BPO#?
  • What is the anticipated monthly budget for this account (rough approximation in $)?
  • Do you want DLT’s business support? (adds 10% surcharge on usage, on a monthly basis)
  • Department and project name?
  • Preferred name for AWS account?
    • We recommend that names be chosen based on the funding source/department, rather than the intended use
  • Lead contact info: the project owner’s name, email, phone#.
  • Purchasing officer contact info: the name, email, phone# of whomever arranged the BPO.

Step 2b: When transferring an existing AWS account, the requestor must share the AWS root login credentials with iSchool IT. The iSchool IT staff can suggest safe means to share account login details. Do not share sensitive info via email!

Step 2c: For existing accounts, iSchool IT will create a request with UW-IT to enable SSO. For new accounts, this has to wait until the AWS account # is created (Step 4).

Step 3: iSchool IT will submit a transfer/new account request to DLT on the user’s behalf and assist with answering any questions that come up. DLT’s account setup/transfer process usually takes a couple weeks, but may take longer if there are complicating factors. At the completion of their process, DLT will provide account setup links for https://app-us.cloudcheckr.com, which is a convenient alternative management console for AWS resources.

Step 4: AWS UW NetID SSO setup – iSchool IT will request an AWS account stem in UW groups, and create a UW group that can be used for admin logins and double as the root email address for the AWS account. This ensures that notifications related to the AWS account are forwarded to all ‘admins’ on the account. iSchool IT will also create any additional ‘selective-access’ groups that are required. The “lead contact/account owner” designated during the setup process will be granted the right to add/remove members from these groups directly to minimize administrative difficulties.

Step 5: iSchool IT will create a corresponding ‘Admin’ role in the AWS account which will allow the project admins full access to the AWS account using their NetID. If additional ‘selective access’ roles were requested, iSchool IT will also create those as well.

At this point, the standard AWS setup is complete and ready to use…

AWS Overview

At the iSchool, any AWS accounts that are paid from funds (grant or otherwise) managed by the iSchool should be created/converted to UW AWS accounts. This allows the iSchool to utilize payment via BPO, and adds other savings and features detailed in the linked service description. All UW AWS accounts are set up via a 3rd party company called DLT.

Role responsibilities:

AWS account owner/operator:

  • Oversee AWS account budget & actual costs
  • Ensure use of AWS resources in accordance with project purposes
  • Responsible for security of all data and AWS resource configuration
  • Manage project member access to AWS account resources (add/remove as needed)

iSchool IT:

  • Facilitate new AWS account setup and existing account transfers to DLT
  • Establish iSchool AWS ‘best practices’ and process documentation
  • Configure UW accounts/groups to ensure consistent AWS notifications/administration
  • Configure UW NetID logins and access management groups for AWS accounts

DLT:

  • Creates AWS accounts under their ‘management account’
  • Acts as primary contacts on AWS accounts (if AWS tries to contact the account holder).
  • Offers management interface

UW-IT:

  • Defines the service requirements with AWS for UW accounts
  • Maintains the contract with DLT
  • Approves individuals to request an AWS account via DLT

Web Hosting options

At the UW there are a lot of web hosting options. The Information School recommends a subset of these options, the details of each are listed below:

Hosting Options

1) sites.uw.edu

This is the preferred first choice. It’s the best option whenever someone can fit into the university environment. Maintenance and support is handled by UW-IT. It’s very secure, reliable, and used by many people on campus. It offers SSL out of the box, and for a $50/year you can point any domain to it (*.ischool.uw.edu).

More info here: https://itconnect.uw.edu/connect/web-publishing/shared-hosting/url-forwarding-and-masking/Sites.uw.edu has a low barrier of entry and requires very minimal technical skills. It’s essentially a blogging platform that has the flexibility to create a site with multiple pages, graphics, menus, etc. You just need to know or learn how to use WordPress. There is no need to be knowledgeable about the installation and maintenance of it.

2) A2 Hosting

When sites.uw.edu isn’t a viable option due to the limitations imposed by the platform, then folks can get a dedicated hosting account. A2 Hosting is a hosting reseller that uses cPanel and gives you the flexibility to install a wide array of web features. Hardware and infrastructure is supported by A2, but any software you install (including your CMS of choice) needs to be configured, updated, and maintained by you. This requires a higher level of technical skill than sites.uw.edu.

3) Linux VM

This is the most technically complex option but also the most flexible. You get a dedicated VM and can do almost anything with this option if you have the necessary technical skills. Maintenance, installation, updates, configuration, and more are all on you. The VM starts with a very base-level of software installed. We will grant you sudo access, and let you configure your VM as you need it. We don’t have the resources to work with individuals to customize the server for them.

X) Find a service they like and use it

Outside of these iSchool/UW provided/supported solutions are additional platforms you can use. Wix, Squarespace and GitHub pages can be used instead. All of these offer different features and you’re welcome to use whatever you want. iSchool IT cannot provide any support in these environments as we don’t have the expertise or resources available to do so.Add-ons*.ischool.uw.edu domains:Anyone who wants a *.ischool.uw.edu domain can request them from us. We can provision that for free and add any DNS records you want. We’ll help you understand this process, but for complex configurations with various third parties, we might not be experts and that process might be slow.*.uw.edu domains:If you want a *.uw.edu domain you need to consult this page and fill out the proper request forms:

https://itconnect.uw.edu/connect/uw-networks/network-addresses/requesting-a-new-subdomain/For all *.uw.edu domains supported by the iSchool, they must delegate “uw_ischool_employees_it_admins_network” as an admin contact group in the networks.uw.edu interface once your request is complete. If you do not do this, we cannot support you.non-uw domains:If you want a non-UW domain for UW business purposes we only support acquiring these through UW-IT. You need to provide a budget and follow the instructions here:

https://itconnect.uw.edu/connect/uw-networks/network-addresses/requesting-a-new-subdomain/If you need/want iSchool IT to support your domain, you must delegate “uw_ischool_employees_it_admins_network” as an admin contact group in the networks.uw.edu interface once your request is complete.ConsultationThe web and infrastructure team is happy to consult with any iSchool faculty, researchers, or staff who have a web need. We don’t have the resources to provide hands-on assistance, but consultation time is usually available. We’re happy to help explain topics and help you pick the best option to suit their needs.

Connecting to SQL Server from an iSchool-provided computer

Connecting to SQL Server from an iSchool-provided computer

These instructions will allow you to connect to a Microsoft SQL Server using Windows Authentication (your UW NetID and password) from iSchool-provided faculty, staff, and lab computers, using SQL Server Management Studio (SSMS).

If you need to connect to a SQL Server from a personal computer, follow the instructions on this page.

How to connect to a SQL Server, using your UW NetID credentials, from an iSchool-provided computer (faculty, staff, lab computers):

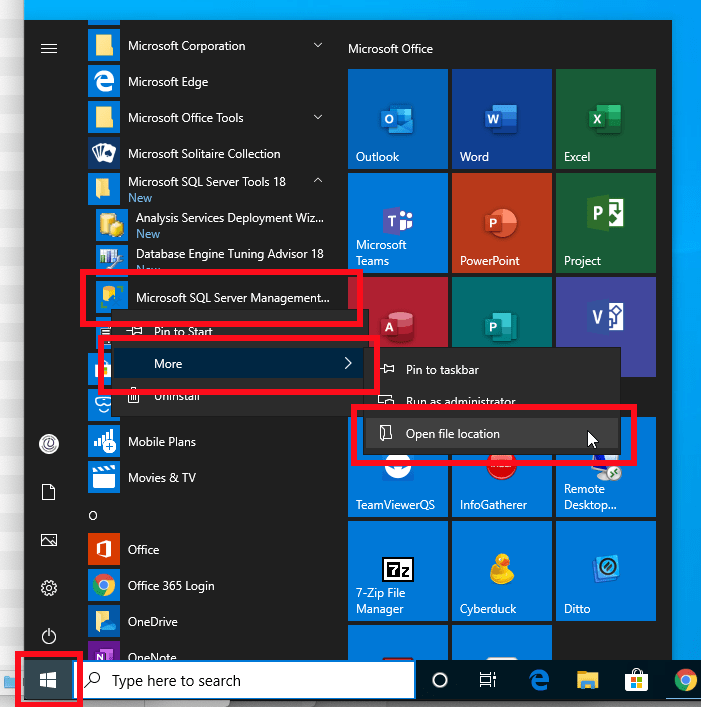
1) Click the lower-left Windows icon, under Microsoft SQL Server Tools, right-click Microsoft SQL Server Management, mouse over More, click Open file location

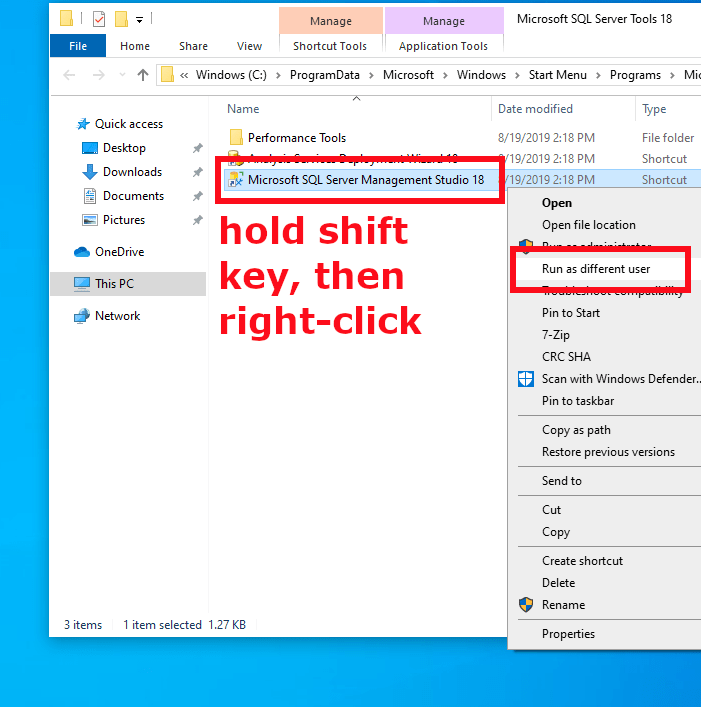
2) A new File Explorer window will open, hold the shift key (on the keyboard) then right-click shortcut to SQL Server Management Studio, click Run as different user

3) In the login window, use the following:

Username: netid\your UW NetID
Password: your UW NetID password

Click OK

Note well: On lab computers, at this point, it may look like nothing is happening.  Wait.  It could be a few minutes before SSMS starts up.

When SSMS opens, for “User name”, you should see NETID\your UW NetID

Enter the server name to connect.