How do I add a Printer to my iSchool Computer

How do I add a Printer to my iSchool Computer

Add a Printer to an iSchool Computer

This web page includes detailed directions for adding an iSchool printer to an iSchool-issued computer:

Instructions for Windows

Instructions for macOS


Instructions for Windows

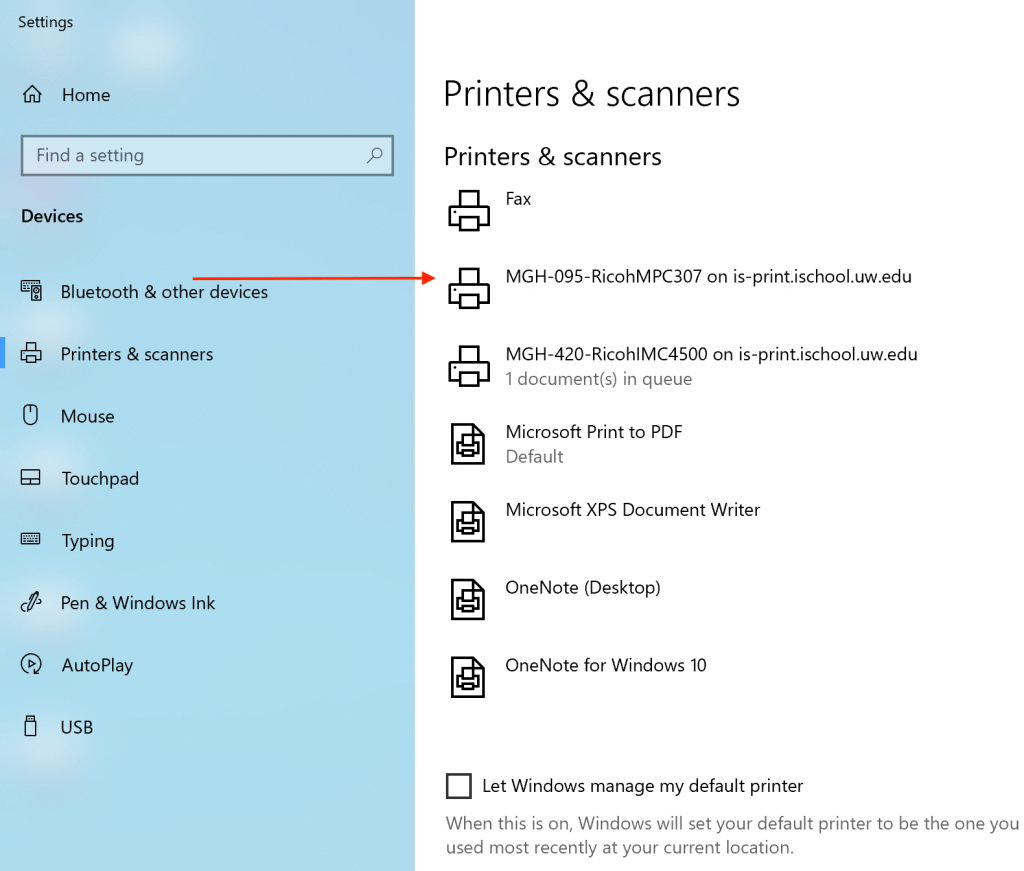
1) Windows computers should arrive to you with all iSchool printers already available to you. You should be able to print to any of the printers listed in Settings -> Bluetooth & devices -> Printers & scanners.

If the printer you need to use is not listed, proceed to step 2.

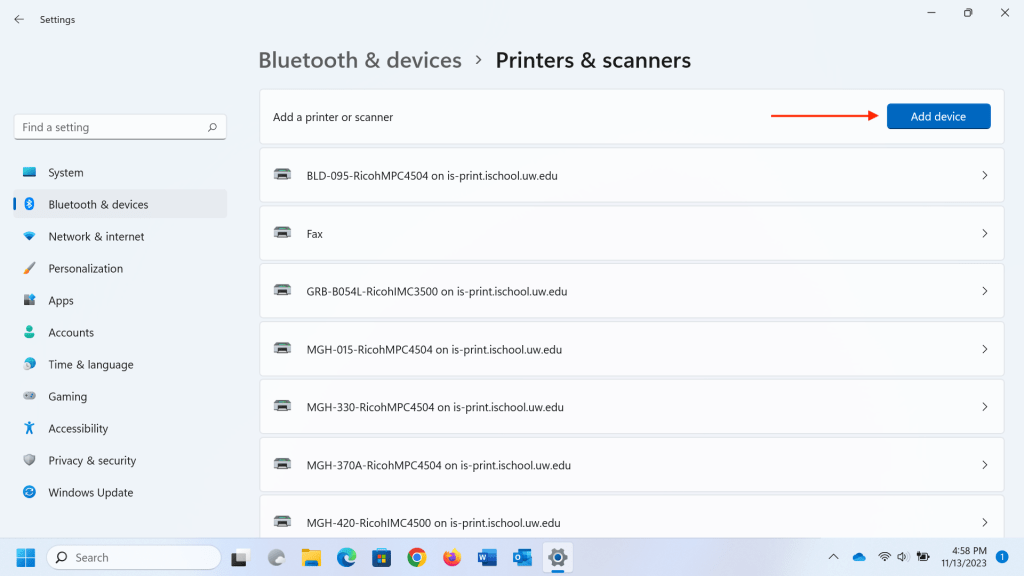
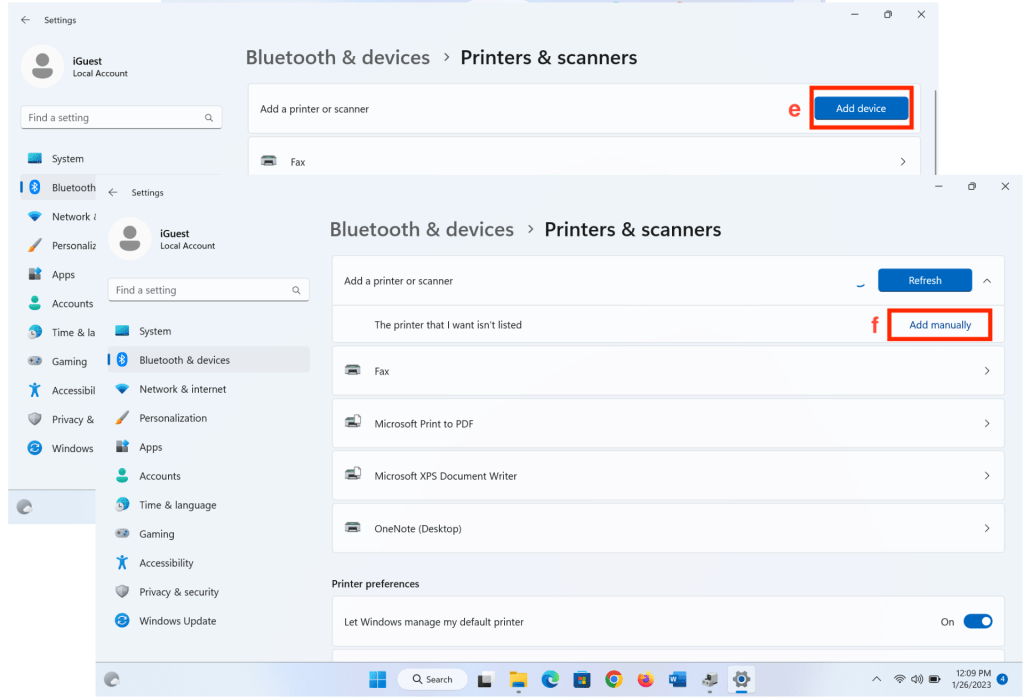
2) In the “Printers & scanners” settings, click Add device.

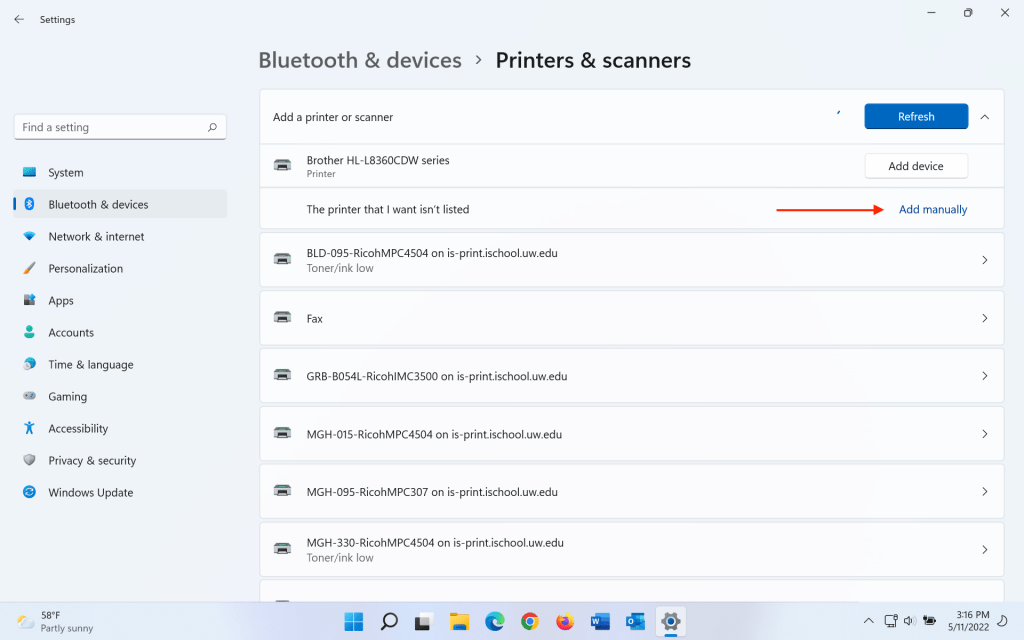
3) In a handful of seconds a “The printer that I want isn’t listed” message and an Add manually button should appear. Click the Add manually button.

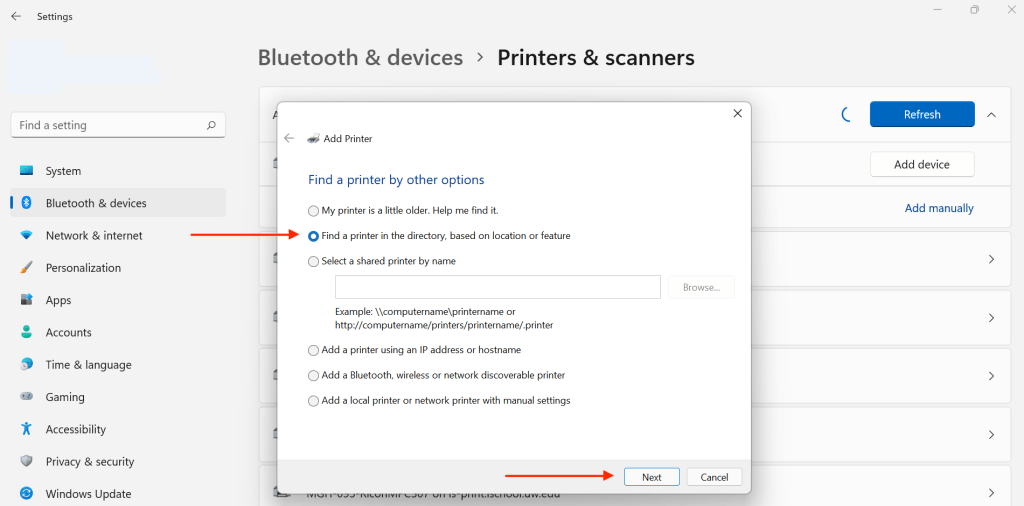
4) Select ” Find a printer in the directory… “, click Next.

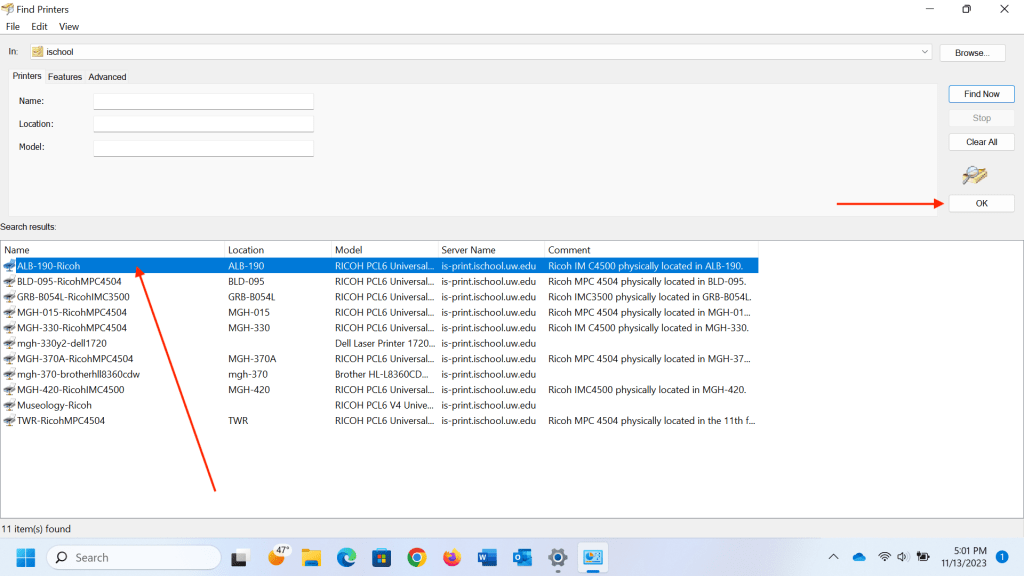
5) Select the printer you need, click OK. Printer names should be self explanatory. Contact iSchool IT, ihelp@uw.edu, if there are any questions.

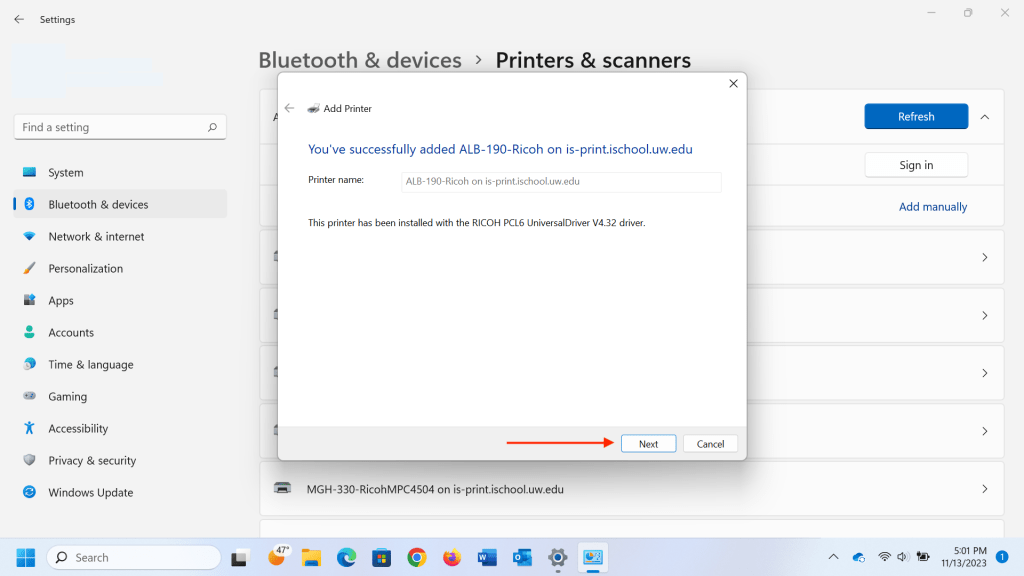
6) After a few seconds you should see a “…successfully added printer…” message. Click Next .

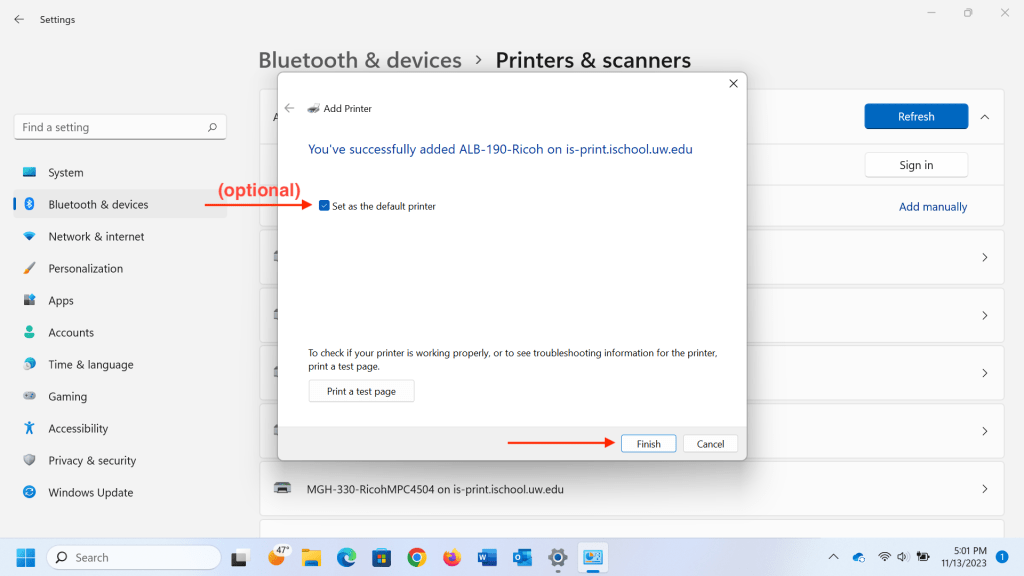
7) You should see another “…successfully added printer…” message. The “Set as the default printer” checkbox is optional. Click Finish .


Instructions for macOS

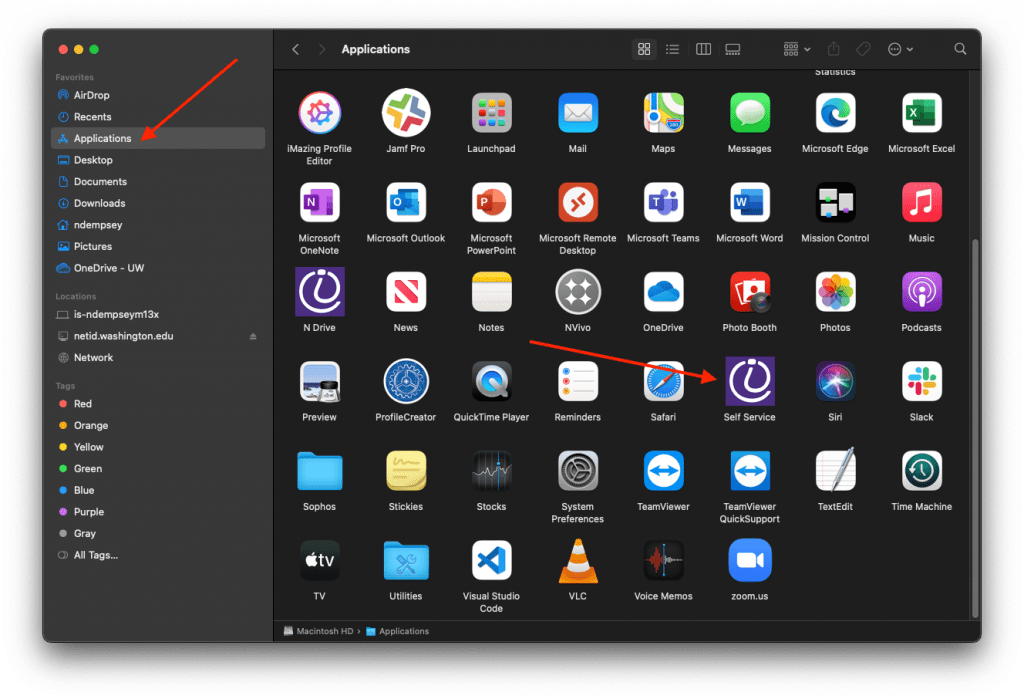
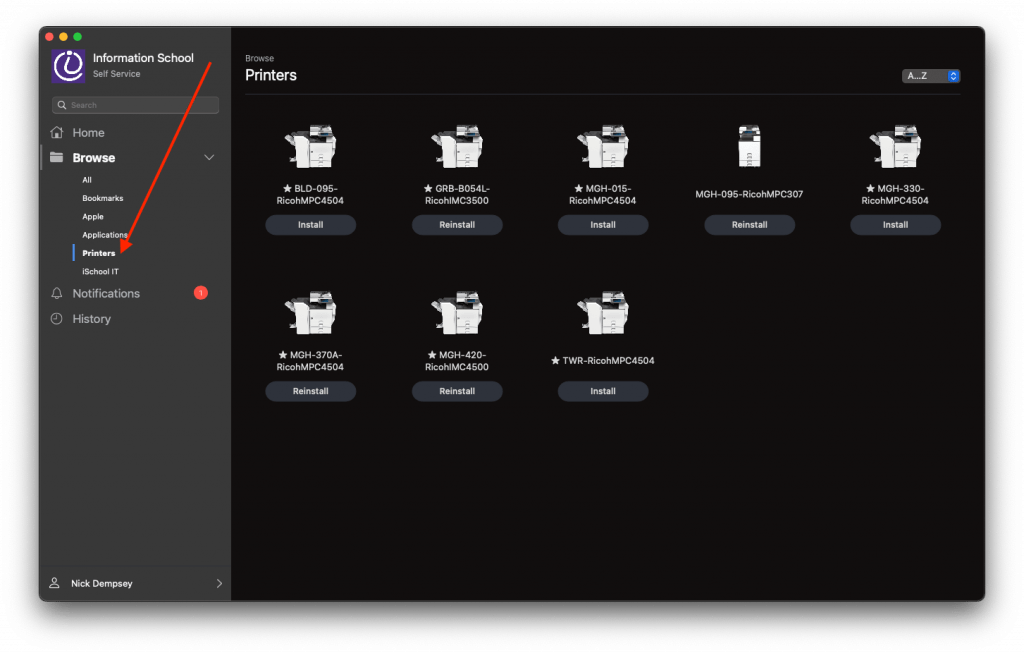
1) Open a Finder window, click Applications, start the application Self Service, sign into Self Service with UW NetID credentials if prompted for credentials.

3) Click the Printers category, click Install for any and all printers you need to use.

MakerBot Replicator Z18 3D printer

The iSchool has a MakerBot Replicator Z18 model 3D printer in Mary Gates Hall 440. It is available for use by iSchool students on a first-come, first-served basis.

General model-specific information and a getting-started-guide can be found on the MakerBot website:

https://www.makerbot.com/replicator-z18/

Please contact the iSchool IT Help Desk for replacement filament or help troubleshooting

Locked printing with Ricoh printers

Locked printing with Ricoh printers

Locked printing with Ricoh printers

Instructions below are for using a security function on Ricoh printers allowing users to “lock” or hold their print until they are physically in front of the printer to “release” the actual printed piece of paper.

The instructions below are applicable to the following printers:

Ricoh in Bloedel Hall 095 (BLD-095-RicohMPC4504)
Ricoh in Gerberding Hall B054L (GRB-B054L-RicohIMC3500)
Ricoh in Mary Gates Hall 015 (MGH-015-RicohMPC4504)
Ricoh in Mary Gates Hall 095 (MGH-095-RicohMPC307)
Ricoh in Mary Gates Hall 330 (MGH-330-RicohMPC4504)
Ricoh in Mary Gates Hall 370A (MGH-370A-RicohMPC4504)
Ricoh in Mary Gates Hall 420 (MGH-420-RicohIMC4500)
Ricoh in Tower (TWR-RicohMPC4504)

Windows
Mac

locked printing in Windows

(Word is used in the example below. However, this option works with Excel and other programs.)

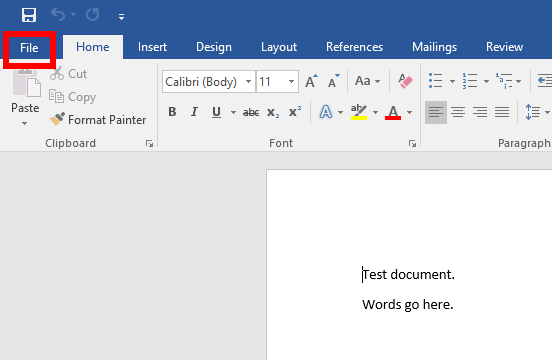
01) click File
 

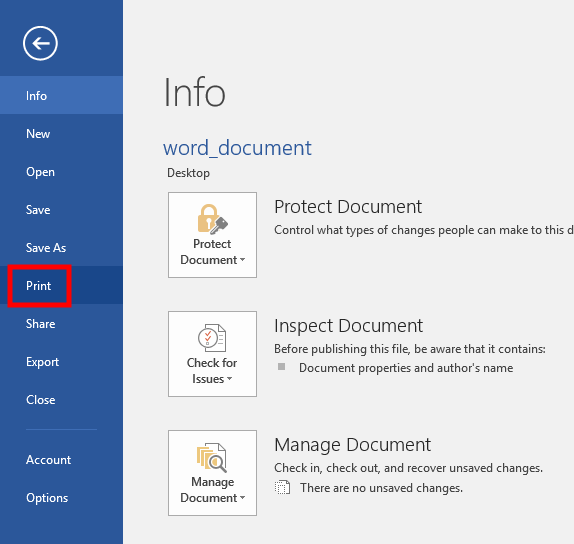
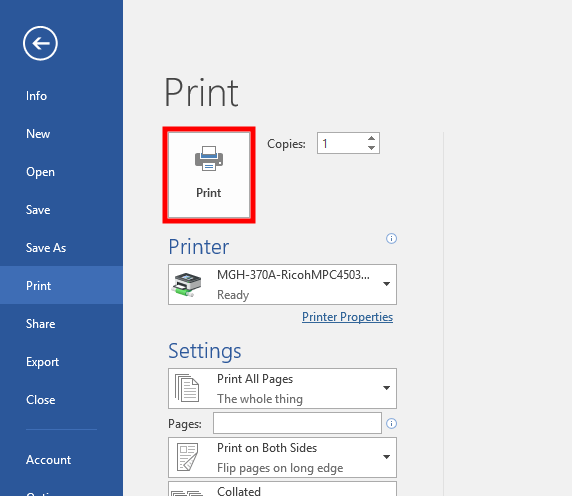
02) click Print
 

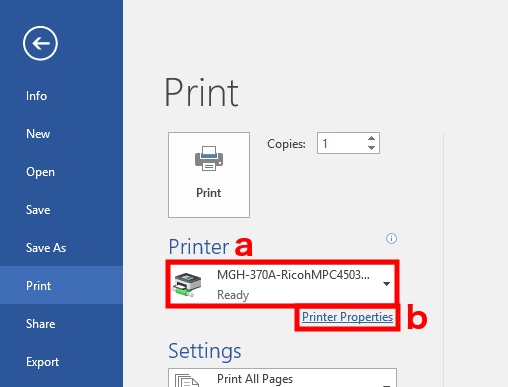
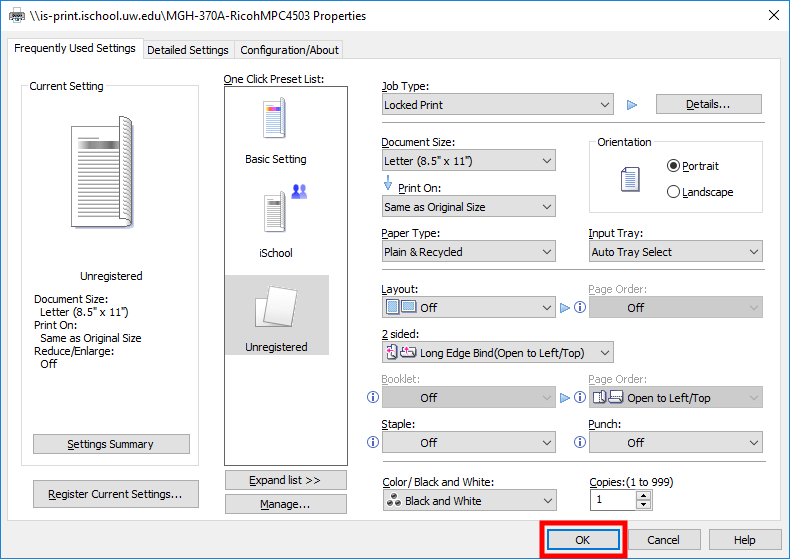
03) select one of the printers listed above, click Printer Properties
 

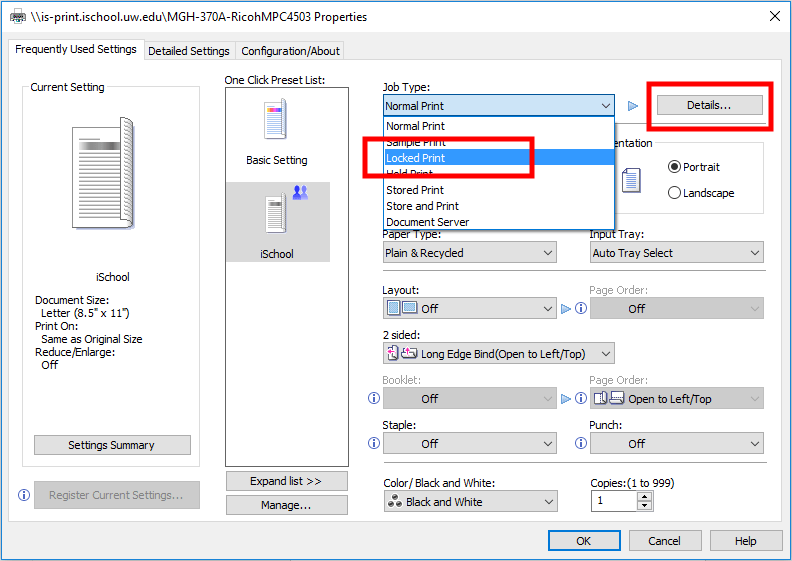
04) from the “Job Type:” drop-down, select Locked Print, click Details…
 

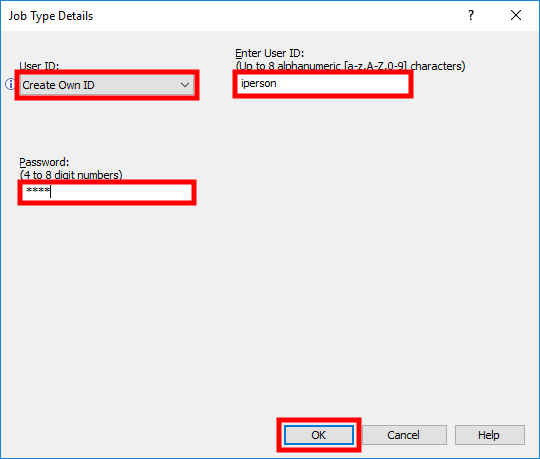
05) in the Job Type Details window, use the following settings:

User ID: use Create Own ID
Enter User ID: use your UW NetID
Password: use any number with 4 to 8 digits, it must be memorable to you, you will need to type in this number while physically at the printer

click OK
 

06) click OK
 

07) click Print
 

At this point, the rest of the steps need to be done while at the printer.

08) (on the Ricoh printer interface) press Printer
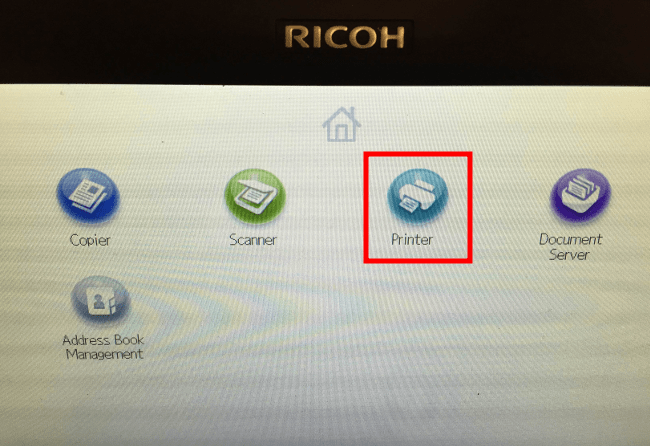
ricoh_printer_button


09) press Print Jobs

ricoh_print_jobs


10) select the User ID you created in step 05
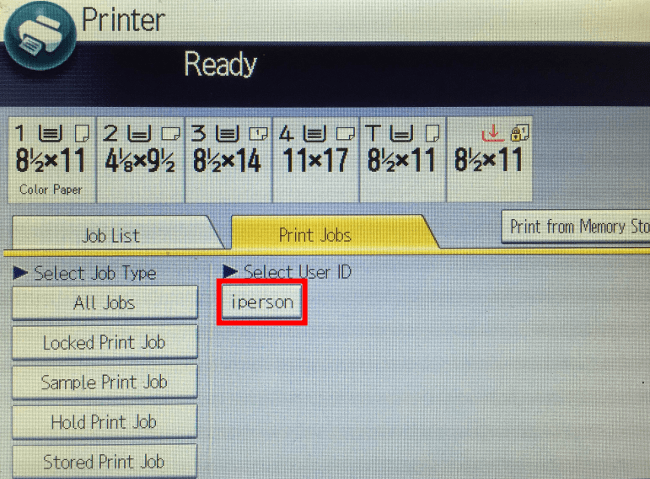
ricoh_user_id


11) select the correct print job, press Print
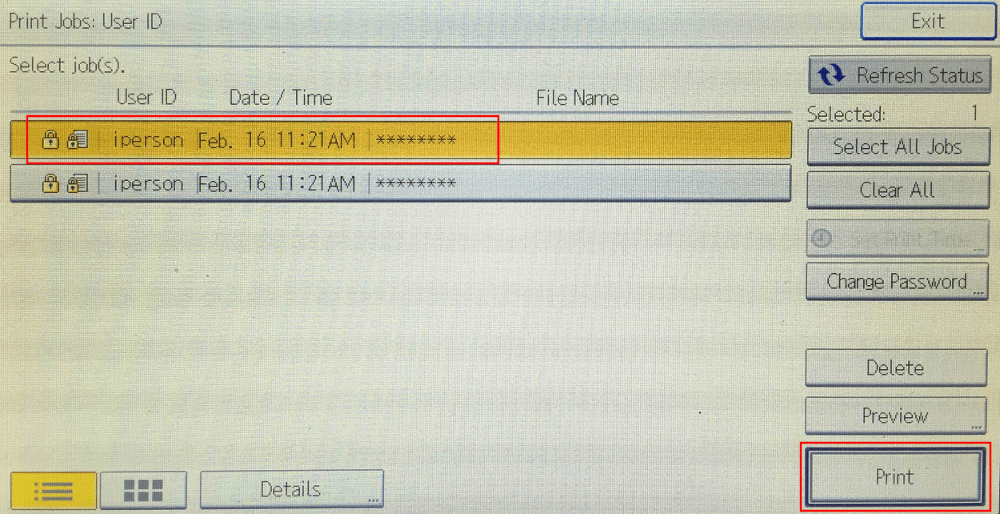
ricoh_user_id_print_job


12) enter the password you created in step 05, press OK
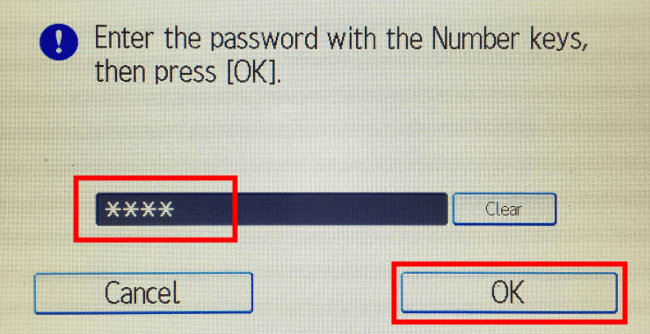
ricoh_print_job_password


13) change the quantity of print copies desired if necessary (1 copy is default), press Print

ricoh_print_button


locked printing in Mac OS

(Word is used in the example below. However, this option works with Excel and other programs.)

01) click File, click Print…

mac_word_file_print


02) select any printer listed above from the “Printer:” drop-down, select Job Log from the third drop-down
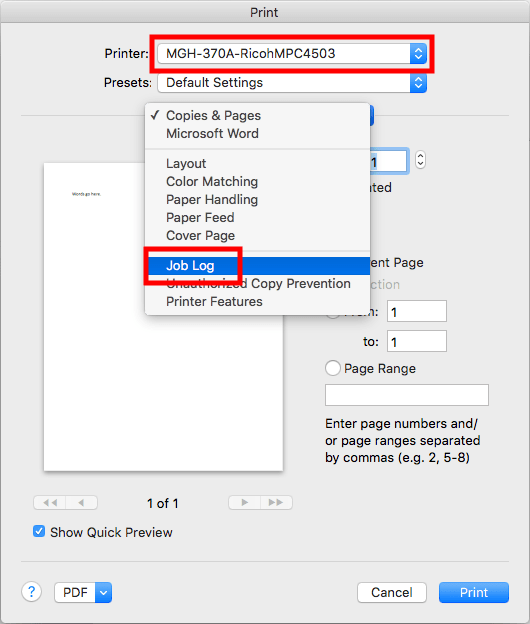
 

03) for “Job Type:” select Locked Print, use the following settings:

User ID: use your UW NetID
Password: use any number with 4 to 8 digits, it must be memorable to you, you will need to type in this number while physically at the printer

click Print
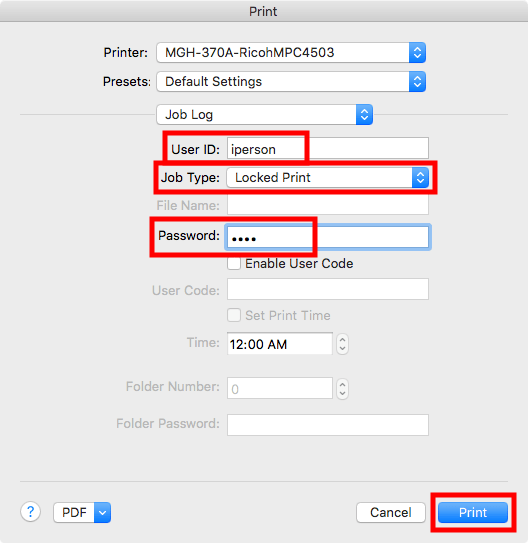
 

At this point, the rest of the steps need to be done while at the printer.

04) (on the Ricoh printer interface) press Printer

ricoh_printer_button


05) press Print Jobs

ricoh_print_jobs


06) select the User ID you created in step 03

ricoh_user_id


07) select the correct print job, press Print

ricoh_user_id_print_job


08) enter the password you created in step 03, press OK

ricoh_print_job_password


09) change the quantity of print copies desired if necessary (1 copy is default), press Print

ricoh_print_button

Basic procedure for printing files from a USB Flash Drive on a Ricoh printer

Notes:

  1. This machine only supports FAT16 or FAT32 formatted USB drives
  2. SD cards must be 2GB or smaller
  3. Saving might fail if the USB flash memory features password protection or other security features
  4. Only connect USB flash memory to the USB slot
  5. Insert the USB drive directly into the media slot
  6. Do not remove the media while data is being written. Doing so will result in corrupted data.

1.  Insert a memory storage device into the media slot.

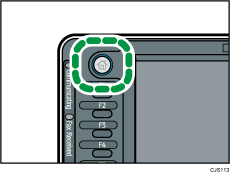
2. Press the [Home] key on the top left of the control panel, and press the [Printer] icon on the [Home] screen.

Home key illustration

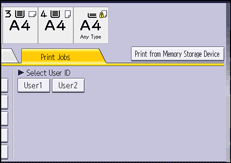
3. Press [Print from Memory Storage Device].

Operation panel screen illustration

4. Select the memory storage device that contains the file you want to print.

– Only one memory storage device can be selected at a time.

5. Select the file you want to print.

– You can simultaneously select multiple files of the same file type in the current folder.

6. If necessary, press [Detailed Settings] to configure detailed print settings.
– Note that certain settings cannot be selected simultaneously.

7. If necessary, press [Preview] to check the print image of the document.
– Only the first page of the document is displayed in the preview screen. No previews can be displayed when more than one document is selected.
– Press [Exit] to close the preview screen.

8. Press [Start Printing] or the [Start] key to start printing.

– To print a password-protected PDF file, enter the password.

9. When printing is complete, Press [Back to dev. slct. scr.].

10. Remove the memory storage device.

Basic procedure for saving scan files on a USB Flash Drive for a Ricoh printer

Notes:

  1. This machine only supports FAT16 or FAT32 formatted USB drives.
  2. SD cards must be 2GB or smaller.
  3. Saving might fail if the USB flash memory features password protection or other security features.
  4. Only connect USB flash memory to the USB slot.
  5. Insert the USB drive directly into the media slot.
  6. Do not remove the media while data is being written. Doing so will result in corrupted data.

1. Press the [Home] key on the top left of the control panel, and press the [Scanner] icon on the [Home] screen.

Screen Shot 2013-08-08 at 3.05.07 PM

2. Insert a removable memory device in the media slot. You can connect only one removable memory device at a time. The media slot cannot be used if both an SD card and a USB flash memory are inserted into it at the same time.

3. Make sure that no previous settings remain. If previous settings remain, press the [Reset] key.

4. Place originals.

5. Press [Store File].

6. Press [Store to Memory Device].

7. Press [OK].

8. If necessary, specify the scan settings according to the original to be scanned.

Screen Shot 2013-08-12 at 2.49.54 PM

9. Press the [Start] key. When writing is complete, a confirmation message appears.

10. Press [Exit].

11. Remove the memory device from the media slot

Basic Procedure for Sending Scan Files by Email with Ricoh Printer

Basic Procedure for Sending Scan Files by Email

1. Press the [Home] key on the top left of the control panel, and press the [Scanner] icon on

the [Home] screen.

Screen Shot 2013-08-08 at 3.05.07 PM

2. Make sure that no previous settings remain.

If a previous setting remains, press the [Clear Modes] key.

3. Press the [E-mail] tab.

Screen Shot 2013-08-08 at 3.17.09 PM

4. Place originals.

5. If necessary, specify the scan settings according to the original to be scanned.

Screen Shot 2013-08-08 at 3.17.09 PM

6. Specify the destination. You can specify multiple destinations.

7. To specify the e-mail sender, press [Sender Name].

8. Press [Manual Entry].

9. Enter the e-mail address.

10. Press [OK].

11. Press the [Start] key.


How do I add iSchool printers to my personal computer?

How do I add iSchool printers to my personal computer?

Adding an iSchool Printer to a Personal Computer:

Instructions for Windows

Instructions for macOS

Instructions for Windows

1. Find the following information about the printer you would like to use: a) IP address – IP addresses should be labeled in plain sight on each printer b) Make and model – printer should indicate make and model in plain sight If you are unable to determine a printer’s IP address or make or model, contact the iSchool IT Help Desk.

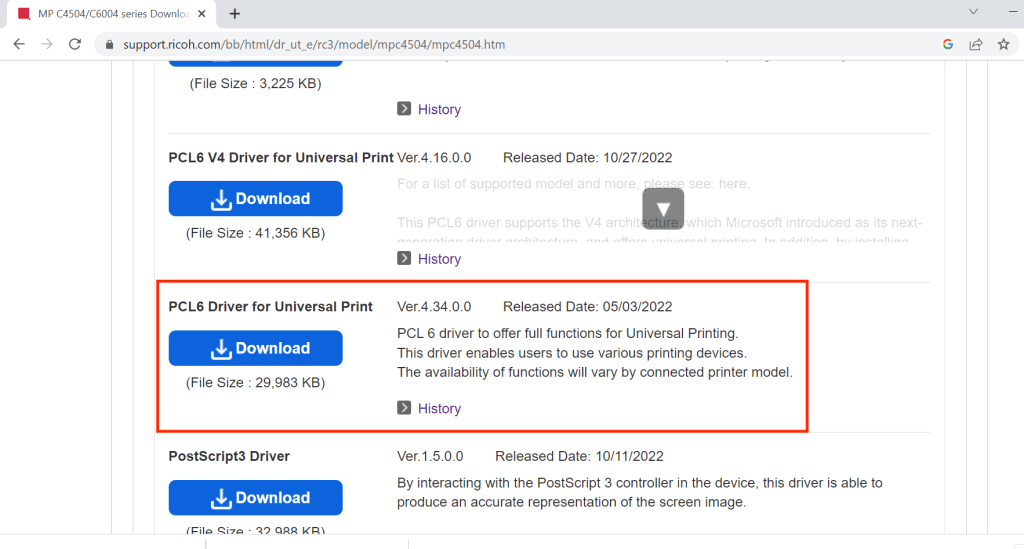
2. Download and install the latest printer driver for the make and model printer you identified in step 1. In general, you will be looking download a Ricoh printer driver: https://www.ricoh-usa.com/en/support-and-download named “PCL6 Driver for Universal Print”:

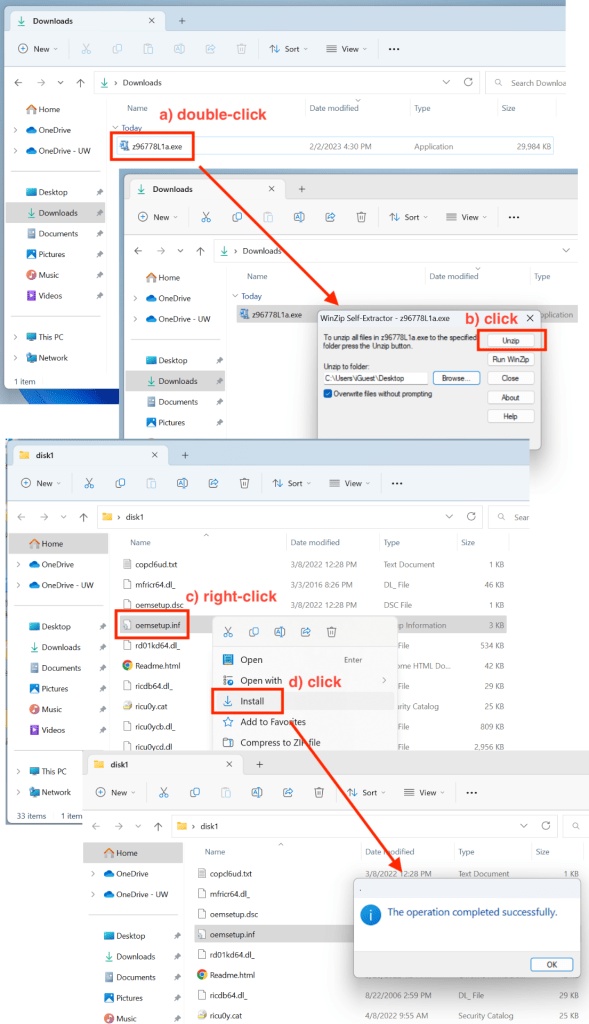
Save the file to your computer. Double-click the file (a)), click Unzip (b)), find then right-click the file named oemsetup.inf (c)), click Install (d)), click Yes. You should receive a “The operation completed successfully” message.

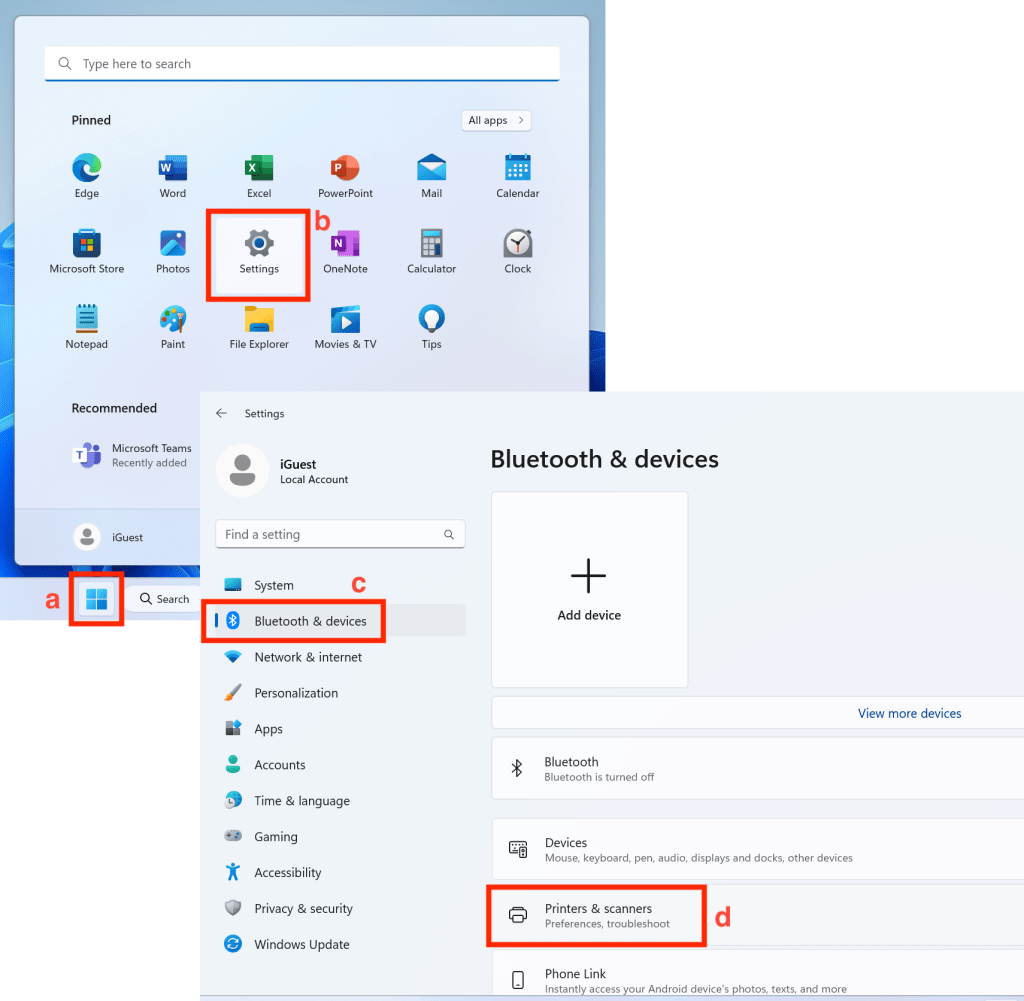
3. Click the Windows icon (a). Click Settings (b). Click Bluetooth & devices (c). Click Printers & scanners (d).

Click Add device (e). The computer will look for available printers. After a few seconds, it will likely fail to find any printers. Click the button that appears: Add manually (f).

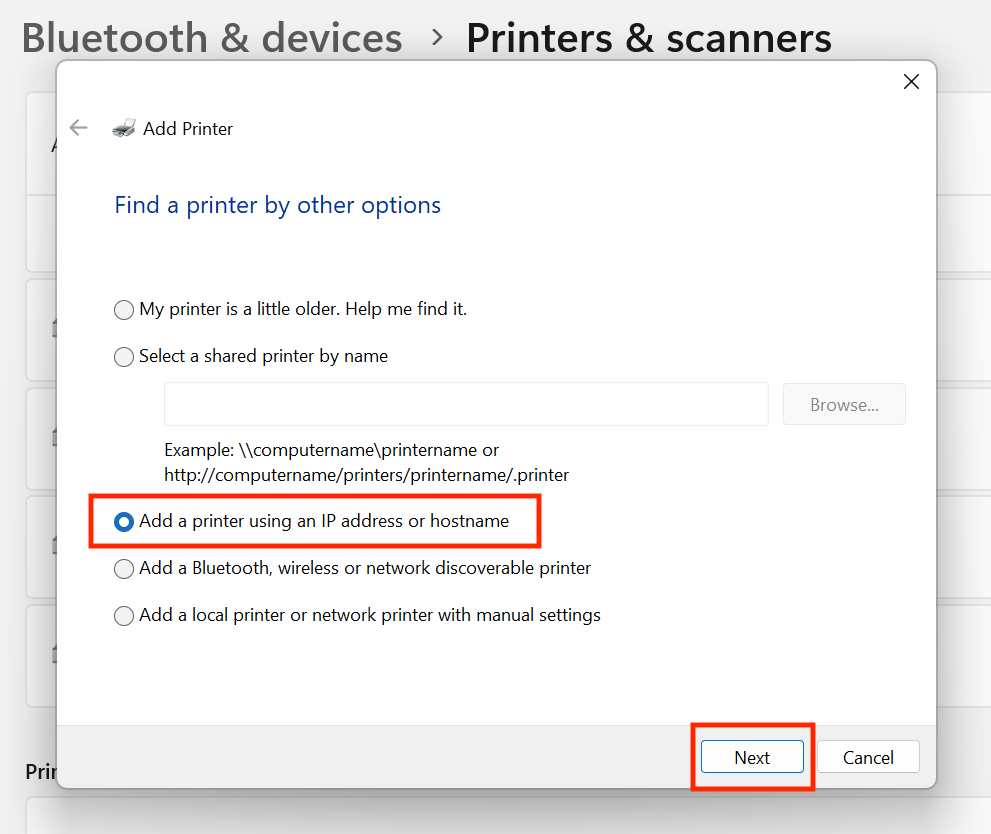
4. Select Add a printer using an IP address or hostname option. Click Next.

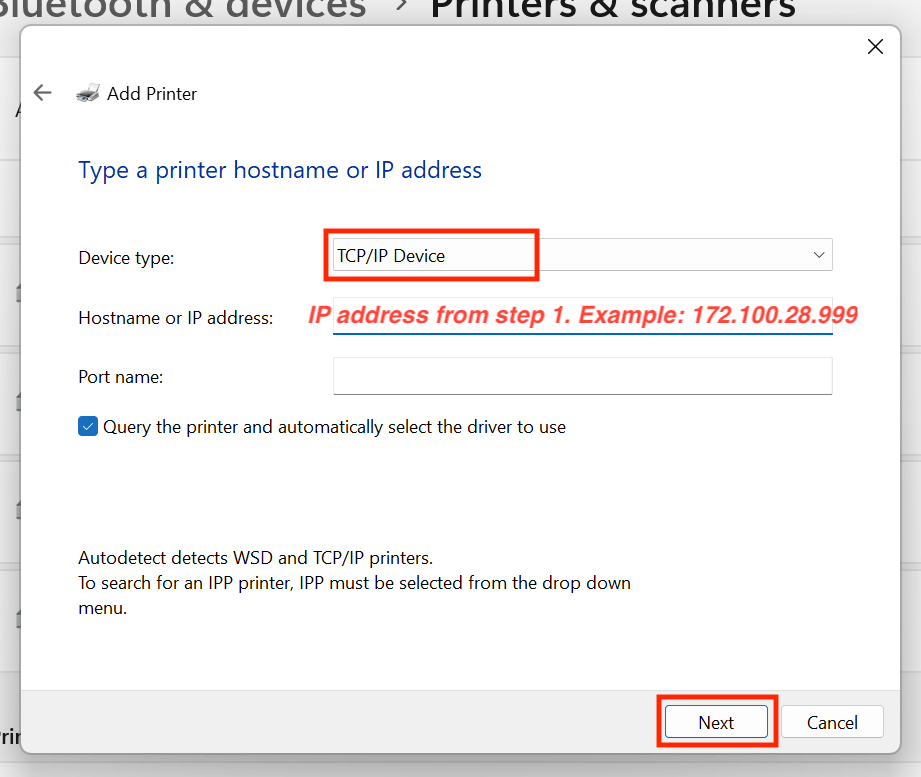
5. Change the Device type: to TCP/IP Device. Type in the IP address you found in step 1 into the Hostname or IP address field. Click Next.

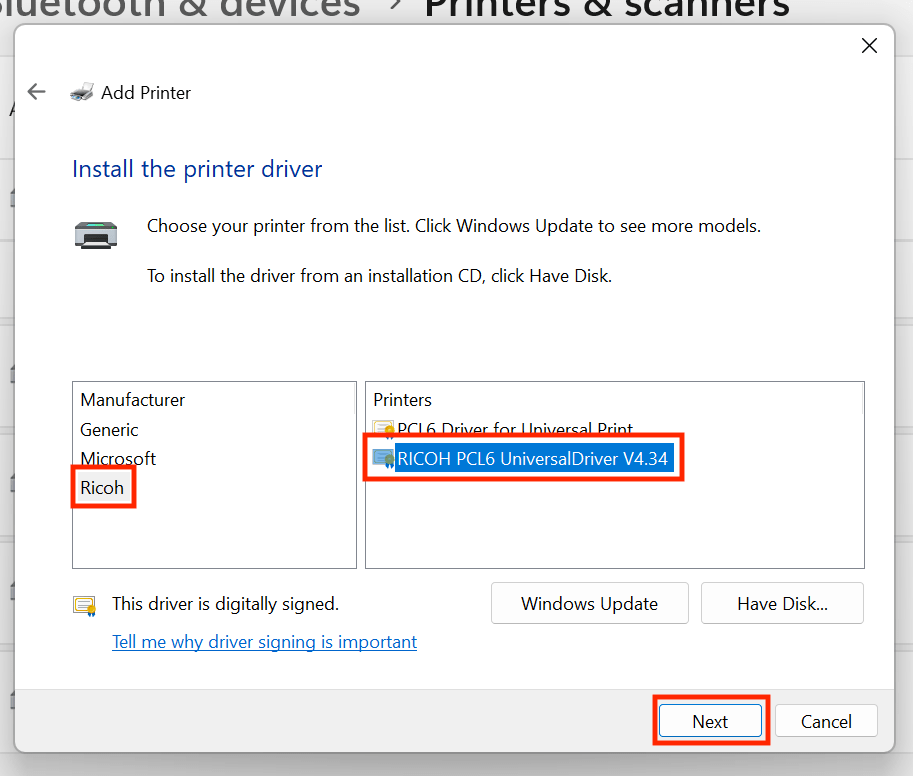
6. Select the “RICOH PCL6 UniversalDriver” printer driver. Click Next.

7. Type in a name for the printer. Click Next.

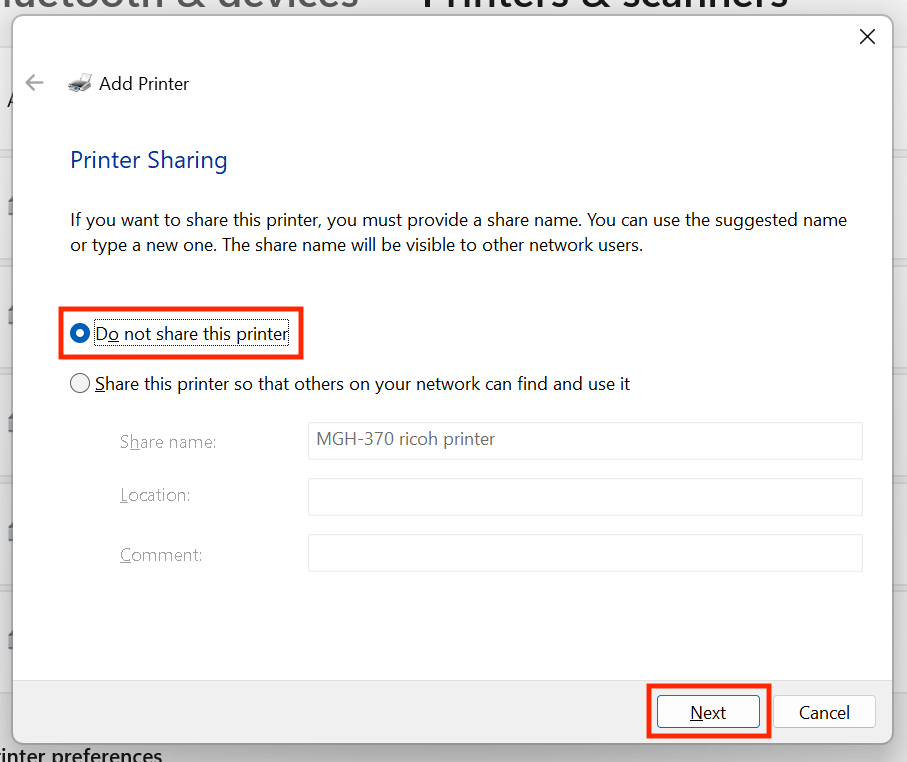
8. Select the Do not share this printer option. Click Next.

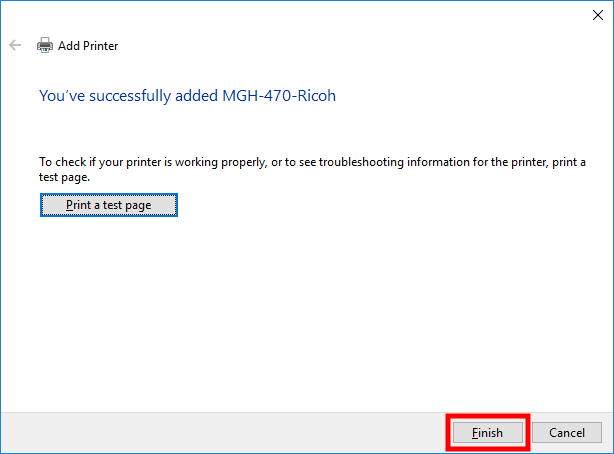
9. You should receive a “success” message. Click Finish. You should be able to print to the printer you just added.


Instructions for macOS

1. Find the IP address and the make and model of the printer you would like to use. IP addresses should be labeled in plain sight on each printer. If you are unable to determine a printer’s IP address or make or model, contact the iSchool IT Help Desk.

2. Download and install the latest printer driver for the make and model printer you identified in step 1. In general, you will be looking for a Ricoh printer driver: https://www.ricoh-usa.com/en/support-and-download If you are printing to a different make or model printer, you will need to web-search for the correct printer driver to install on your computer. If you need help with this step, contact the iSchool IT Help Desk.

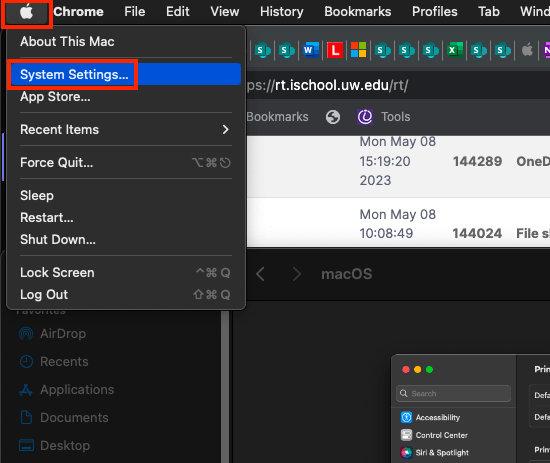
3. Click the top-left Apple icon. Click System Settings….

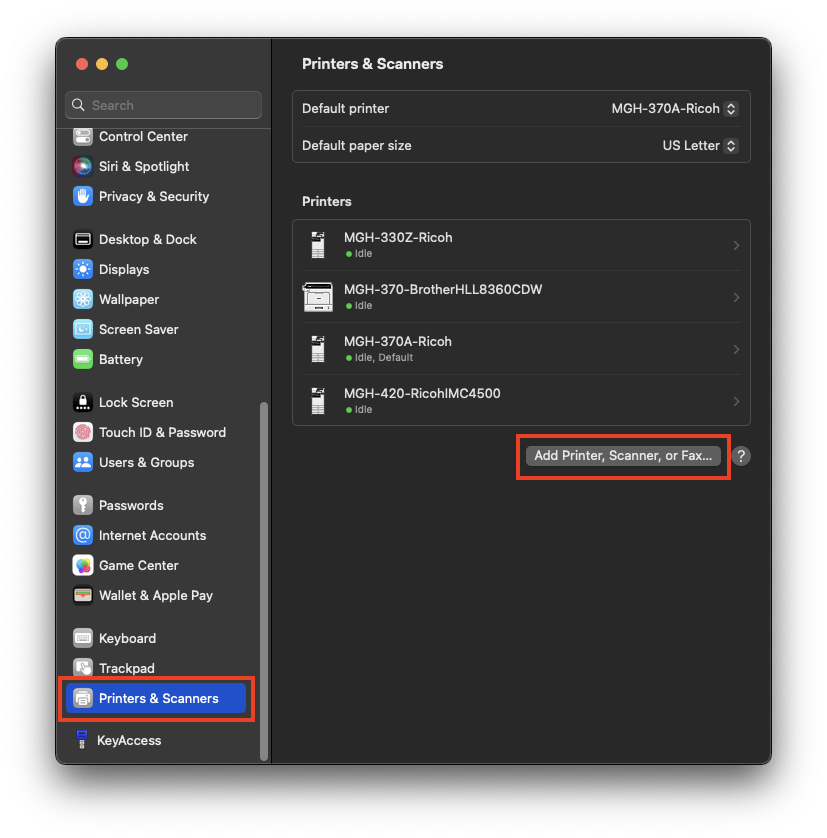
4. Click Printers & Scanners, click Add Printer, Scanner, or Fax….

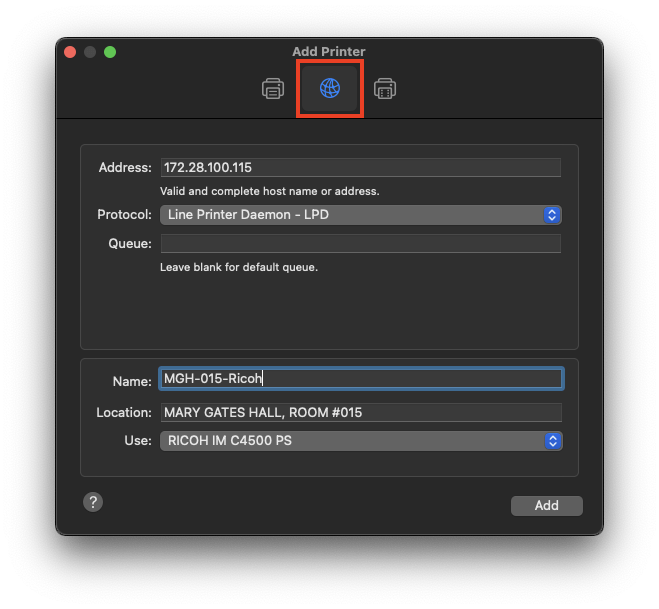
5. Click the IP button. Use the following settings:

Address: enter the IP address you found from step 1.

Protocol: Line Printer Daemon – LPD

Queue: leave blank

Name: can be anything you want, use something that makes it clear what it is

Location: gets filled in automatically

Use: *should* get selected automatically, if not, select the make and model of the printer

Click Add.

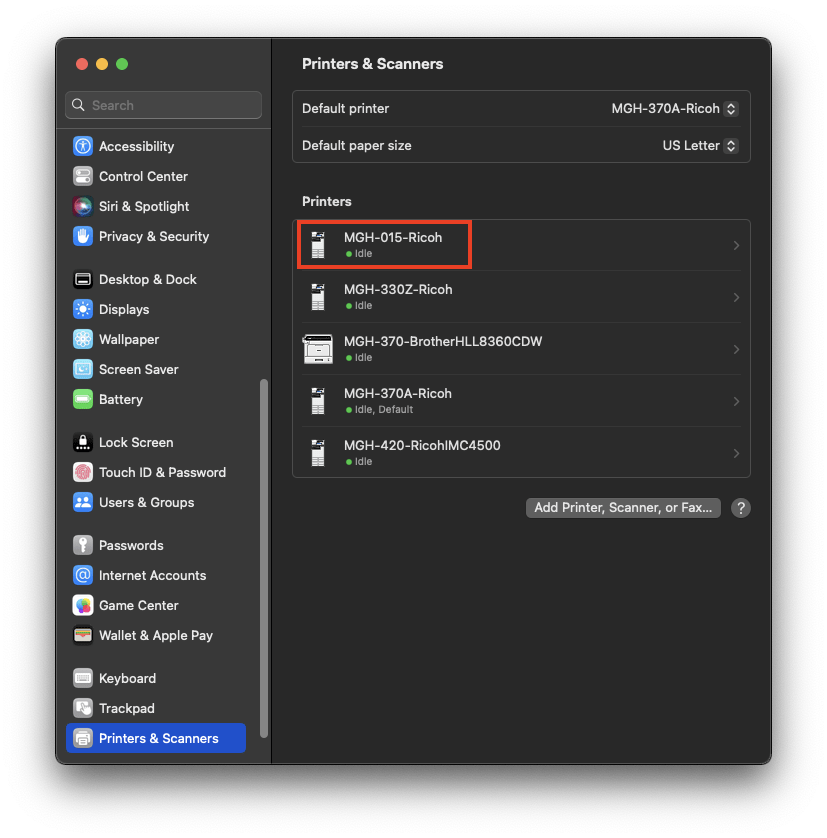
6. You should see the printer added with a green light indicating it is ready to print to.

Printing in the iSchool Computer Labs

Mary Gates Hall room 440 (MGH-440), sometimes referred to as “The TE Lab”, has a “Dawg Prints” pay-for-print system. From any computer, send your document to the MGH-440 Dawg Prints printer (or any Dawg Prints printer) by using the website: print.uw.edu.

Full instructions for using the Dawg Prints printing system are available on this website: Dawg Prints instructions.

If the printer in MGH-440 is out of paper, please notify IT personnel at the iSchool IT Help Desk in MGH-470.