Focused Inbox

Microsoft introduced “Focused Inbox” for Outlook. The idea of “Focused Inbox”, is that Outlook will “learn” to automatically sort emails into two “tabs” in your inbox: “Focused” and “Other.” “Important” emails will be sorted into the “Focused” tab of your Inbox. Less important emails will be sorted into the “Other” tab of your Inbox.

Full documentation about Focused Inbox can be found at the link below:

Microsoft Focused Inbox documentation

A previous version of this feature, named “Clutter”, should be turned off. Steps to turn off “Clutter” can be found at the link below:

Microsoft documentation for turning off “Clutter”

OneDrive Files On-Demand

The newest version of OneDrive offers “Files On-Demand.”

With OneDrive Files On-Demand, you can:

– Save space on your device by storing files online only

– Set files and folders to be always available locally on your device

– See important information about files, such as whether they are shared

If you are running the latest version of Windows or macOS and the latest version of the OneDrive sync client application, OneDrive Files On-Demand is available to you.

Information about configuring OneDrive Files On-Demand is available on this web page:

Manage OneDrive sync options

Using Microsoft 365 for Shared UW NetIDs

Unless there is a specific reason not to, we recommend that all Shared NetIDs use UW Microsoft 365 (Office 365) for email. Some of the reasons are HIPAA and FERPA compatibility and the ability for us (or even you) to manage who has access to the email for this account. Here is how to make that happen.

  • Contact the iSchool IT Help Desk and tell us what your Shared NetID is and that you want to change the email forwarding to UW Microsoft 365 (Office 365).
  • We will then endorse this NetID for an UW Microsoft 365 (Office 365) license.
  • We will then ask you to make us an Admin for this NetID so that we can change the UW Email Forwarding.
  • Once the email forwarding has been changed, we will grant you access to the Exchange Online Mailbox for the NetID and walk you through the process of adding this account to Outlook or accessing it via OWA.

How to Create a Rule for Outlook or OWA

Sorting email into folders automatically can be a huge time saver and can keep you focused on the messages that demand your immediate attention. You can create rules to let Outlook or OWA (Outlook Web App) sort them into the folder of your choice. Rules can sort messages based on the sender, the subject, the recipient or a combination of various characteristics. When you are creating a rule for Outlook, make sure that:

RULES

  • If you have a UW Spam Gauge rule applied, always move the Spam rule to the top of your list of rules so that it is processed first;
  • All your rules are server-side unless you are creating rules for client only actions, such as coloring your emails or otherwise personalizing your email. You can make your rules on OWA to ensure it’s server-side.

Here is an article from Microsoft about how to make rules in Outlook:

https://support.office.com/en-us/article/manage-email-messages-by-using-rules-c24f5dea-9465-4df4-ad17-a50704d66c59

And one about how to make rules in OWA:

https://support.office.com/en-us/article/inbox-rules-in-outlook-edea3d17-00c9-434b-b9b7-26ee8d9f5622

UNREAD MAIL

Once you have rules in place that sort your email you need the ability to find them. This is best done using the Unread Mail Search Folder:

https://support.office.com/en-us/article/View-only-unread-messages-F2C8450C-9CD0-4037-A5D3-26F6946727CA

Connecting to SQL Server from an iSchool-provided computer

Connecting to SQL Server from an iSchool-provided computer

These instructions will allow you to connect to a Microsoft SQL Server using Windows Authentication (your UW NetID and password) from iSchool-provided faculty, staff, and lab computers, using SQL Server Management Studio (SSMS).

If you need to connect to a SQL Server from a personal computer, follow the instructions on this page.

How to connect to a SQL Server, using your UW NetID credentials, from an iSchool-provided computer (faculty, staff, lab computers):

1) Click the lower-left Windows icon, under Microsoft SQL Server Tools, right-click Microsoft SQL Server Management, mouse over More, click Open file location
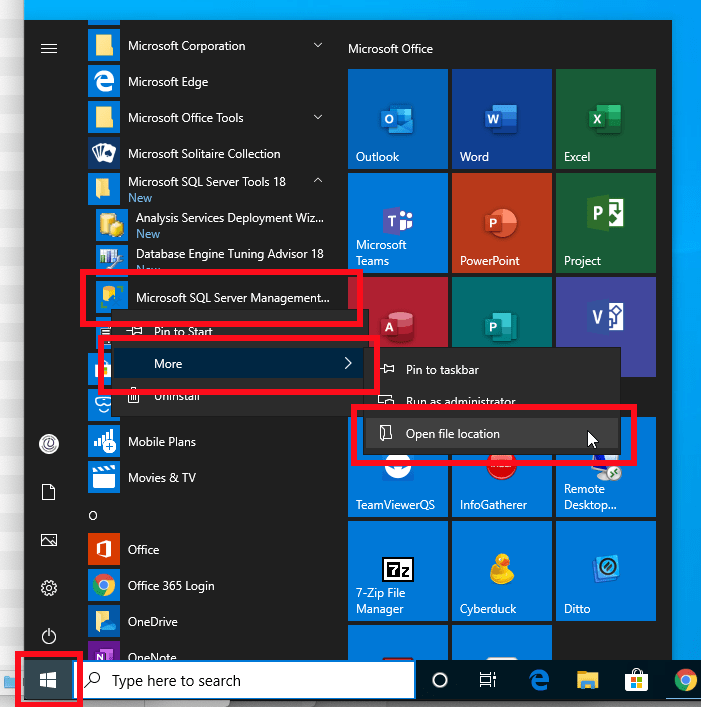
 ​

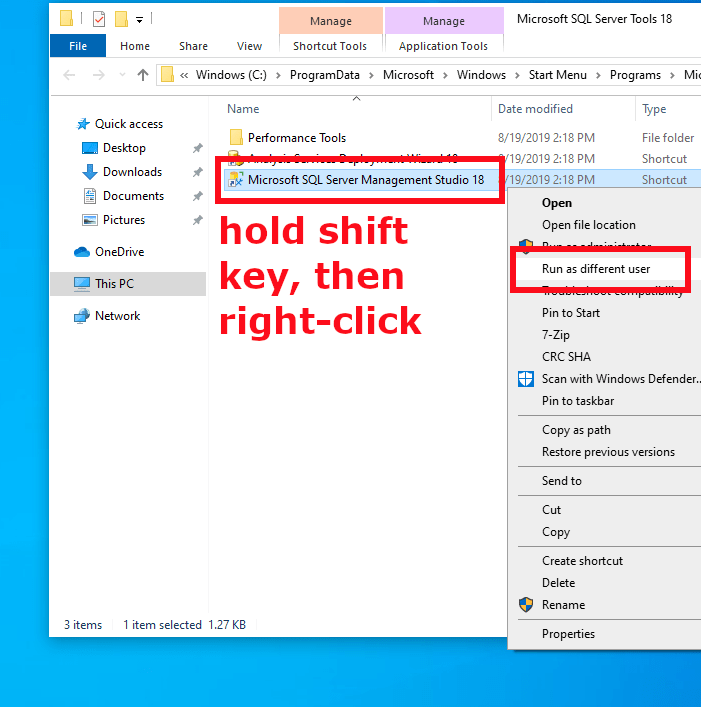
2) A new File Explorer window will open, hold the shift key (on the keyboard) then right-click shortcut to SQL Server Management Studio, click Run as different user

 ​

3) In the login window, use the following:

username: netid\your UW NetID
password: your UW NetID password

click OK

 ​

Note well: On lab computers, at this point, it may look like nothing is happening.  Wait.  It could be a few minutes before SSMS starts up.

When SSMS opens, for “User name”, you should see NETID\your UW NetID

 ​

Enter the server name to connect.

Connecting to a Microsoft SQL Server with UW NetID credentials from a personal computer

Connecting to a Microsoft SQL Server with UW NetID credentials from a personal computer

These instructions will allow you to connect to a Microsoft SQL Server using Windows Authentication (your UW NetID and password) from a personal computer, with SQL Server Management Studio (SSMS).

If you need to connect to a SQL Server from an iSchool-provided faculty, staff, or lab computer follow the instructions on this page instead.

You might need these instructions if you are taking, teaching, or TAing a course that requires you to connect to a SQL Server and you want to connect from your personal computer.

SSMS is available as a free download, from this website: SQL Server Management Studio (SSMS)

If you are connecting to a SQL Server that is not on the public network, please connect to the Husky OnNet VPN.

How to connect to a SQL Server, using your UW NetID credentials, from a personal computer:

1) Click the lower-left Windows icon, under Microsoft SQL Server Toolsright-click Microsoft SQL Server Management, mouse over More, click Open file location

2) A new File Explorer window will open, right-click SQL Server Management Studio, mouse over Send to, click Desktop (create shortcut)
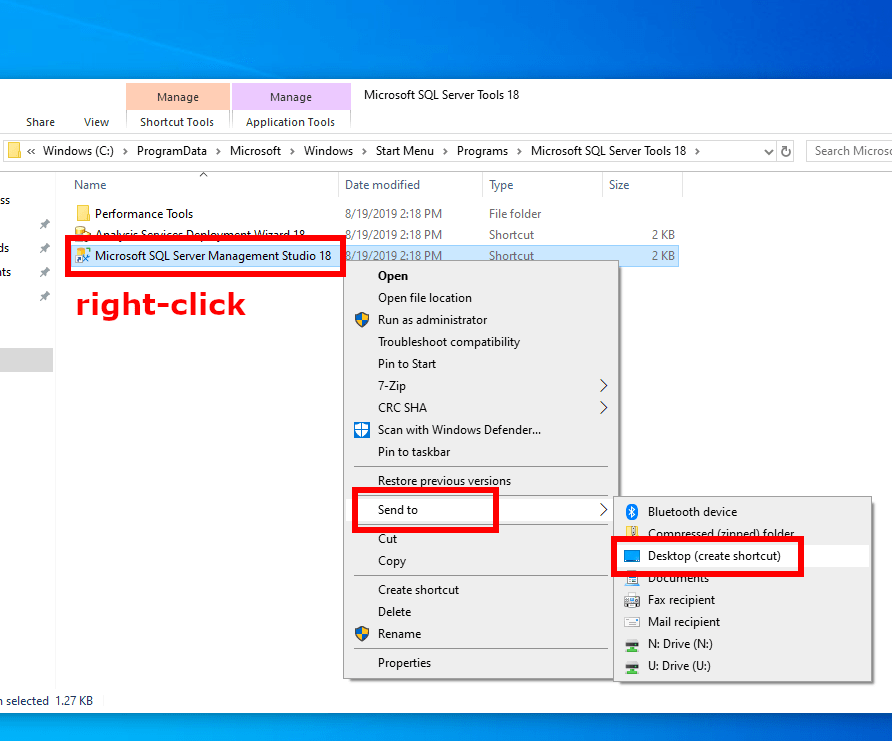
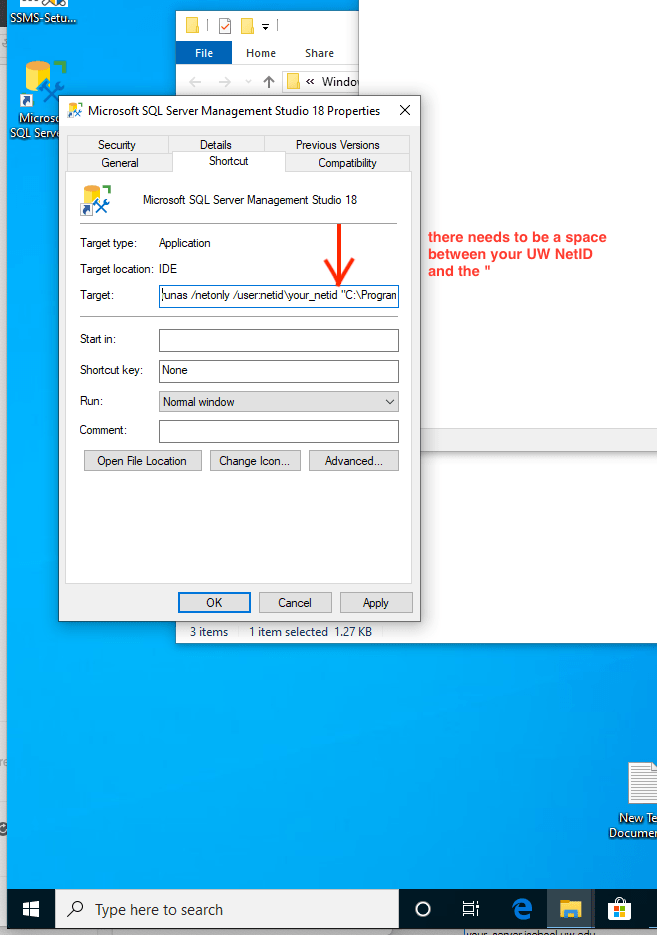
3) On your desktop, right-click the SSMS shortcut, click Properties

4) In the “Target” box, add the following to the beginning of what is already there:

runas /netonly /user:netid\your_UW_NetID 

Note well: There needs to be a space between your UW NetID and the “.

Click OK
5) The icon of the shortcut on the desktop will change.  This is expected.

Steps 1 – 5 are initial setup that only need to happen once.

6) Double-click the shortcut, a command window will open and ask for your UW NetID password, type it, then hit Enter or Return

SSMS should open with a “Connect to server” window.  The “User name:” field will display your computer’s name and username, but you can safely ignore that.  You will be connecting to the server, with the UW NetID credentials used when creating the shortcut above.

7) Enter the server address you want to connect to (your instructor needs to give you this information), click Connect

Create SharePoint List from Excel Spreadsheet

The advantages of using a SharePoint list instead of just uploading an Excel file to SharePoint is that multiple people can edit the file simultaneously, you avoid version sprawl by only having one centrally located version of the list and you can always download the list as a file if needed.

Here are the steps.

  • Make sure your Excel file is saved in the newest format, it needs to have a .XLSX extension. If it does not, simply save it in this newer format. The old format is .XLS.
  • Browse to your SharePoint site using Internet Explorer. This task requires IE as it is the only browser that works with ActiveX controls.
  • Follow these steps here using Internet Explorer:

https://support.office.com/en-us/article/Create-a-list-based-on-a-spreadsheet-380cfeb5-6e14-438e-988a-c2b9bea574fa

Office 365 SLA (Service Level Agreement)

Many of us expect email to be delivered instantly. Although it is usually very fast, there are many factors that affect the delivery time and most of us have unreasonable expectations based on the service that we use. This article will hopefully explain some of the things that can affect the delivery of email and spell out the level of service guaranteed by Microsoft.

In summary.

  • The service design goal of Exchange Online is the delivery of email in less than one minute, but this is an average over a month and not for any one email message.
  • Broken is considered an average delay of greater than 10 minutes over a month, again this is an average and does not apply to any individual email message.
  • Any one message is considered delayed after three hours at which point the sender should get an information email.
  • Any one message that is not delivered in three days is failed and the sender will get a NDR (Non-Delivery Report).

There are also other factors that affect the delivery of email.

  • Exchange on-premise adds additional delay for Exchange Online users, this is usually under one minute (20-30 seconds seems normal) but can be up to five minutes. Currently, because of a requirement of a small number of users, all Exchange Online email is routed through an on-premise Exchange server. If there is a delay, this is usually where it occurs rather than with any Microsoft infrastructure.
  • That said, routing email through an on-premise Exchange server has mitigated numerous other risks with corresponding cost reductions that would have been incurred by addressing them. It also lets the UW comply with ISO 27001, ISO 27018, Safe Harbor, SSAE16 SOC1 Type II, SOC2 Type II and FISMA. Very few cloud-only (or even any) email providers can claim this.

BitLocker

The iSchool has BitLocker configured on all Faculty, Staff, and PhD student Windows computers.  BitLocker is a Microsoft disk encryption technology.  Once BitLocker is turned on, your UW NetID credentials will continue to allow you to sign into the computer; you should see no noticeable change in behavior.

If you are ever prompted for a BitLocker Recovery Key, please contact the iSchool IT Help Desk.

More about BitLocker can be found at the websites below.

https://docs.microsoft.com/en-us/windows/device-security/bitlocker/bitlocker-overview

https://en.wikipedia.org/wiki/BitLocker