Web browsers not loading websites, Sophos Web Protection

Web browsers not loading websites, Sophos Web Protection

Some users with Sophos installed on macOS computers have reported the following issue:

-All web browsers do not load any and all web pages.

-Other network activity like email and video conferencing continue to work.

Troubleshooting 

Follow the steps for one workaround that has “fixed” the issue in the past:

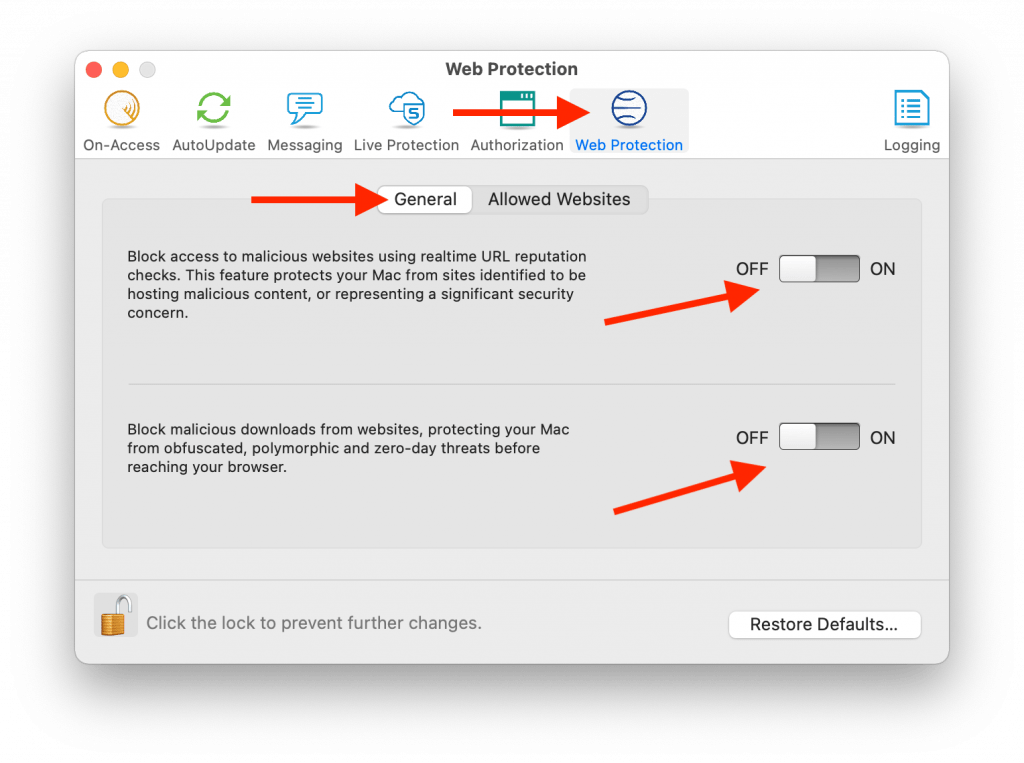
1) Click the Sophos icon in the top-right menu bar, click Open Preferences….

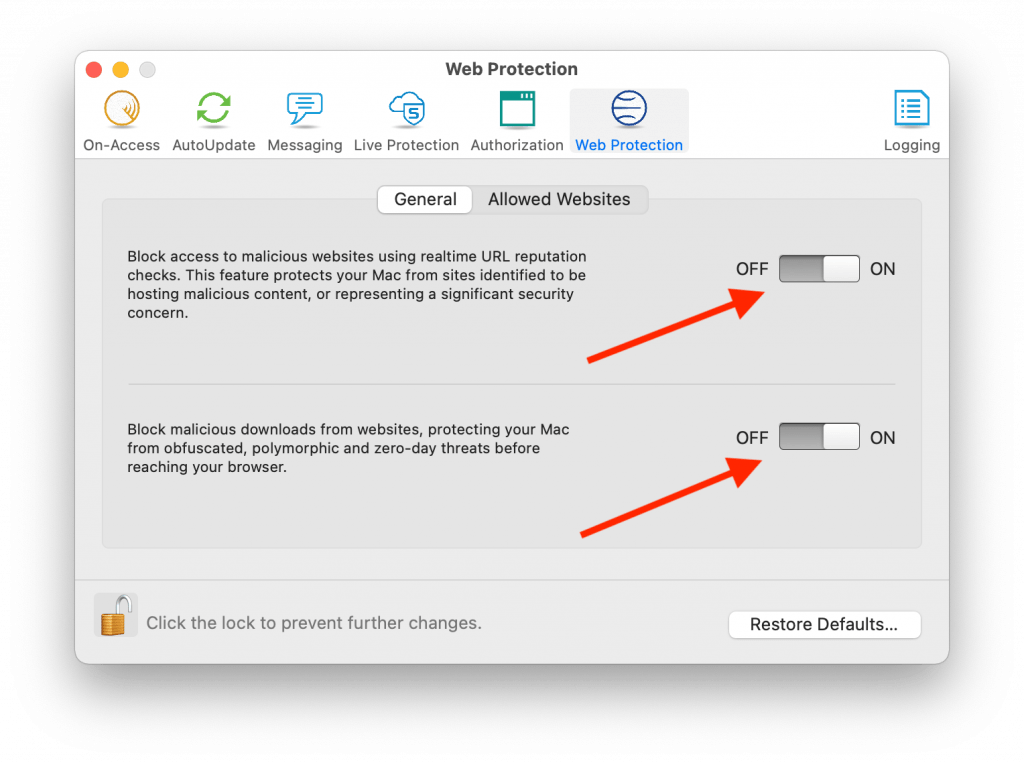
2) Click Web Protection, click General, click both switches OFF.

3) Switch to any web browser application. Load any website. Confirm websites and pages load as expected.

4) Back in Sophos, click both Web Protection switches back ON. Switch back to a web browser and confirm web pages continue to load and work as expected.

Outlook shared calendar synchronization errors

Outlook shared calendar synchronization errors

The steps below can be done if you see multiple “synchronization errors” due to adding a shared calendar to Outlook on a Windows computer.

“Synchronization errors” found in the “Sync Issues” folder:

will indicate some wording about:

“Synchronizing server changes in folder ‘Colleague Name – Calendar’
Downloading from server ‘https://outlook.office365.com/’
Error synchronizing folder
[80070005-508-80070005-560]
You do not have sufficient permission to perform this operation on this object. See the folder contact or your system administrator”

Steps to take to attempt to resolve this issue:

1) Quit Outlook.

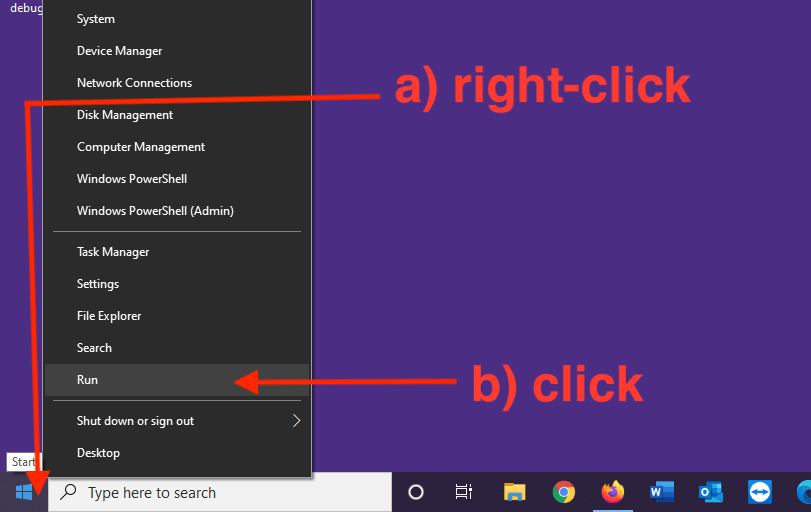
2) Right-click the lower-left Windows Start icon, click Run.


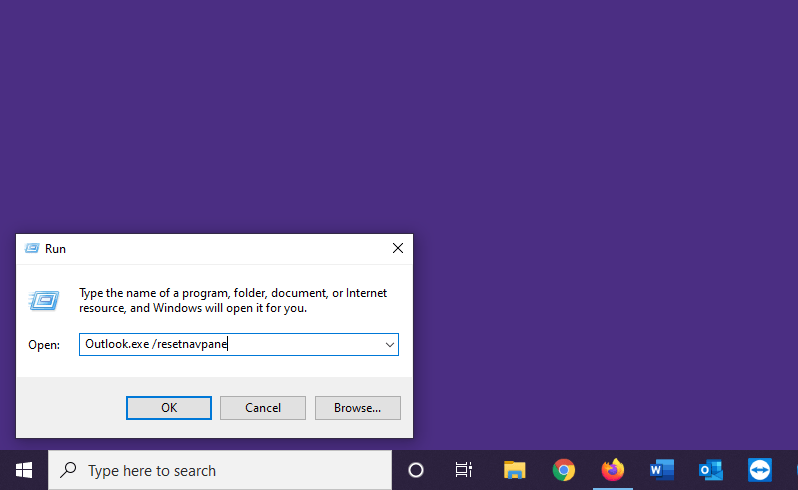
3) In the “Open:” field of the “Run” window, type:

Outlook.exe /resetnavpane

Click OK.

4) Outlook will open. Let Outlook remain open for a while; 20, 30 seconds. Quit Outlook.

5) Right-click the lower-left Windows Start icon, click Run.

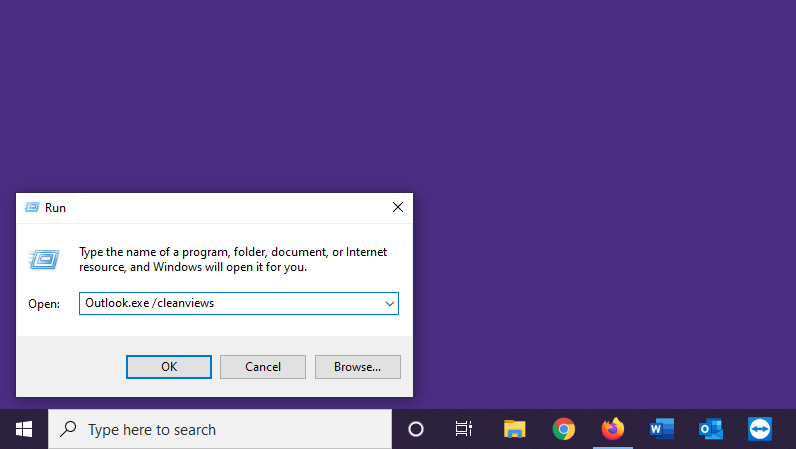
6) In the “Open:” field of the “Run” window, type:

Outlook.exe /cleanviews

Click OK.

7) Outlook will open. The synchronization errors should clear up.

Microsoft Office Outlook default mail client error message

Microsoft Office Outlook default mail client error message

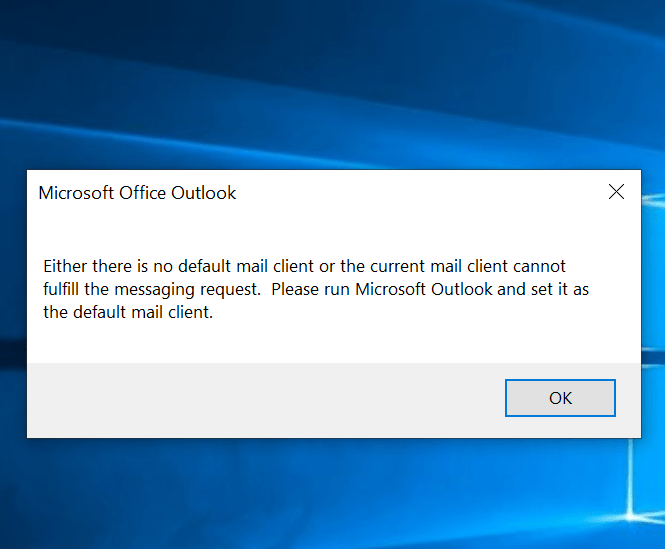
If you are using an iSchool-issued Windows laptop and continually seeing a pop-up message, with the wording “Either there is no default mail client or the current mail client cannot fulfill the messaging request. Please run Microsoft Outlook and set it as the default mail client.”, follow the steps below:


1) Quit Outlook.


2) If you are off campus, connect to the Husky OnNet VPN by following these steps:

https://itconnect.uw.edu/connect/uw-networks/about-husky-onnet/use-husky-onnet/#windows


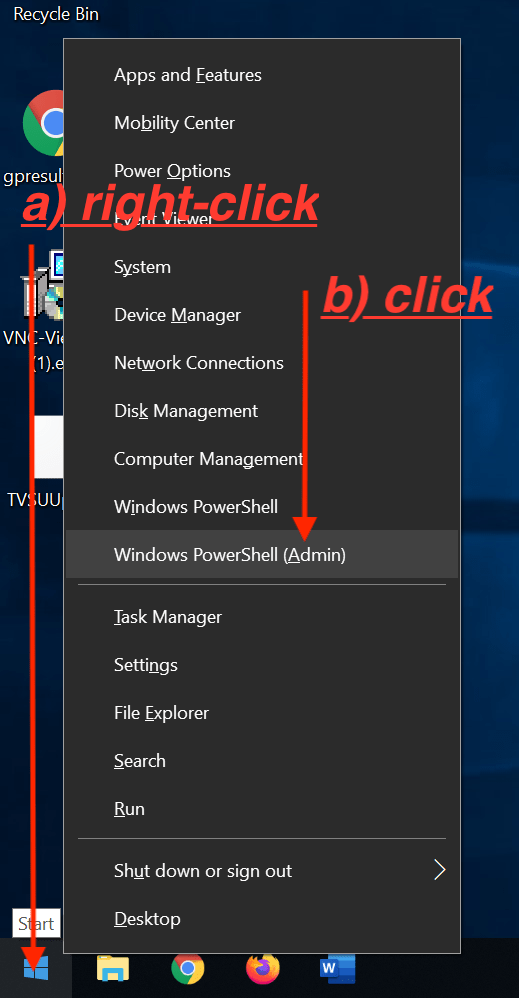
3) Right-click the lower-left Windows icon, click Windows PowerShell (Admin), click Yes.


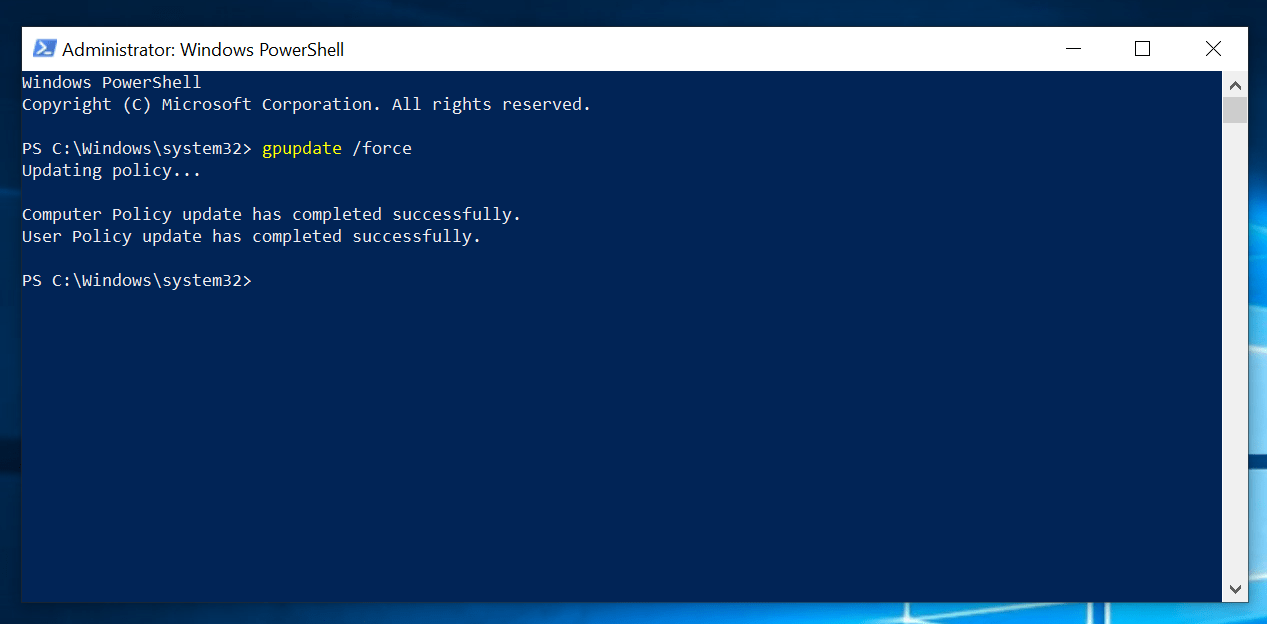
4) In the “PowerShell” application window that opens, type:

gpupdate /force

press “Enter” on your keyboard

after a few seconds, you should see wording indicating “Computer Policy” and “User Policy” updated successfully.


If you see wording that the “Computer Policy” and “User Policy” updated successfully, the Outlook “…no default mail client…” message should stop appearing.

Focused Inbox

Microsoft introduced “Focused Inbox” for Outlook. The idea of “Focused Inbox”, is that Outlook will “learn” to automatically sort emails into two “tabs” in your inbox: “Focused” and “Other.” “Important” emails will be sorted into the “Focused” tab of your Inbox. Less important emails will be sorted into the “Other” tab of your Inbox.

Full documentation about Focused Inbox can be found at the link below:

Microsoft Focused Inbox documentation

A previous version of this feature, named “Clutter”, should be turned off. Steps to turn off “Clutter” can be found at the link below:

Microsoft documentation for turning off “Clutter”


OneDrive Files On-Demand

The newest version of OneDrive offers “Files On-Demand.”

With OneDrive Files On-Demand, you can:

– Save space on your device by storing files online only

– Set files and folders to be always available locally on your device

– See important information about files, such as whether they are shared

If you are running the latest version of Windows or macOS and the latest version of the OneDrive sync client application, OneDrive Files On-Demand is available to you.

Information about configuring OneDrive Files On-Demand is available on this web page:

Manage OneDrive sync options

Create SharePoint List from Excel Spreadsheet

The advantages of using a SharePoint list instead of just uploading an Excel file to SharePoint is that multiple people can edit the file simultaneously. You avoid version sprawl by only having one centrally located version of the list and you can always download the list as a file if needed.

Here are the steps:

  • Make sure your Excel file is saved in the newest format, it needs to have a .XLSX extension. If it does not, simply save it in this newer format. The old format is .XLS.
  • Browse to your SharePoint site using Internet Explorer. This task requires IE as it is the only browser that works with ActiveX controls.
  • Follow these steps here using Internet Explorer: Create a list based on a spreadsheet.

Kubi

Kubi is a video conferencing tool. A Kubi robot is an iPad with a motorized tablet stand which will pivot and rotate. Using a Kubi robot allows the videoconferencing participant look around the meeting or classroom and interact in real-time with classmates or colleagues.

The Online Learning Team maintains a guide for this tool, which is available on Canvas via the iSchool Online Learning Support site. You can access the guide here.

The Online Learning Team provides streaming support for classes and events. If you would like to request this, please fill out the streaming support request form.

If you have any questions, you may reach out to the Online Learning Team by emailing olt@uw.edu.

Google Drive

Google Drive is part of the UW Google Apps suite. Google Drive is a cloud-based storage area that can be used to store any kind of file. It can also be used for collaboration on Google Docs, Sheets and Slides.

The Online Learning Team maintains a guide for this tool, which is available on Canvas via the iSchool Online Learning Support site. You can access the guide here.

If you have any questions, you may reach out to the Online Learning Team by emailing olt@uw.edu.

Google Hangouts

Google Hangouts a video conferencing tool that lets you connect live with up to ten people over mic and webcam. You can also share slides and documents.

Google Hangouts is linked to a user’s Google profile, and because UW uses Google Apps for Education, you can use your yournetid@uw.edu account to access Hangouts.

The Online Learning Team maintains a guide for this tool, which is available on Canvas via the iSchool Online Learning Support site. You can access the guide here.

The Online Learning Team provides streaming support for classes and events. If you would like to request this, please fill out the streaming support request form.

If you have any questions, you may reach out to the Online Learning Team by emailing olt@uw.edu.

Subscribe a UW Mailman list to a UW SharePoint Announcement List

Sometimes it’s easier to send SharePoint Announcements out to a Mailman list that your users are already subscribed to rather than trying to get everyone to browse to your Announcement List and subscribe themselves or to manually subscribe everyone yourself.

Another benefit of this method is subscribers of your mailing list are already used to receiving messages from the list so this won’t be such a new thing (although the email address that posts these messages will be new).

Lastly, SharePoint will archive the announcements in a way that is easier to browse than a Mailman archive.

Here is how iSchool IT did this.

Create a Shared UW NetID

  • Ideally, you will create a new/unique NetID just for this purpose. You don’t want this email address being used for anything else and you don’t want this SharePoint/Mailman relationship to suddenly break for any reason. A dedicated NetID for each Mailman list is best.
  • You can get a Shared UW NetID here:

https://uw.service-now.com/sp?id=sc_cat_item&sys_id=61fc4ab50fc3e7006cad419ce1050e78

  • Make sure this NetID has a strong password and record it somewhere, it only has one function so you won’t need to remember it once this has been configured.

Forward UW email

Provision Office 365

If your SharePoint Announcement List is hosted on SharePoint Online, you will need to provision the Office 365 service for the Shared UW NetID. You can do that here: https://provision.uw.edu/

If you don’t provision the service, Office 365 will not recognize the account and will see it as being outside of the UW domain. Provisioning should not be required if your SharePoint List is on-premise.

Add the NetID to SharePoint

You can’t subscribe to a SharePoint Announcement List unless you have access to it, the easiest way to grant these shared accounts access to the List is to add the NetID you just provisioned directly to this list with the Read permission.

Subscribe the NetID to the Announcement List

  • Browse to your SharePoint Announcement List using using the NetID you just provisioned.
  • In the Modern view, click the ellipsis in the top nav > Alert me
  • In the Classic view, click the List tab and then Alert Me > Set alert on this list
  • We left all the defaults alone since we don’t post announcements very often but you are of course free to adjust any variable or interval as it best suits your needs.
  • Click OK to save your alert preferences.

Allow the Announcement List to post to your Mailman list

  • Browse to the administrative interface of your Mailman list with an account that is an Administrator for this list.
  • Click Privacy options > Sender filters

If your SharePoint site is on SharePoint Online (https://uwnetid.sharepoint.com/)

  • Add no-reply@sharepointonline.com to the “List of non-member addresses whose postings should be automatically accepted.” field and submit your changes.

If your SharePoint site is on premise (https://sharepoint.washington.edu/)

  • Add a_spnotification@u.washington.edu to the “List of non-member addresses whose postings should be automatically accepted.” field and submit your changes.

Qualify alias as explicit To or Cc

  • Browse to the administrative interface of your Mailman list with an account that is an Administrator for this list.
  • Click Privacy options > Recipient filters
  • Add the Shared UW NetID email address to the “Alias names (regexps) which qualify as explicit to or cc destination names for this list.” Be sure to use the exact same format (@uw.edu, @u.washington.edu, etc.) as you did when you set up the forwarding.

Done! Now every time you post a new SharePoint Announcement to your Announcement List it will be sent to your Mailman list. Feel free to test before you need it, we suggest making the subject and body of your test post an obvious test so users recognize this.

Caveats

  • If you are not creating a new shared UW NetID and instead recycling an old one and find that it is not being recognized by Office 365 even after you provision the Office 365 service for it, you might need to reset the password. UW-IT has a policy that all shared accounts (and perhaps all accounts?) that are not logged into for a year are deactivated. Resetting the password will activate it again. Once this has been done it will take a couple of hours for Office 365 to recognize it.
  • We also recommend that you add these dedicated accounts to this UW Group here (using the UW Groups web interface) to prevent them from getting deactivated in the future.
    • u_msinf_delou_<ou-name>_accountsthatdonotlogin
    • Where “ou-name” is the name of your delegated OU.