Panopto

Panopto is a lecture capture tool that instructors can use to record and publish presentations online. It is able to capture audio, webcam video, PowerPoints, and desktop screens. It is a good tool to record narrated PowerPoints and computer tutorials.

The Online Learning Team maintains a guide for this tool. You can access the guide here.

If you have any questions, you may reach out to the Online Learning Team by emailing olt@uw.edu.

Screencast-o-Matic

Screencast-o-matic is a screen capture software that can be used to create video from your screen (i.e. short lectures or course tours).

The Online Learning Team maintains a guide for this tool, which is available on Canvas via the iSchool Online Learning Support site. You can access the guide here.

If you have any questions, you may reach out to the Online Learning Team by emailing olt@uw.edu.

VoiceThread

VoiceThread is a collaborative, multimedia slide show that holds images, documents, and videos and allows people to navigate pages and leave comments. VoiceThread is typically used as a presentation tool.

The Online Learning Team maintains two guides for this tool, which are available on Canvas via the iSchool Online Learning Support site. You can access the first guide, which provides an overview of the software, here. You can access the second guide, which discusses integration of VoiceThread with Canvas, here.

If you have any questions, you may reach out to the Online Learning Team by emailing olt@uw.edu.

Husky OnNet VPN Service

The Husky OnNet VPN application is installed on all iSchool issued computers. Search your computer for the application named “BIG-IP Edge Client.” For more detailed instructions, refer to “Run” sections on this page:

https://itconnect.uw.edu/connect/uw-networks/about-husky-onnet/use-husky-onnet/

Read on for more information about the Husky OnNet VPN.

Husky OnNet, offered by UW-IT, is a client-based, SSL (Secure Sockets Layer) VPN (Virtual Private Network) service. Husky OnNet provides individuals using Mac OS and Windows devices with a secure, temporary connection to the UW network from off-campus locations. Users connecting their device to an off-campus network (e.g., from home, a conference, a café, at the airport, etc.) can use Husky OnNet to connect to the UW network to access resources as if they were physically on campus.

If you are off campus:

you need to be connected to Husky OnNet to:
– access the N drive via File Explorer or Finder
– use the Avaya telephone software
– connect to certain class and research related servers
access library databases and journals

you do not need to be connected to Husky OnNet to:
– connect to your iSchool Windows computer using the iSchool Remote Desktop Gateway
– access your UW email
– access the iSchool SharePoint Intranet
– access the Internet

To use Husky OnNet, you need to have the application installed on your computer. There is an application for both Mac OS and Windows.

If you have an iSchool issued computer, you already have the Husky OnNet application installed.

If you do not have the application installed, click the link below to download the application installer:

Download the Husky OnNet application

UW-IT maintains a web page with information about installing and running the Husky OnNet VPN application:

https://itconnect.uw.edu/connect/uw-networks/about-husky-onnet/

More Husky OnNet resources from UW-IT:

Husky OnNet frequently asked questions

Recover a deleted Contact in Outlook

Sometimes we delete things accidentally and sometimes we even empty the Deleted Items folder before we figure out what we did. Fortunately, if you realize what you have done within a few days, there is a recourse.

Follow these instructions:

https://support.office.com/en-us/article/Recover-a-deleted-contact-in-Outlook-51c83288-6888-4dcd-8c99-4932daabf643?ui=en-US&rs=en-US&ad=US

Locked printing with Ricoh printers

Locked printing with Ricoh printers

Locked printing with Ricoh printers

Instructions below are for using a security function on Ricoh printers allowing users to “lock” or hold their print until they are physically in front of the printer to “release” the actual printed piece of paper.

The instructions below are applicable to the following printers:

Ricoh in Bloedel Hall 095 (BLD-095-RicohMPC4504)
Ricoh in Gerberding Hall B054L (GRB-B054L-RicohIMC3500)
Ricoh in Mary Gates Hall 015 (MGH-015-RicohMPC4504)
Ricoh in Mary Gates Hall 095 (MGH-095-RicohMPC307)
Ricoh in Mary Gates Hall 330 (MGH-330-RicohMPC4504)
Ricoh in Mary Gates Hall 370A (MGH-370A-RicohMPC4504)
Ricoh in Mary Gates Hall 420 (MGH-420-RicohIMC4500)
Ricoh in Tower (TWR-RicohMPC4504)

Windows
Mac

locked printing in Windows

(Word is used in the example below. However, this option works with Excel and other programs.)

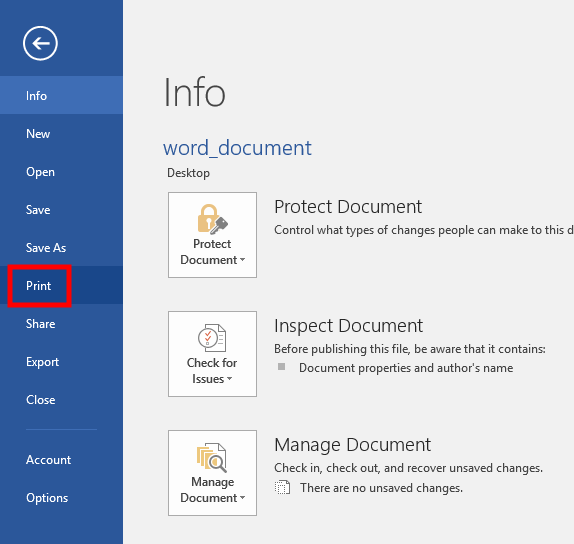
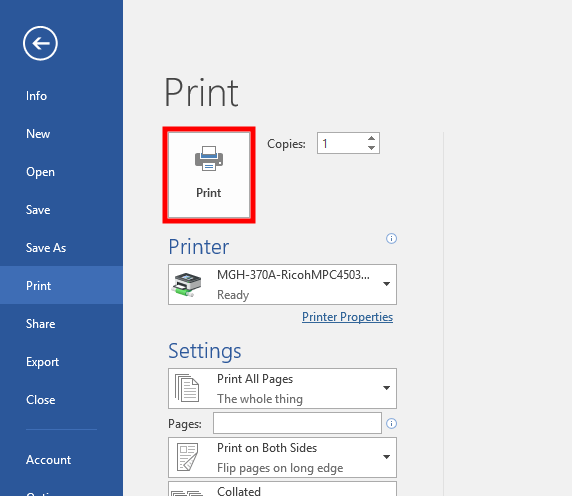
01) click File
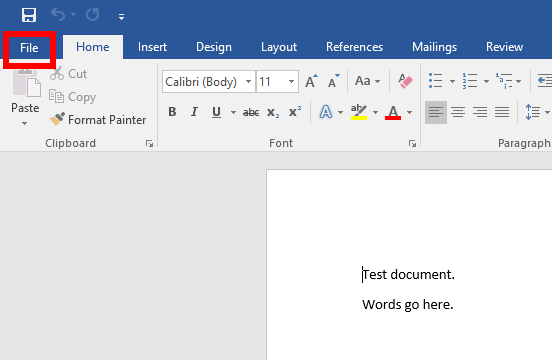
 

02) click Print
 

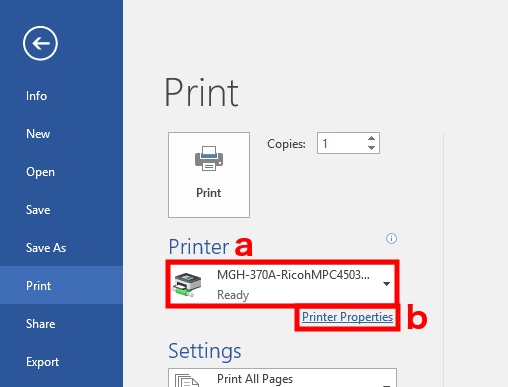
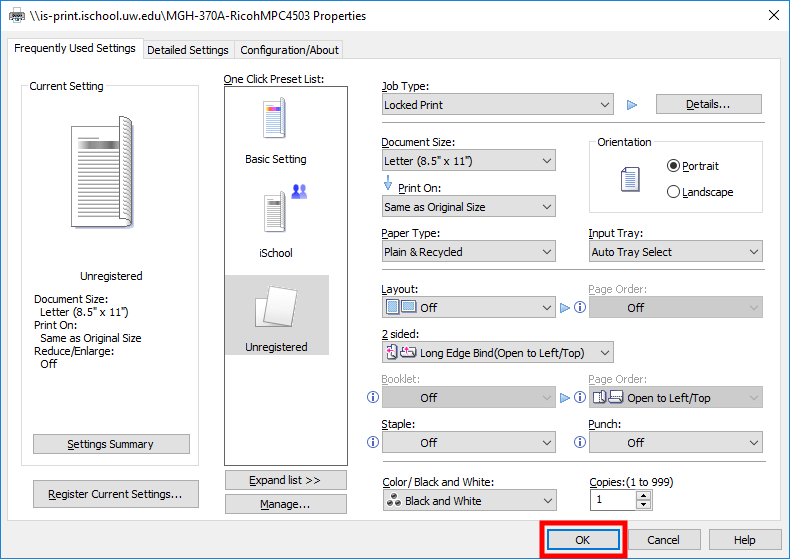
03) select one of the printers listed above, click Printer Properties
 

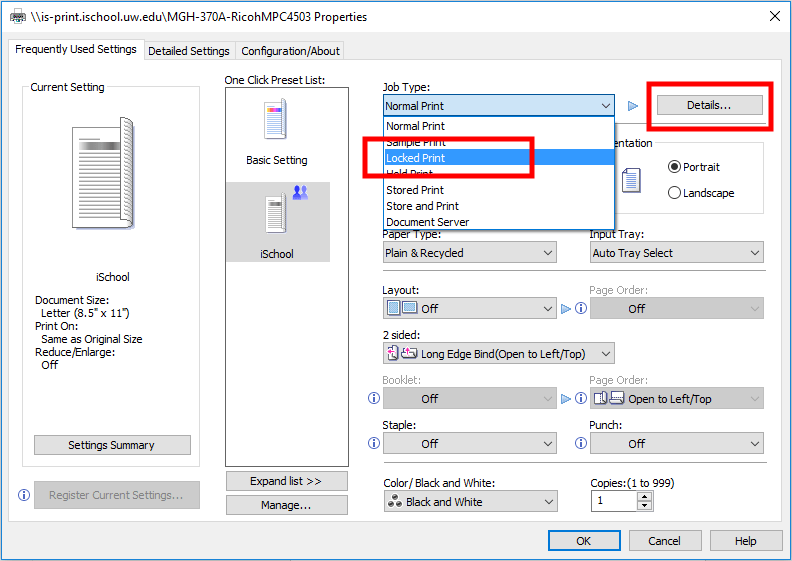
04) from the “Job Type:” drop-down, select Locked Print, click Details…
 

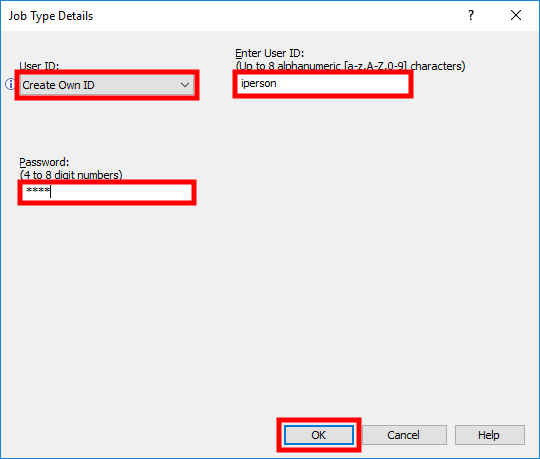
05) in the Job Type Details window, use the following settings:

User ID: use Create Own ID
Enter User ID: use your UW NetID
Password: use any number with 4 to 8 digits, it must be memorable to you, you will need to type in this number while physically at the printer

click OK
 

06) click OK
 

07) click Print
 

At this point, the rest of the steps need to be done while at the printer.

08) (on the Ricoh printer interface) press Printer
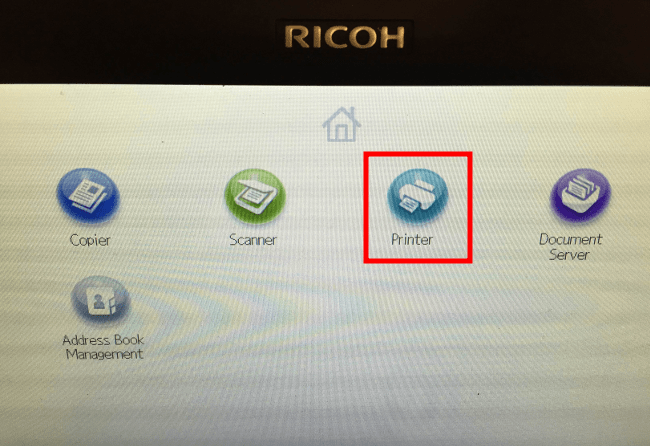
ricoh_printer_button


09) press Print Jobs

ricoh_print_jobs


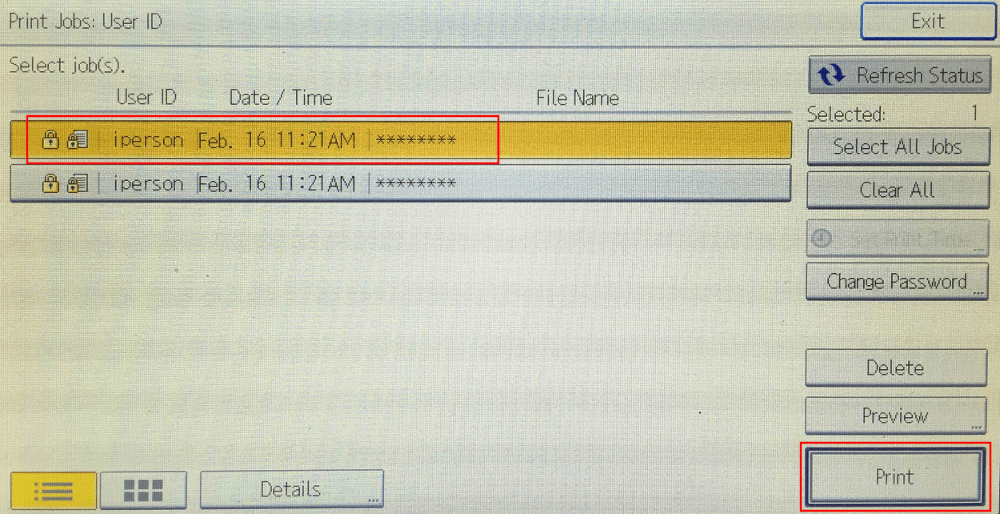
10) select the User ID you created in step 05
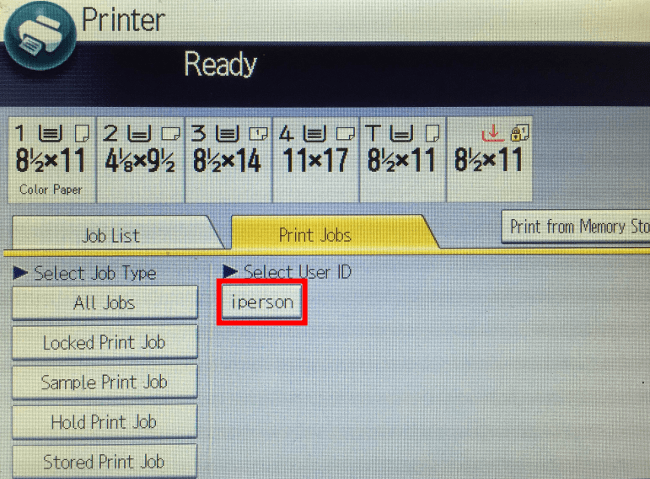
ricoh_user_id


11) select the correct print job, press Print
ricoh_user_id_print_job


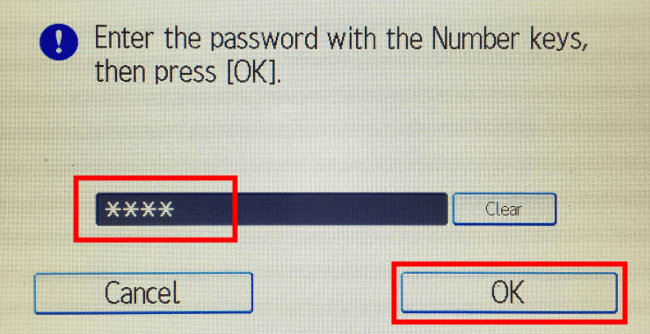
12) enter the password you created in step 05, press OK
ricoh_print_job_password


13) change the quantity of print copies desired if necessary (1 copy is default), press Print

ricoh_print_button


locked printing in Mac OS

(Word is used in the example below. However, this option works with Excel and other programs.)

01) click File, click Print…

mac_word_file_print


02) select any printer listed above from the “Printer:” drop-down, select Job Log from the third drop-down
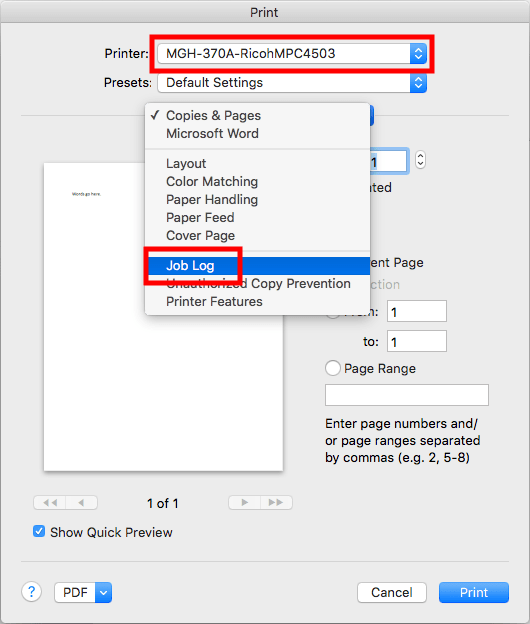
 

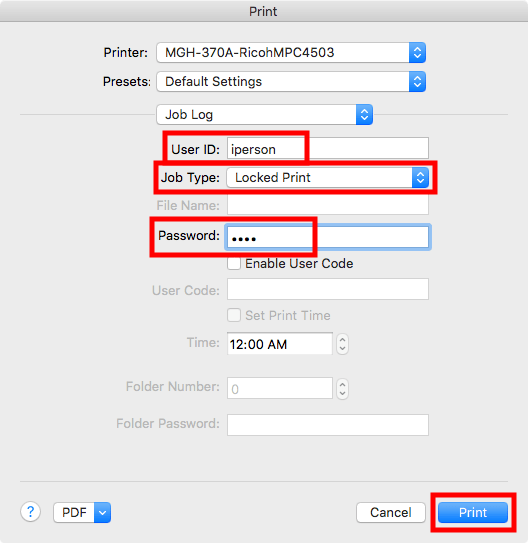
03) for “Job Type:” select Locked Print, use the following settings:

User ID: use your UW NetID
Password: use any number with 4 to 8 digits, it must be memorable to you, you will need to type in this number while physically at the printer

click Print
 

At this point, the rest of the steps need to be done while at the printer.

04) (on the Ricoh printer interface) press Printer

ricoh_printer_button


05) press Print Jobs

ricoh_print_jobs


06) select the User ID you created in step 03

ricoh_user_id


07) select the correct print job, press Print

ricoh_user_id_print_job


08) enter the password you created in step 03, press OK

ricoh_print_job_password


09) change the quantity of print copies desired if necessary (1 copy is default), press Print

ricoh_print_button

Driver, BIOS, and firmware updates

Driver, BIOS, and firmware updates

If a specific hardware part of your computer is not working correctly, updating “drivers”, “BIOS”, or “firmware” is worth trying to attempt to fix the problem.

Before proceeding with the instructions, save whatever documents you are working on. You will likely need to restart your computer to install updates.

My computer is a:

iSchool issued Lenovo


update drivers on an iSchool issued Lenovo

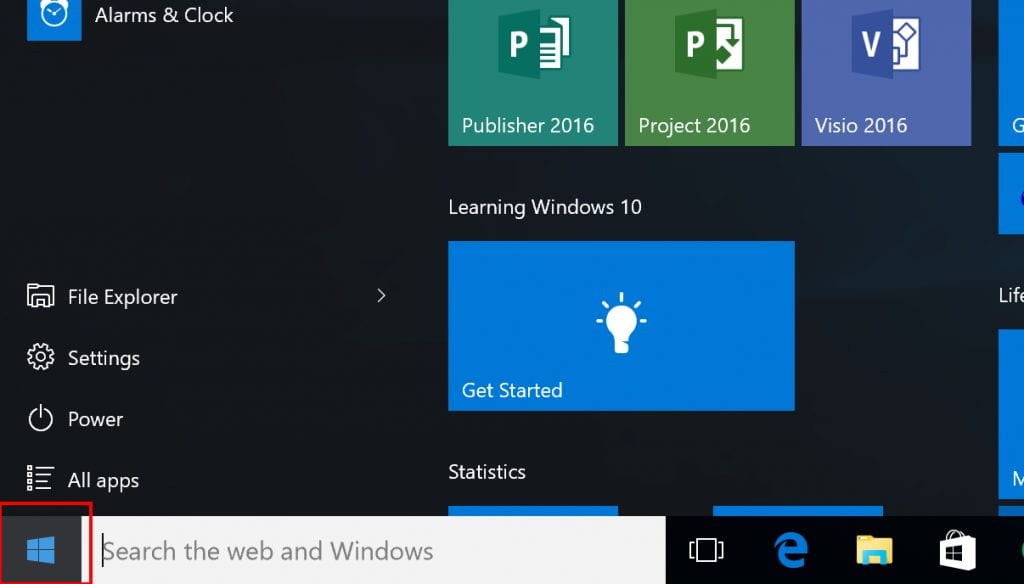
1) Click the lower Windows icon to bring up the Start menu.


2) Start typing the words “system update.” Click the System Update icon to start the application.

search_for_system_update


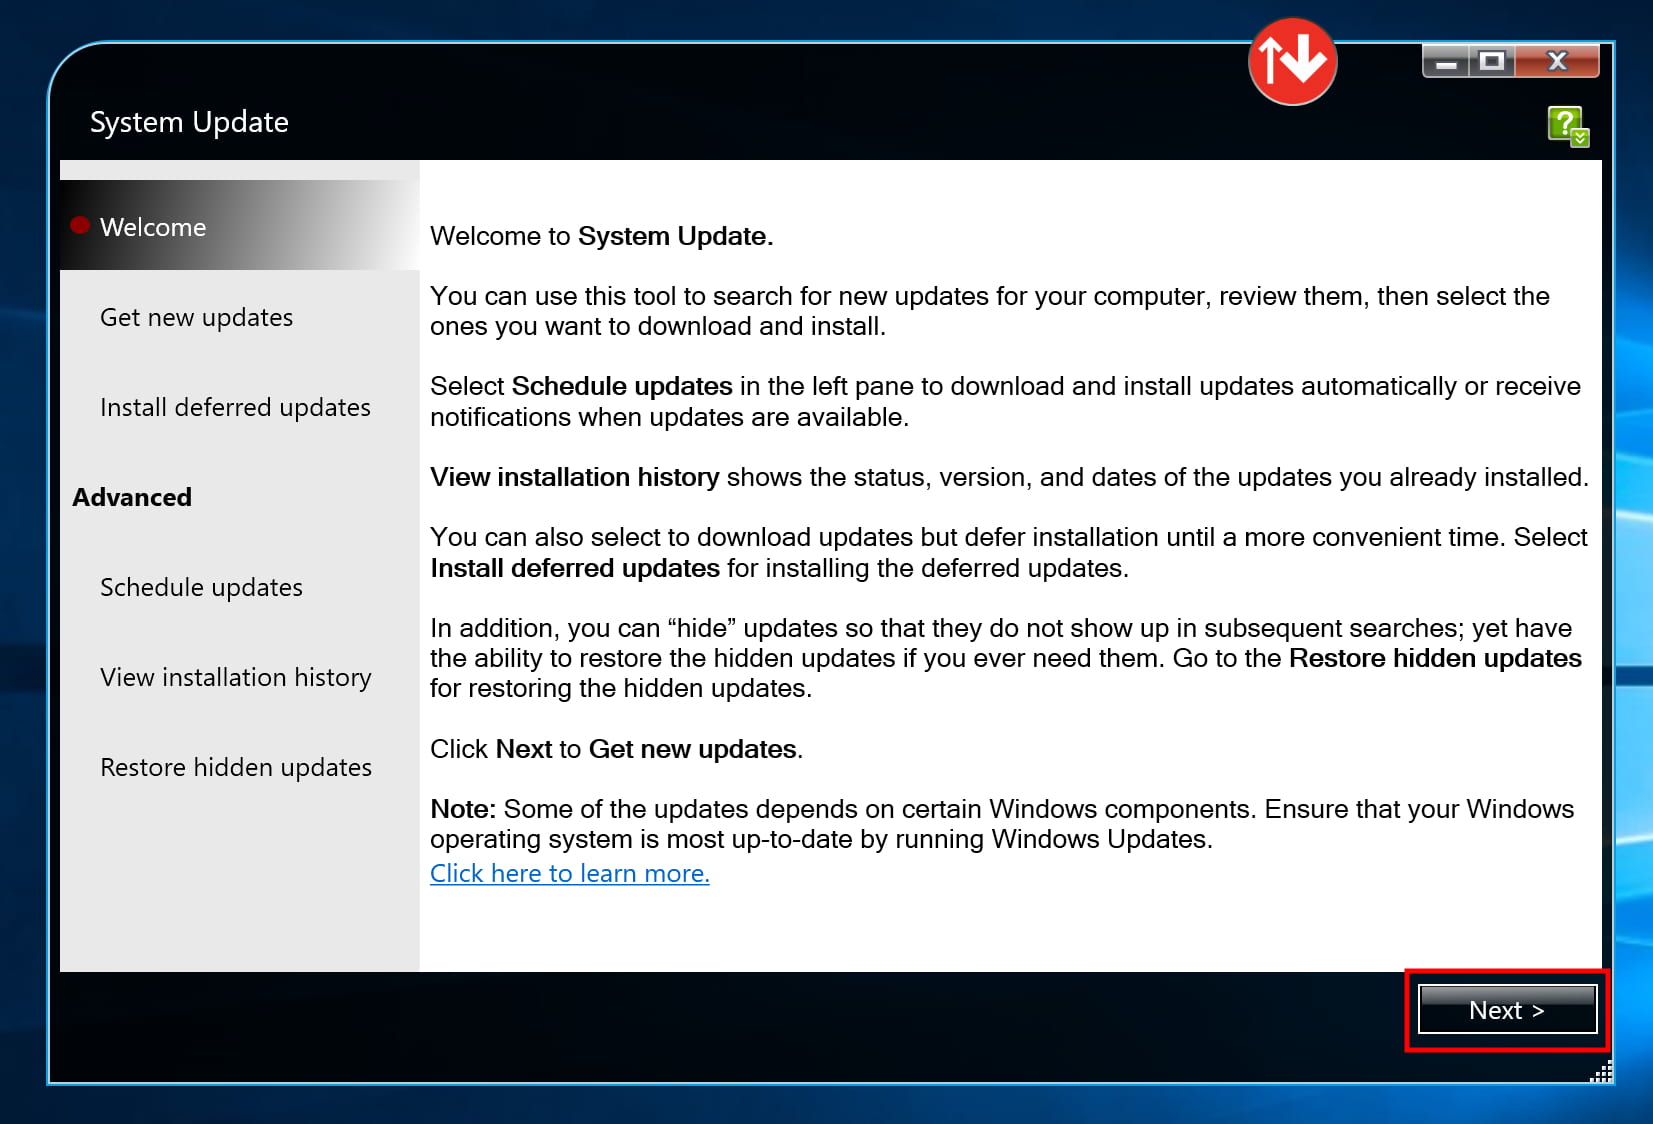
3) Click Next, the application will search for updates applicable to your computer. If there is an update available for the Lenovo System Update application itself, follow the on-screen instructions to apply the update.

system_update_next


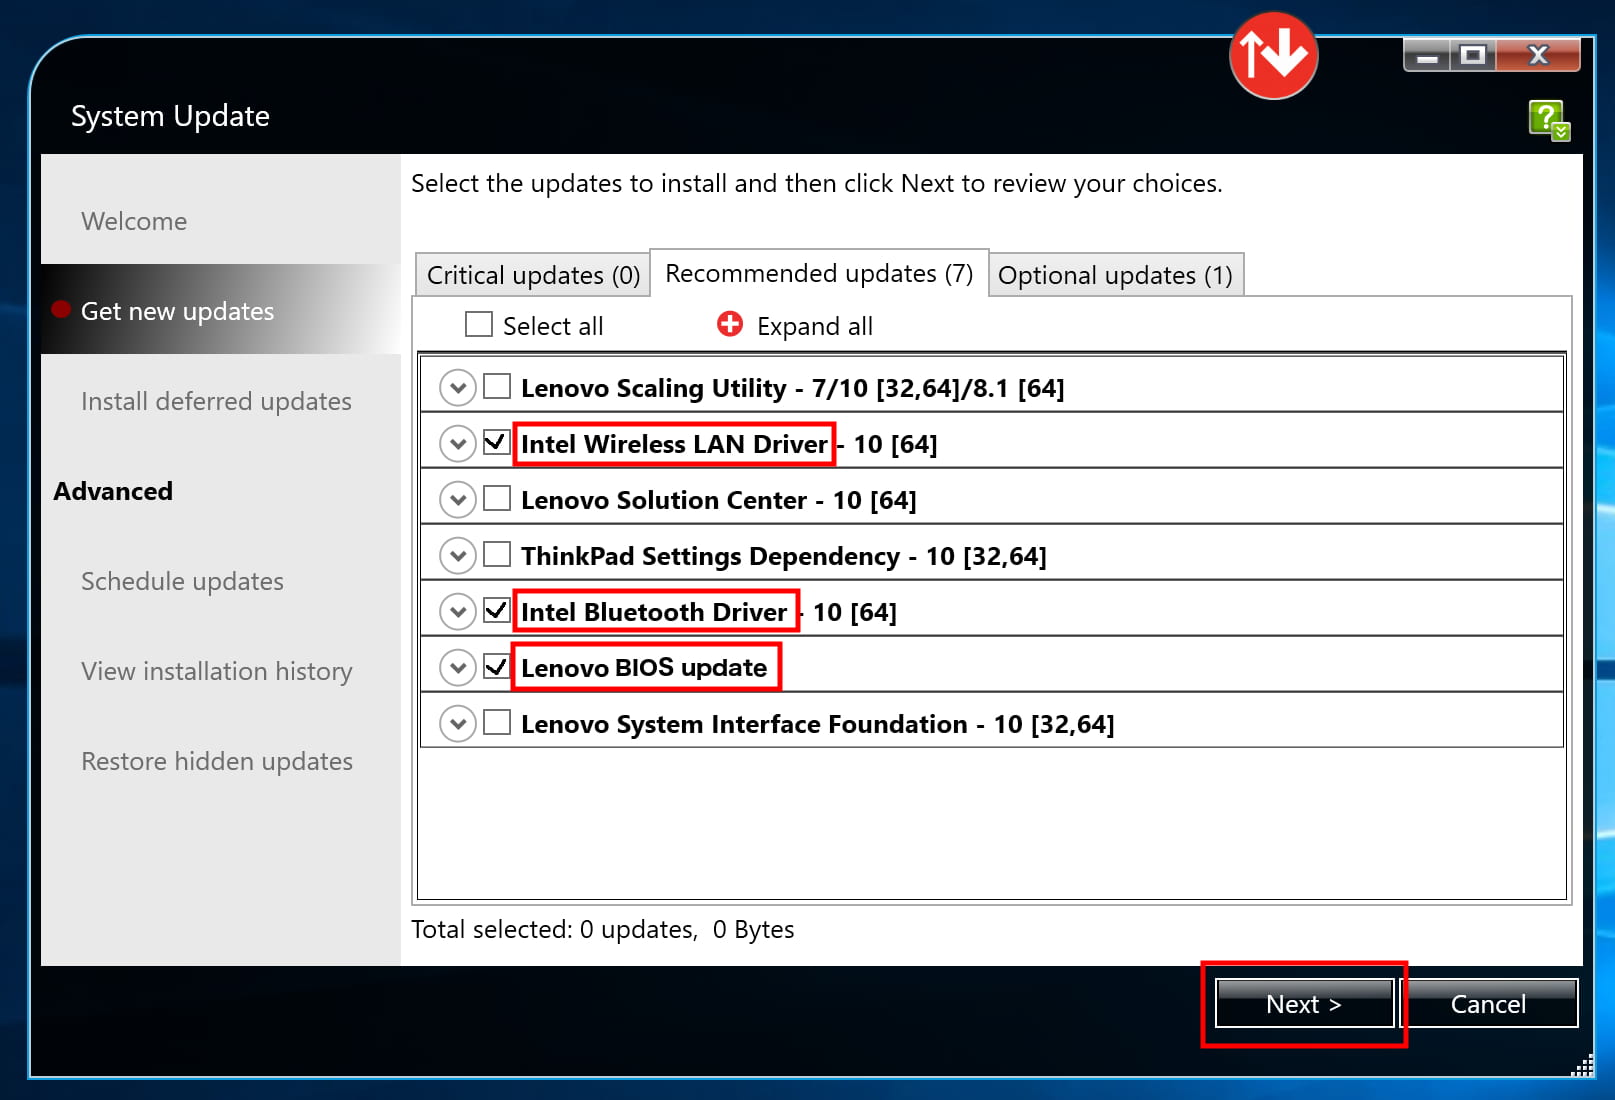
4) Once search results appear, for the “Critical updates” and “Recommended updates” sections, select only the items that have the words “Thunderbolt” or “Driver” or “BIOS” or “Firmware” in the title. Click Next.

note: The picture below is an example. The updates that appear for your specific computer will likely be different from what is pictured below. Select only the items that have the words “Thunderbolt” or “Driver” or “BIOS” or “Firmware” in the title.

driver_bios_updates


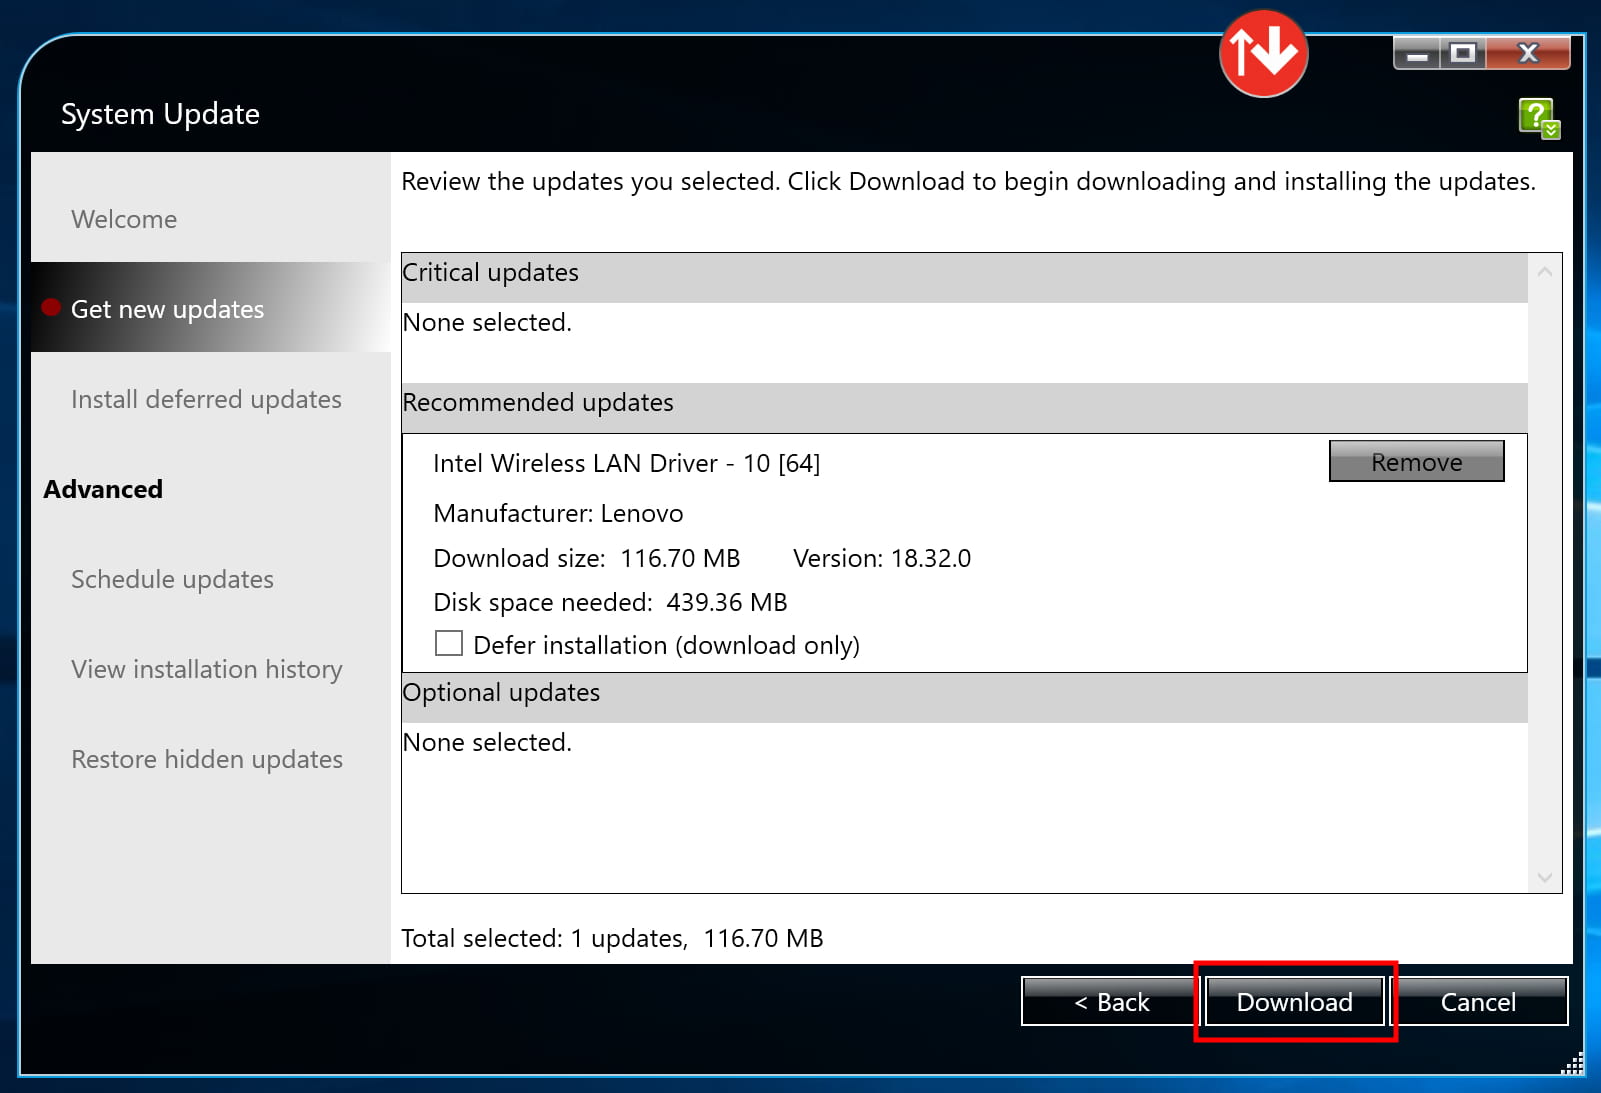
5) Click Download.

download_selected_drivers


6) The selected items will be downloaded and installed. Follow any specific on-screen instructions presented.

download_and_install_progress


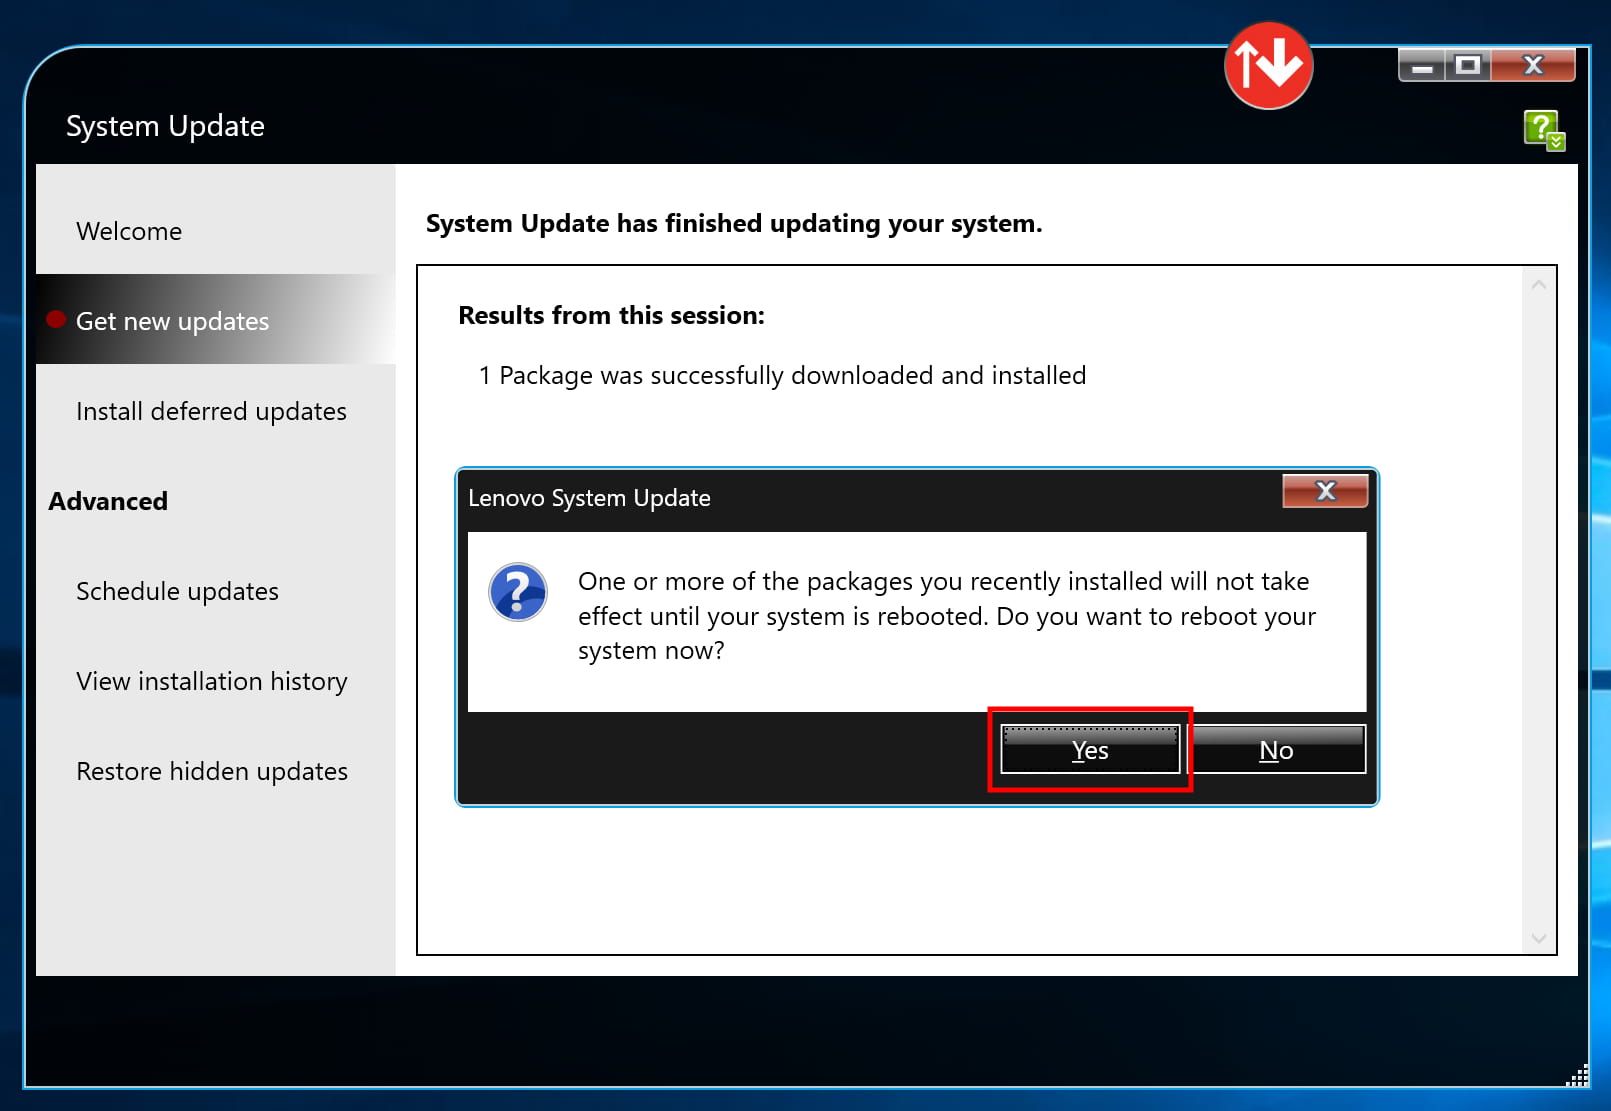
7) When the installation is finished, you may be prompted to restart the computer. Follow the specific on-screen instructions.

restart_if_needed

Edit your Office 365 Profile

How to edit your Profile Picture in Office 365, Outlook, Teams, etc.

1) Browse to here: https://www.microsoft365.com  and log in.

2) Click on your old picture or your initials in the circle in the top, right corner.

3) Click the “My Microsoft 365 profile” link.

4) Click on the camera icon and upload a picture of yourself (you can use your iSchool staff picture if you like) in the popup dialog.

5) Optionally, you can also edit your Profile to add additional information to your profile here.

Note that your Name, title, etc is locked by UW and cannot be updated here.

Use SecureCRT for accessing Keynes

The application SecureCRT should be used for accessing Keynes.  Download SecureCRT from this webpage:

https://itconnect.uw.edu/wares/uware/securecrt-software/

Download and install the most current 64-bit version.

Due to licensing restrictions, SecureCRT is not something we can work into the iSchool software image so you will need to install it yourself if you need it.

Basic procedure for printing files from a USB Flash Drive on a Ricoh printer

Notes:

  1. This machine only supports FAT16 or FAT32 formatted USB drives
  2. SD cards must be 2GB or smaller
  3. Saving might fail if the USB flash memory features password protection or other security features
  4. Only connect USB flash memory to the USB slot
  5. Insert the USB drive directly into the media slot
  6. Do not remove the media while data is being written. Doing so will result in corrupted data.

1.  Insert a memory storage device into the media slot.

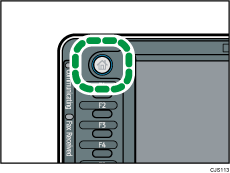
2. Press the [Home] key on the top left of the control panel, and press the [Printer] icon on the [Home] screen.

Home key illustration

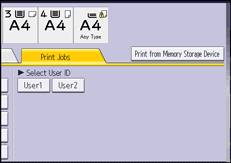
3. Press [Print from Memory Storage Device].

Operation panel screen illustration

4. Select the memory storage device that contains the file you want to print.

– Only one memory storage device can be selected at a time.

5. Select the file you want to print.

– You can simultaneously select multiple files of the same file type in the current folder.

6. If necessary, press [Detailed Settings] to configure detailed print settings.

– Note that certain settings cannot be selected simultaneously.

7. If necessary, press [Preview] to check the print image of the document.

– Only the first page of the document is displayed in the preview screen. No previews can be displayed when more than one document is selected.

– Press [Exit] to close the preview screen.

8. Press [Start Printing] or the [Start] key to start printing.

– To print a password-protected PDF file, enter the password.

9. When printing is complete, Press [Back to dev. slct. scr.].

10. Remove the memory storage device.