Eduroam

Eduroam is the preferred Wi-Fi network to use while on the University of Washington campus. Eduroam is an encrypted network available at participating institutions around the world. See UW-IT’s Eduroam documentation for much more information about Eduroam.

Connecting to or “onboarding” to the Eduroam Wi-Fi network requires a specific set of steps. The steps to connect to the Eduroam Wi-Fi network are on UW-IT’s website:

Eduroam Onboarding Guides

in

Cyberduck

Cyberduck is the iSchool IT recommended application for Secure File Transfer Protocol (SFTP). It works on both Windows and macOS and can be downloaded from this website: https://cyberduck.io.

Typical reasons to use an SFTP application include connecting to UW Shared Webhosting Servers to update website content or connecting to the UW U: Drive. Once you install Cyberduck, bookmarks can be set up by using the following settings:

Homer/Ovid web hosting server (for employees (Faculty and Staff) and Shared NetIDs)
Hostname/Server: homer.u.washington.edu
Port: 22
Protocol: SFTP/SSH
Username: UW NetID
Password: UW NetID Password
Directory: Leave blank; if required, try public_html

Dante/Vergil web hosting server (for students and RSOs)
Hostname/Server: dante.u.washington.edu
Port: 22
Protocol: SFTP/SSH
Username: UW NetID
Password: UW NetID Password
Directory: Leave blank; if required, try public_html

UW U: Drive
Hostname/Server: sftp.udrive.uw.edu
Port: 22
Protocol: SFTP/SSH
Username: UW NetID
Password: UW NetID Password
Directory: udrive

Connecting to a Microsoft SQL Server with UW NetID credentials from a personal computer

Connecting to a Microsoft SQL Server with UW NetID credentials from a personal computer

These instructions will allow you to connect to a Microsoft SQL Server using Windows Authentication (your UW NetID and password) from a personal computer, with SQL Server Management Studio (SSMS).

If you need to connect to a SQL Server from an iSchool-provided faculty, staff, or lab computer follow the instructions on this page instead.

You might need these instructions if you are taking, teaching, or TAing a course that requires you to connect to a SQL Server and you want to connect from your personal computer.

SSMS is available as a free download, from this website: SQL Server Management Studio (SSMS)

If you are connecting to a SQL Server that is not on the public network, please connect to the Husky OnNet VPN.

How to connect to a SQL Server, using your UW NetID credentials, from a personal computer:

1) Click the lower-left Windows icon, under Microsoft SQL Server Toolsright-click Microsoft SQL Server Management, mouse over More, click Open file location
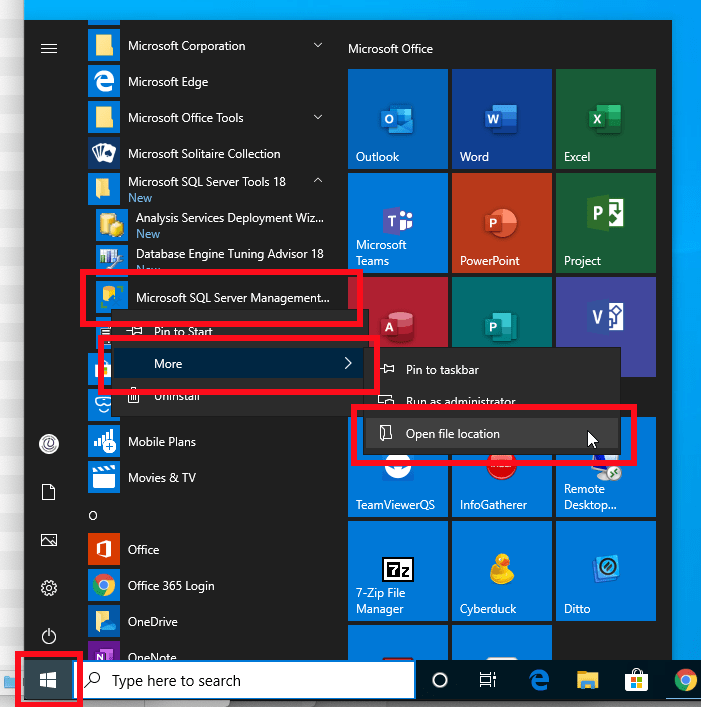
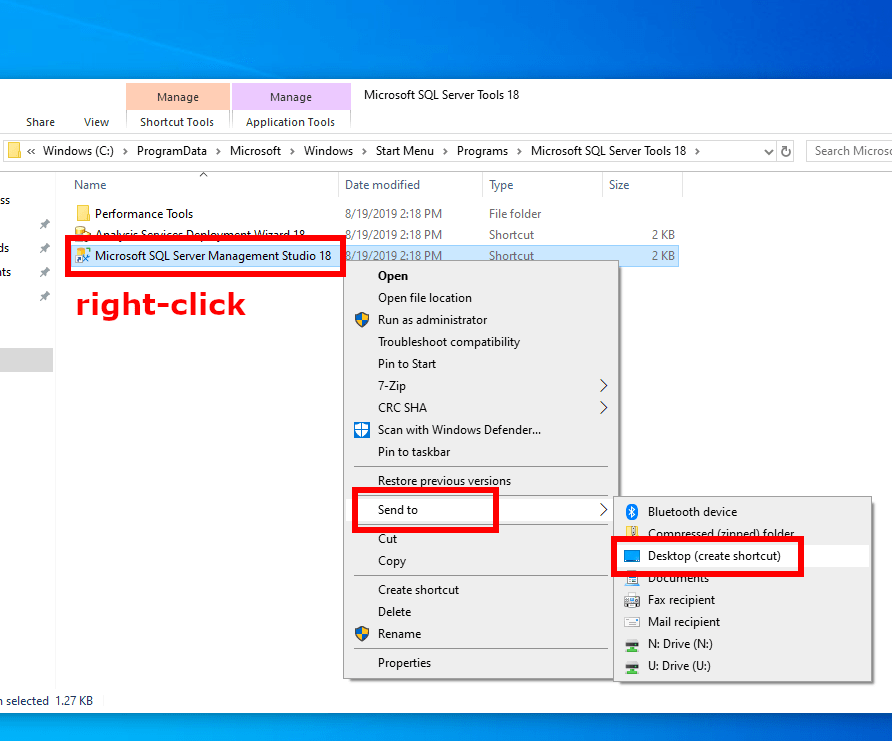
2) A new File Explorer window will open, right-click SQL Server Management Studio, mouse over Send to, click Desktop (create shortcut)
3) On your desktop, right-click the SSMS shortcut, click Properties

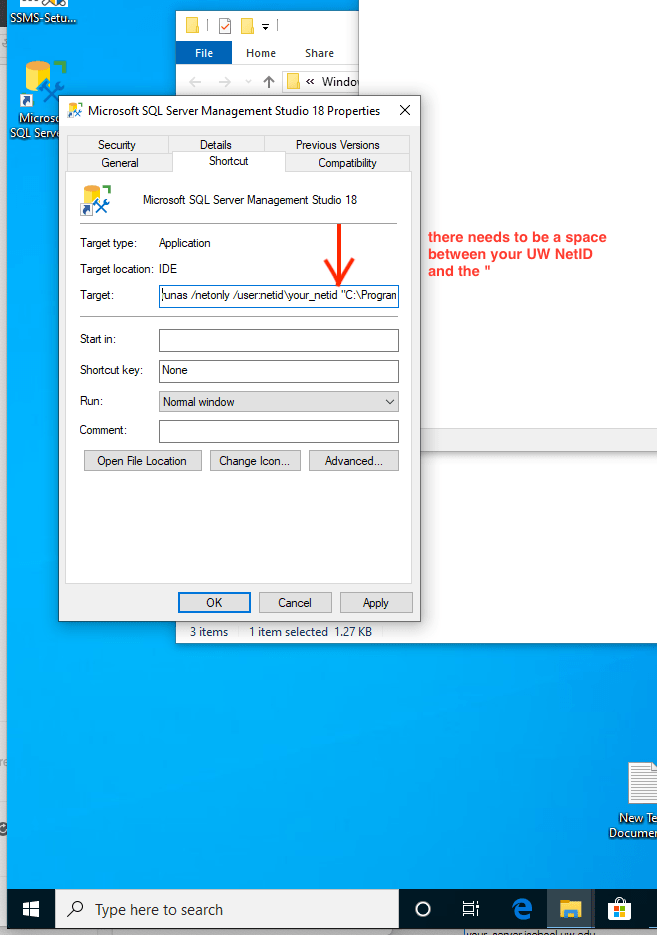
4) In the “Target” box, add the following to the beginning of what is already there:

runas /netonly /user:netid\your_UW_NetID 

Note well: There needs to be a space between your UW NetID and the “.

Click OK
5) The icon of the shortcut on the desktop will change.  This is expected.

Steps 1 – 5 are initial setup that only need to happen once.

6) Double-click the shortcut, a command window will open and ask for your UW NetID password, type it, then hit Enter or Return

SSMS should open with a “Connect to server” window.  The “User name:” field will display your computer’s name and username, but you can safely ignore that.  You will be connecting to the server, with the UW NetID credentials used when creating the shortcut above.

7) Enter the server address you want to connect to (your instructor needs to give you this information), click Connect

Husky OnNet VPN Service

The Husky OnNet VPN application is installed on all iSchool issued computers. Search your computer for the application named “BIG-IP Edge Client.” For more detailed instructions, refer to “Run” sections on this page:

https://itconnect.uw.edu/connect/uw-networks/about-husky-onnet/use-husky-onnet/

Read on for more information about the Husky OnNet VPN.

Husky OnNet, offered by UW-IT, is a client-based, SSL (Secure Sockets Layer) VPN (Virtual Private Network) service. Husky OnNet provides individuals using Mac OS and Windows devices with a secure, temporary connection to the UW network from off-campus locations. Users connecting their device to an off-campus network (e.g., from home, a conference, a café, at the airport, etc.) can use Husky OnNet to connect to the UW network to access resources as if they were physically on campus.

If you are off campus:

you need to be connected to Husky OnNet to:
– access the N drive via File Explorer or Finder
– use the Avaya telephone software
– connect to certain class and research related servers
access library databases and journals

you do not need to be connected to Husky OnNet to:
– connect to your iSchool Windows computer using the iSchool Remote Desktop Gateway
– access your UW email
– access the iSchool SharePoint Intranet
– access the Internet

To use Husky OnNet, you need to have the application installed on your computer. There is an application for both Mac OS and Windows.

If you have an iSchool issued computer, you already have the Husky OnNet application installed.

If you do not have the application installed, click the link below to download the application installer:

Download the Husky OnNet application

UW-IT maintains a web page with information about installing and running the Husky OnNet VPN application:

https://itconnect.uw.edu/connect/uw-networks/about-husky-onnet/

More Husky OnNet resources from UW-IT:

Husky OnNet frequently asked questions

Use SecureCRT for accessing Keynes

The application SecureCRT should be used for accessing Keynes.  Download SecureCRT from this webpage:

https://itconnect.uw.edu/wares/uware/securecrt-software/

Download and install the most current 64-bit version.

Due to licensing restrictions, SecureCRT is not something we can work into the iSchool software image so you will need to install it yourself if you need it.

How to use TeamViewer for remote IT support

How to use TeamViewer for remote IT support

TeamViewer is a program that makes it possible for the iSchool IT Help Desk to see and control your computer, wherever it may be, allowing for easier remote support. To use TeamViewer:

Mac
Windows

Use TeamViewer on macOS

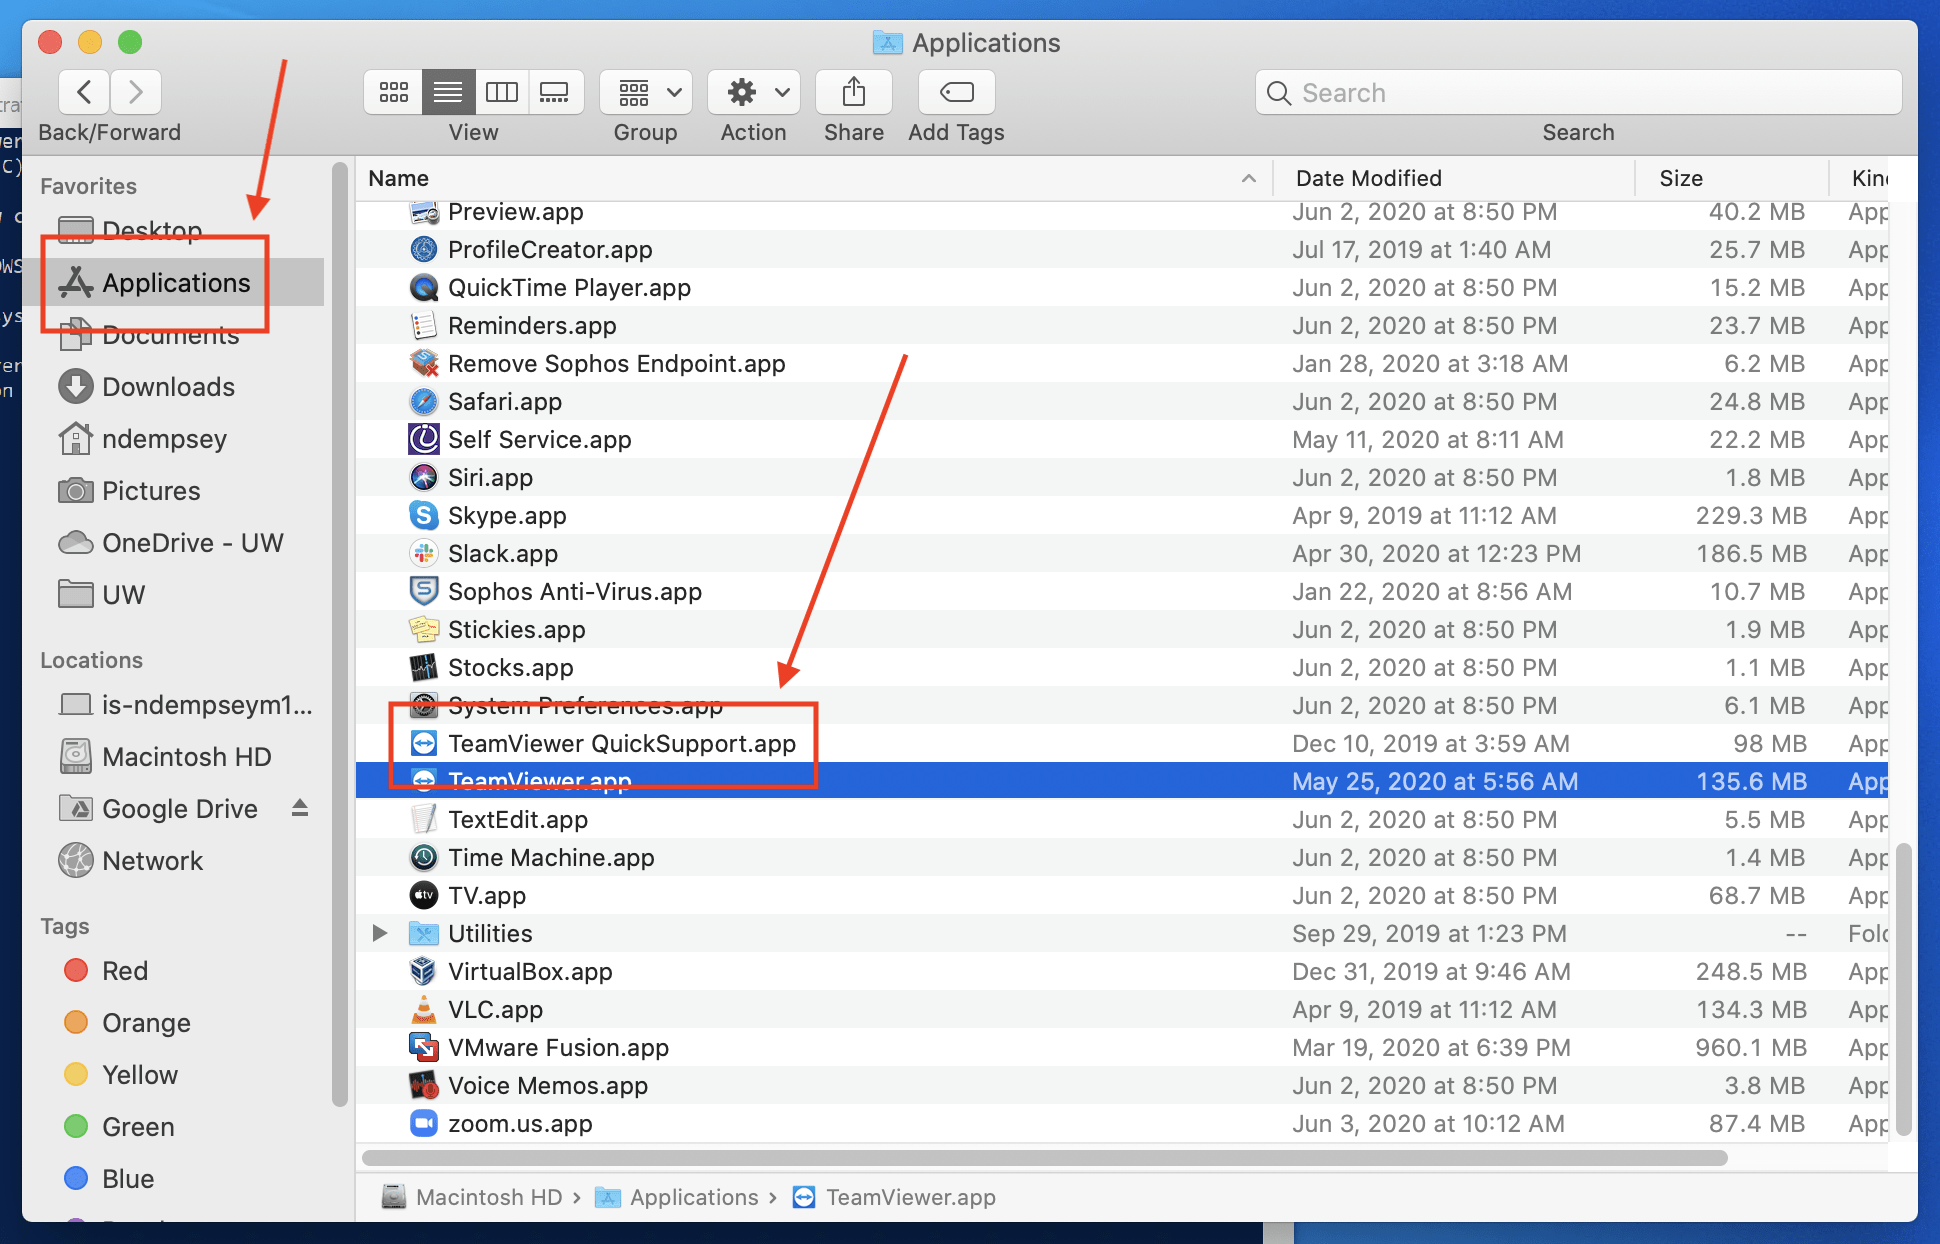
1. Start Finder, click Applications, double-click TeamViewer QuickSupport.app

1a. If TeamViewer QuickSupport.app is not in the Applications folder you can download it from:

https://get.teamviewer.com/ischool

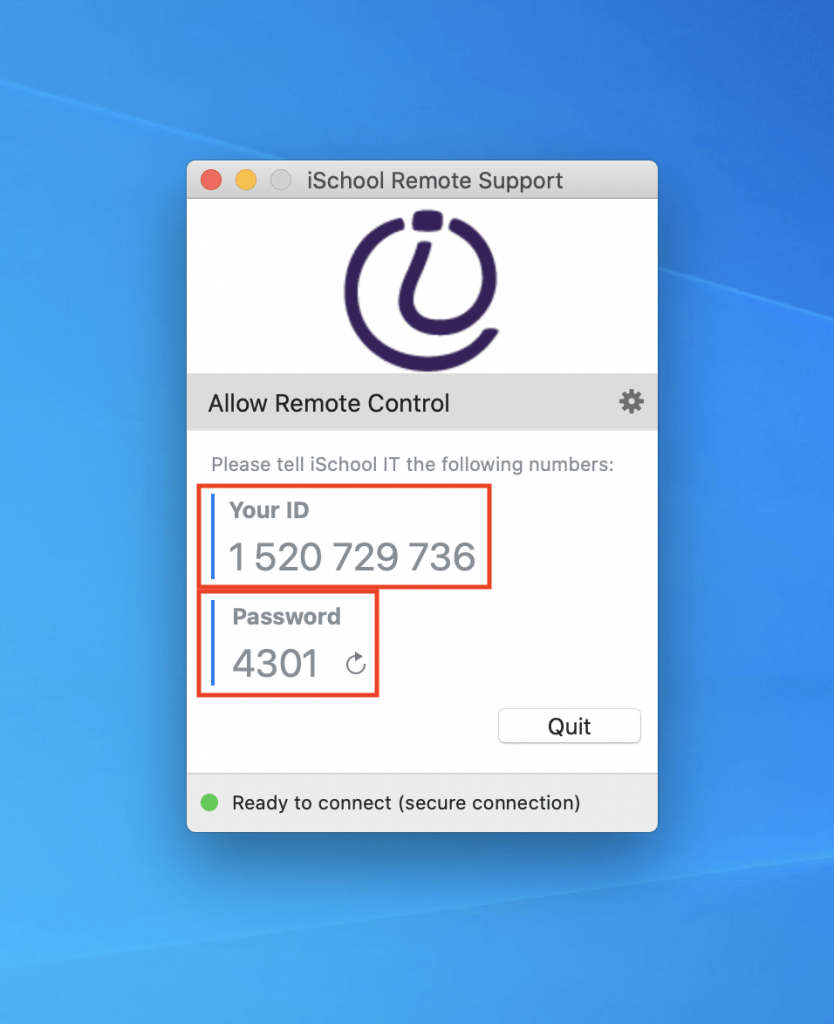
2. Once started, the TeamViewer application generates two numbers. The iSchool IT Help Desk will need these numbers to remotely connect to your computer.

Use TeamViewer on Windows

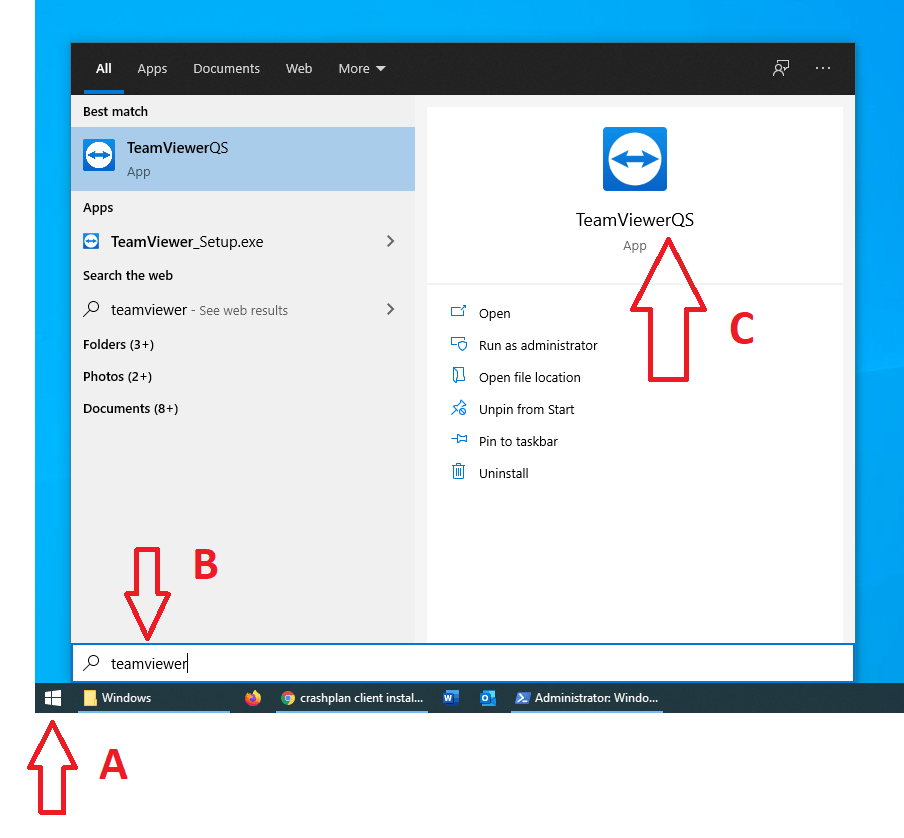
1. Click the lower-left Windows icon (A), start typing TeamViewer (B), click the search result named TeamViewerQS.

Start TeamViewer on an iSchool Windows Computer

1a. If TeamViewer QS.exe (could also be named TeamViewer QuickSupport.exe) is not already on your computer, you can download it from:

https://get.teamviewer.com/ischool

2. Once started, the TeamViewer application generates two numbers. The iSchool IT Help Desk will need these numbers to remotely connect to your computer.