Subscribe a UW Mailman list to a UW SharePoint Announcement List

Sometimes it’s easier to send SharePoint Announcements out to a Mailman list that your users are already subscribed to rather than trying to get everyone to browse to your Announcement List and subscribe themselves or to manually subscribe everyone yourself.

Another benefit of this method is subscribers of your mailing list are already used to receiving messages from the list so this won’t be such a new thing (although the email address that posts these messages will be new).

Lastly, SharePoint will archive the announcements in a way that is easier to browse than a Mailman archive.

Here is how iSchool IT did this.

Create a Shared UW NetID

  • Ideally, you will create a new/unique NetID just for this purpose. You don’t want this email address being used for anything else and you don’t want this SharePoint/Mailman relationship to suddenly break for any reason. A dedicated NetID for each Mailman list is best.
  • You can get a Shared UW NetID here:

https://uw.service-now.com/sp?id=sc_cat_item&sys_id=61fc4ab50fc3e7006cad419ce1050e78

  • Make sure this NetID has a strong password and record it somewhere, it only has one function so you won’t need to remember it once this has been configured.

Forward UW email

Provision Office 365

If your SharePoint Announcement List is hosted on SharePoint Online, you will need to provision the Office 365 service for the Shared UW NetID. You can do that here: https://provision.uw.edu/

If you don’t provision the service, Office 365 will not recognize the account and will see it as being outside of the UW domain. Provisioning should not be required if your SharePoint List is on-premise.

Add the NetID to SharePoint

You can’t subscribe to a SharePoint Announcement List unless you have access to it, the easiest way to grant these shared accounts access to the List is to add the NetID you just provisioned directly to this list with the Read permission.

Subscribe the NetID to the Announcement List

  • Browse to your SharePoint Announcement List using using the NetID you just provisioned.
  • In the Modern view, click the ellipsis in the top nav > Alert me
  • In the Classic view, click the List tab and then Alert Me > Set alert on this list
  • We left all the defaults alone since we don’t post announcements very often but you are of course free to adjust any variable or interval as it best suits your needs.
  • Click OK to save your alert preferences.

Allow the Announcement List to post to your Mailman list

  • Browse to the administrative interface of your Mailman list with an account that is an Administrator for this list.
  • Click Privacy options > Sender filters

If your SharePoint site is on SharePoint Online (https://uwnetid.sharepoint.com/)

  • Add no-reply@sharepointonline.com to the “List of non-member addresses whose postings should be automatically accepted.” field and submit your changes.

If your SharePoint site is on premise (https://sharepoint.washington.edu/)

  • Add a_spnotification@u.washington.edu to the “List of non-member addresses whose postings should be automatically accepted.” field and submit your changes.

Qualify alias as explicit To or Cc

  • Browse to the administrative interface of your Mailman list with an account that is an Administrator for this list.
  • Click Privacy options > Recipient filters
  • Add the Shared UW NetID email address to the “Alias names (regexps) which qualify as explicit to or cc destination names for this list.” Be sure to use the exact same format (@uw.edu, @u.washington.edu, etc.) as you did when you set up the forwarding.

Done! Now every time you post a new SharePoint Announcement to your Announcement List it will be sent to your Mailman list. Feel free to test before you need it, we suggest making the subject and body of your test post an obvious test so users recognize this.

Caveats

  • If you are not creating a new shared UW NetID and instead recycling an old one and find that it is not being recognized by Office 365 even after you provision the Office 365 service for it, you might need to reset the password. UW-IT has a policy that all shared accounts (and perhaps all accounts?) that are not logged into for a year are deactivated. Resetting the password will activate it again. Once this has been done it will take a couple of hours for Office 365 to recognize it.
  • We also recommend that you add these dedicated accounts to this UW Group here (using the UW Groups web interface) to prevent them from getting deactivated in the future.
    • u_msinf_delou_<ou-name>_accountsthatdonotlogin
    • Where “ou-name” is the name of your delegated OU.
Alternatives to Adobe Acrobat Pro

Alternatives to Adobe Acrobat Pro

There are many tasks with PDF’s that can be performed without Adobe Acrobat Pro. Some of the most common tasks are:

Edit a PDF using Microsoft Word
Create a PDF from a Microsoft Office application
Saving an email as a PDF
Sign a PDF
Split or break up a PDF
Combine multiple PDFs
Create a PDF from a web page using Google Chrome
Use Optical Character Recognition (OCR) in Microsoft OneNote


How to edit a PDF with Microsoft Word

Windows 10

Word includes the ability to convert a PDF to a Word document, allowing you to then edit the content:

1) start Word

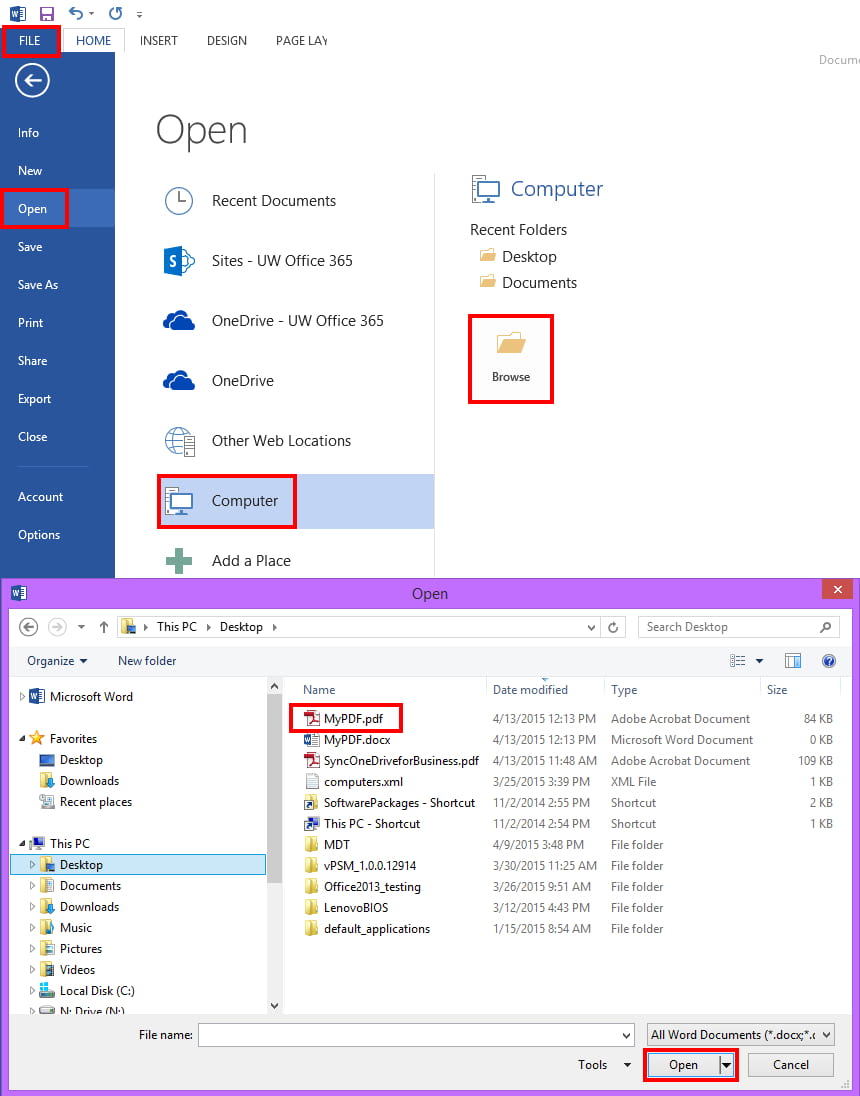
2) click File, click Open, navigate and find the PDF you wish to edit, click Open

Open PDF Word 2013


3) a message will appear letting you know the converted-and-editable-document may not look perfectly like the original, but, you will be able to use and edit the original content

Open PDF Word 2013 Message

This works best with files that are mostly text. There are some elements that do not convert well.

More information about editing PDF’s in Word can be found at these websites:

Edit PDF content in Word
Unlock PDFs with Word 2013
Why does my PDF look different in Word?


How to create a PDF using a Microsoft Office application

Although the following instructions are specific to Word, they work for other Office applications like Excel, Visio, etc.

1) create the document in a Microsoft Office application

2) click File, click Save As, click the “Save as type:” drop-down, select PDF (*.pdf), click Save

Save As PDF


How to save an email as a PDF

Outlook does not include a way to save an email directly to PDF. You must first copy the contents of the email to a Word document, then save the document as a PDF.

1) open the message in Outlook

a. (optional) if you want to include the subject and “To” and “From” email address information: click Reply (you will not actually need to reply to the email)

2) on your keyboard, press CTRL and A to select all message content

3) on your keyboard, press CTRL and C to copy selected message content

4) start Word and create a new document

5) on your keyboard, press CTRL and V to paste selected message content

6) click File, click Save As, click the “Save as type:” drop-down, select PDF (*.pdf), click Save

Save As PDF


How to sign a PDF using Adobe Acrobat Reader (free application)

1) open the document you need to sign with Adobe Acrobat Reader

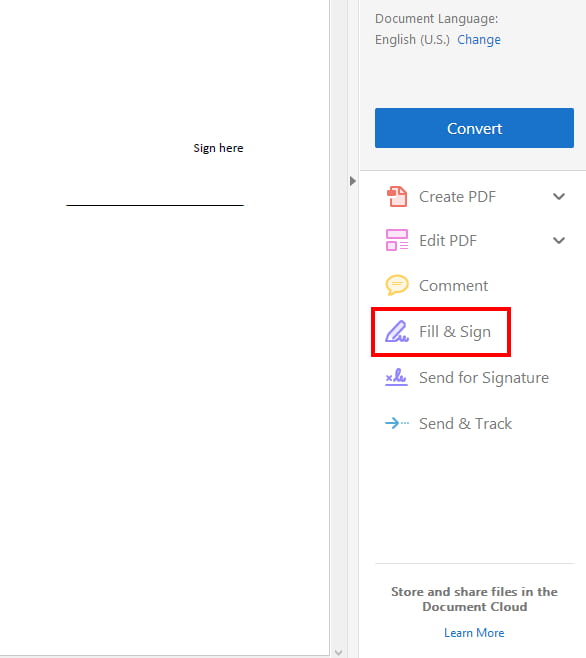
2) click Fill & Sign

Adobe Reader Fill Sign Button


3) click Sign, click Add Signature

Adobe Reader Add Signature


4) select the option of typing or drawing your signature, enter your signature, select the option of saving your signature for later use, click Apply

Adobe Reader Apply Signature


5) position the signature, click File, click Save to save the document with your signature

Adobe Reader Position Signature


How to split or break up a PDF

There are a few ways to split or break up a PDF:

Split a PDF using Microsoft Word
Split a PDF using the Google Chrome web browser

How to split or break up a PDF using Word

1) open the PDF in Word

2) copy whatever content you need, paste content into a new Word document

3) save the new document as a PDF


How to split or break up a PDF using the Google Chrome web browser

1) start the Google Chrome application

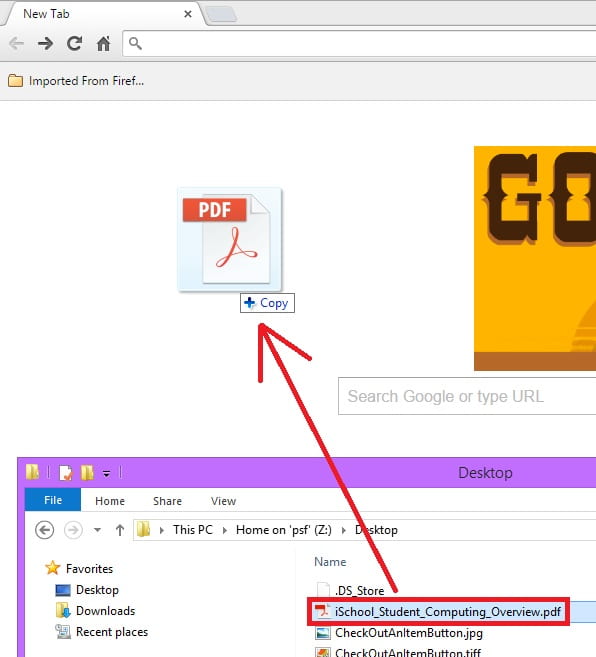
2) find the PDF in a Windows Explorer folder, click and drag the PDF into Google Chrome to open it

Open PDF in Google Chrome


3) bring your mouse to the bottom of the screen to bring up the menu buttons, click the Print button

Menu Google Chrome


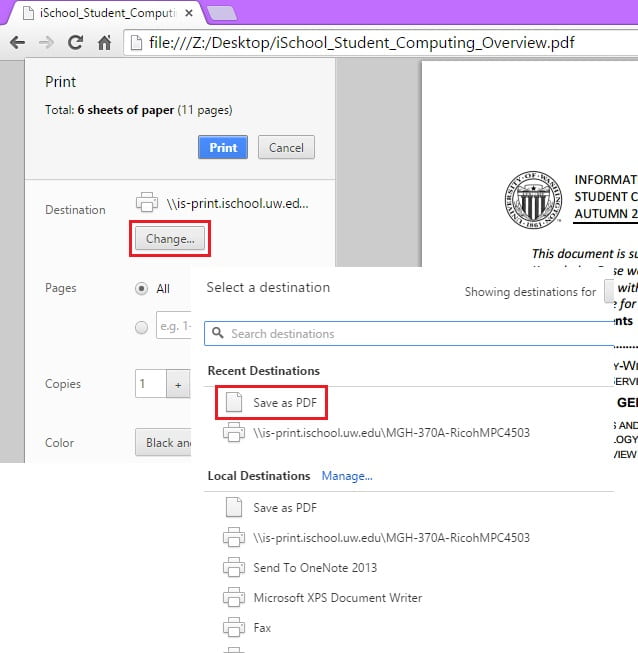
4) click Change… (destination), click Save as PDF

Save As PDF Google Chrome 01


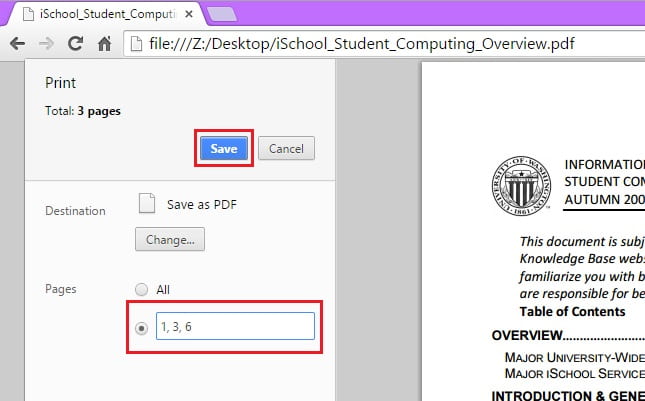
5) enter the specific pages or range of pages you need, click Save

Save As PDF Google Chrome 02


How to combine PDFs

1) open the PDFs in Word

2) copy and paste the contents of each PDF into a new Word document

3) save the new document as a PDF


How to create a PDF from a web page using Google Chrome

1) use Google Chrome to navigate to the web page you intend to create a PDF of

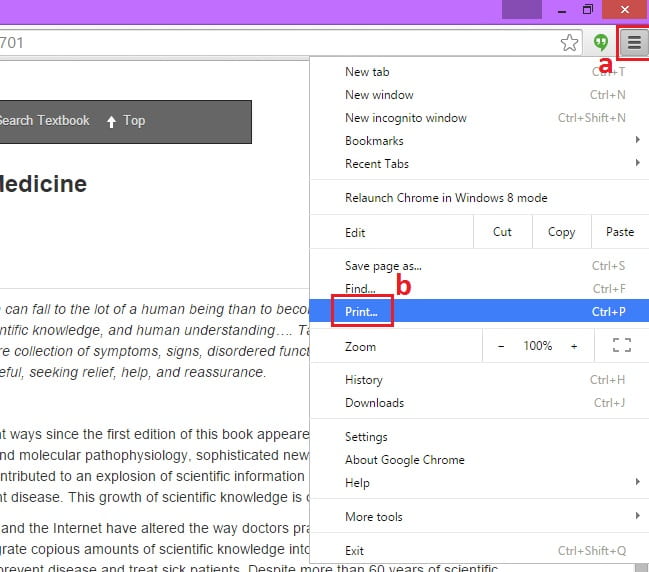
2) click the top-right Chrome menu button, click Print…

Save Web Page As PDF Google Chrome 01


3) for Destination click Change…, select Save as PDF, click Save

Save As PDF Google Chrome 01


How to use Optical Character Recognition (OCR) in Microsoft OneNote, Windows Version

Microsoft OneNote, Windows version, has the ability to extract text from scanned images.

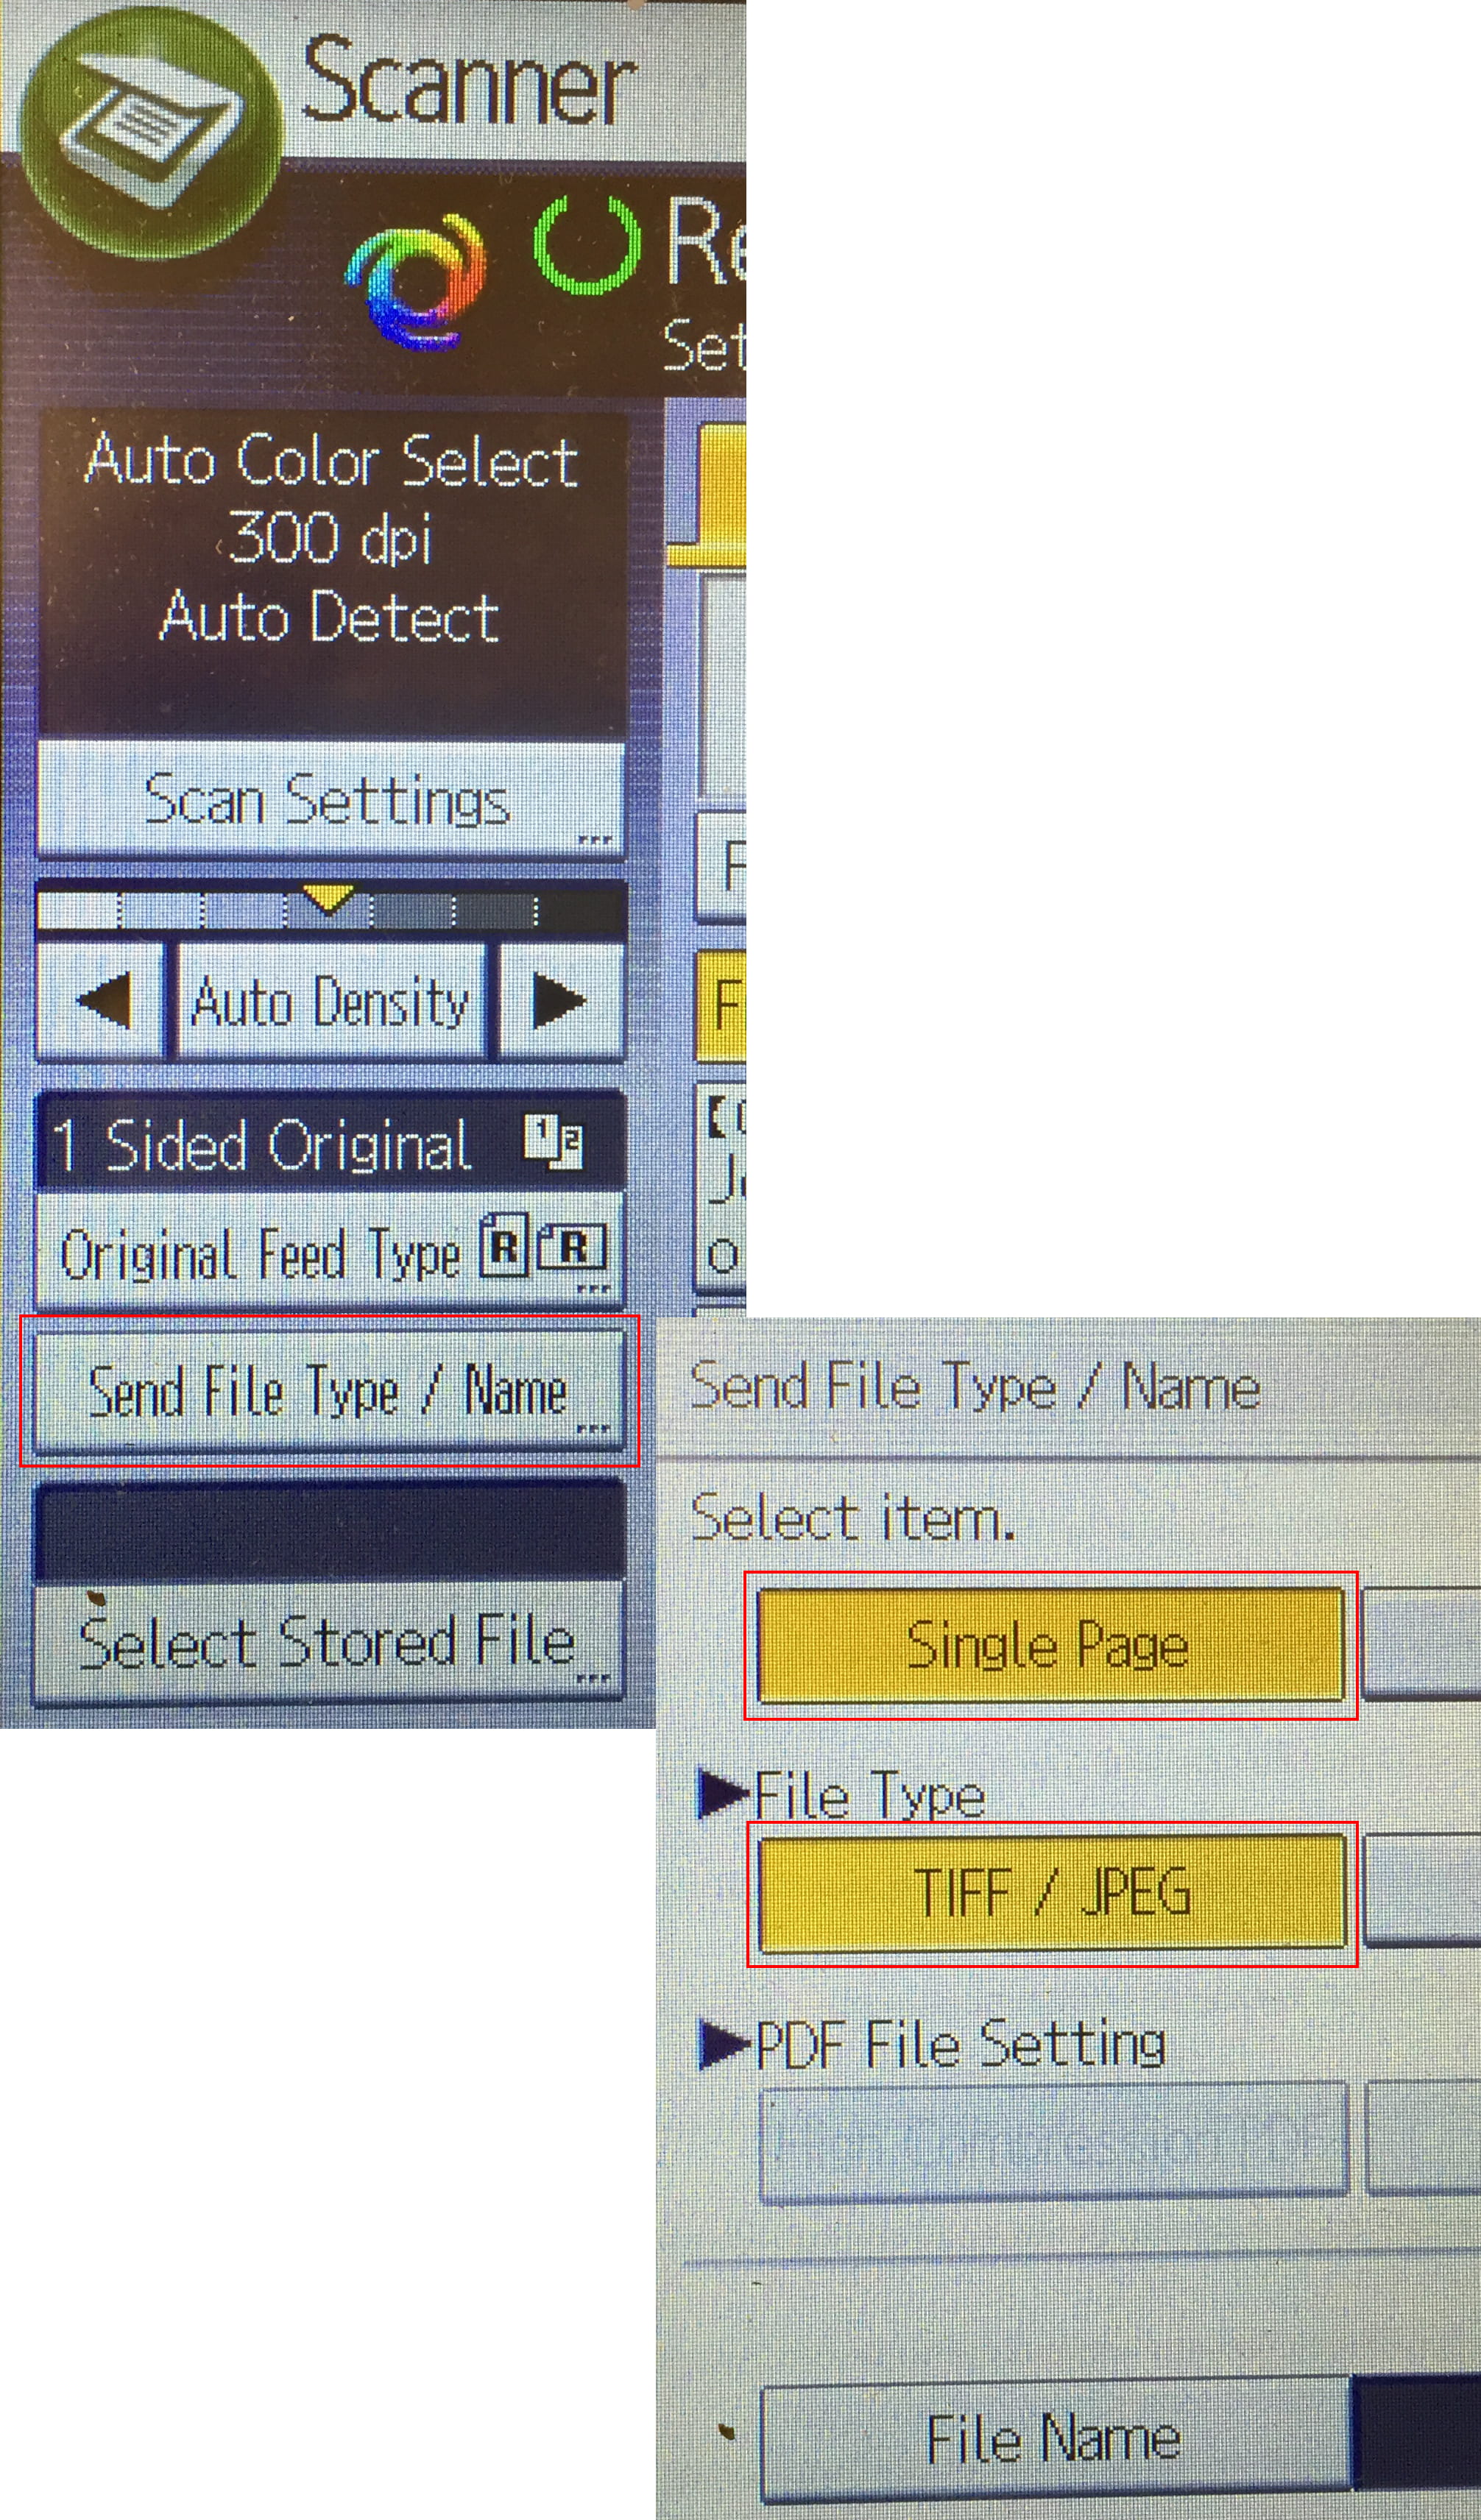
1) Scan the document you intend to use as a TIFF/JPEG image. On iSchool Ricoh scanners, this option can be set in the Scanner menu -> Send File Type / Name… -> Single Page -> TIFF / JPEG

Ricoh Scan To TIFF/JPEG


2) start Microsoft OneNote in Windows, create a new notebook

OneNote, Windows, Create Notebook


3) click the plus sign to create a new section

OneNote, Windows, Create Section


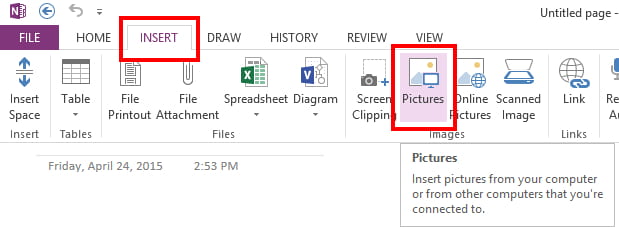
4) click Insert, click Pictures, find and select the image you scanned in step 1

OneNote, Windows, Insert Picture


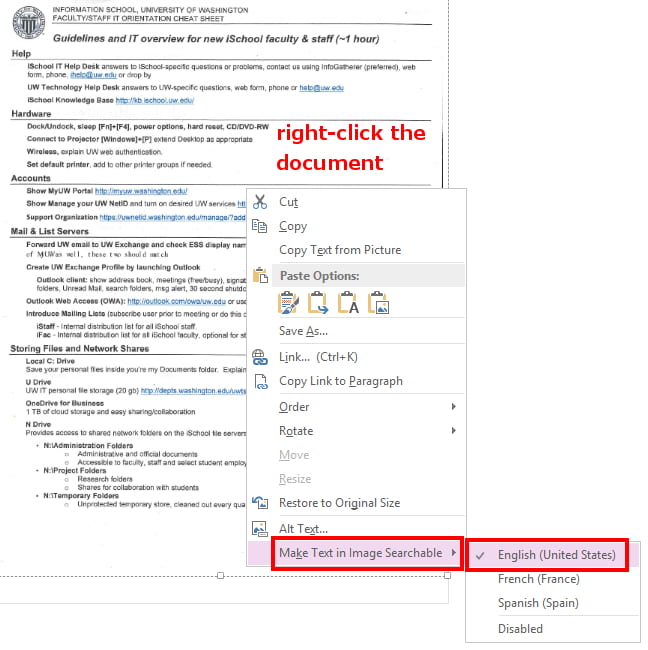
5) right-click the document, select Make Text in Image Searchable, select the language

OneNote, Windows, Make Image Text Searchable


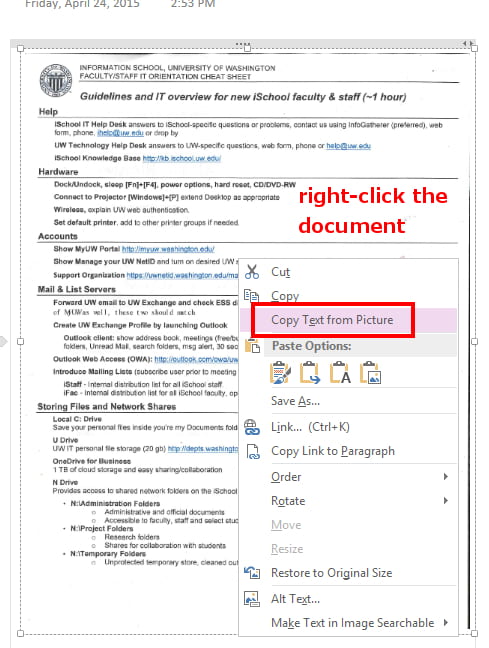
6) right-click the document, click Copy Text from Picture

OneNote, Windows, Copy Image Text


7) start Word, paste the text into a document, whatever text was able-to-be-copied from the image will be available in the document

Paste Image-Text Into Word Document


Note: This method strips all formatting leaving you with only editable text.

Digital Signatures in Microsoft Word

Digital Signatures in Microsoft Word

The purpose of a digital signature is the same as your handwritten signature.  Compared to a handwritten signature, it is considered significantly more difficult to forge a digital signature. A valid digital signatures assures the recipient of your document that:

  • Authentication – you are the sender of your document
  • Integrity – the document has not been altered since you signed it
  • Non-repudiation – you can’t deny the authenticity of the document

Digital Signatures are a great tool to keep your documents secure, and to keep your data electronic to avoid wasting paper.


There are different ways to approach adding a digital signature to a Microsoft Office document. Full Microsoft instructions can be found on the following websites:


Insert a signature

Add or remove a digital signature in Office files

Yammer Desktop Notifier

Yammer is a Microsoft product that lets you communicate (think social networking) in various communities and to create your own communities.

By signing up with your UW email address you can join the UW Yammer community.

To get all your Yammer notifications without needing to be logged in via a web browser you can install the Yammer Desktop Notifier here:

https://about.yammer.com/product/desktop-application/

Canvas Knowledge Base

Canvas is the Learning Management System adopted by the University of Washington and the iSchool. It began to be used in Autumn 2011. It is widely used to communicate with students in all areas related to coursework (syllabi, assignments, grading, etc.).

The Online Learning Team maintains a fantastic course about using Canvas and related technologies here. On this page, you can find resources and tutorials to help you navigate your way through the tools used as part of online learning at the iSchool.

Need help with Canvas specifically? Check out our Canvas for Instructors area at: https://sites.google.com/uw.edu/ischool-learningtech/home.

Faculty teaching for the Information School can enlist help from the Online Learning Team by emailing olt@uw.edu.

In addition to the above resources, you can also get help with Canvas at:

UW IT Canvas Guide
Guides from Instructure, the company that makes Canvas

How to connect to your computer via Remote Desktop using the iSchool Remote Desktop Gateway

How to connect to your computer via Remote Desktop using the iSchool Remote Desktop Gateway

If your iSchool issued work computer is running Windows, it is possible to connect to it and use it remotely, from a separate computer.

If your iSchool issued work computer is a Mac and you are looking to connect to it and use it remotely, see this page.

In order to access your iSchool Windows work computer remotely:

a) You need to know your computer’s name.
b) The computer must allow remote connections.
c) The computer must be powered on and not in sleep mode.
d) The computer must be connected to the UW campus network.

After confirming a through d above, follow these instructions to access your Windows work computer from a separate computer.

How to find your iSchool computer name

Windows 10

Windows 10

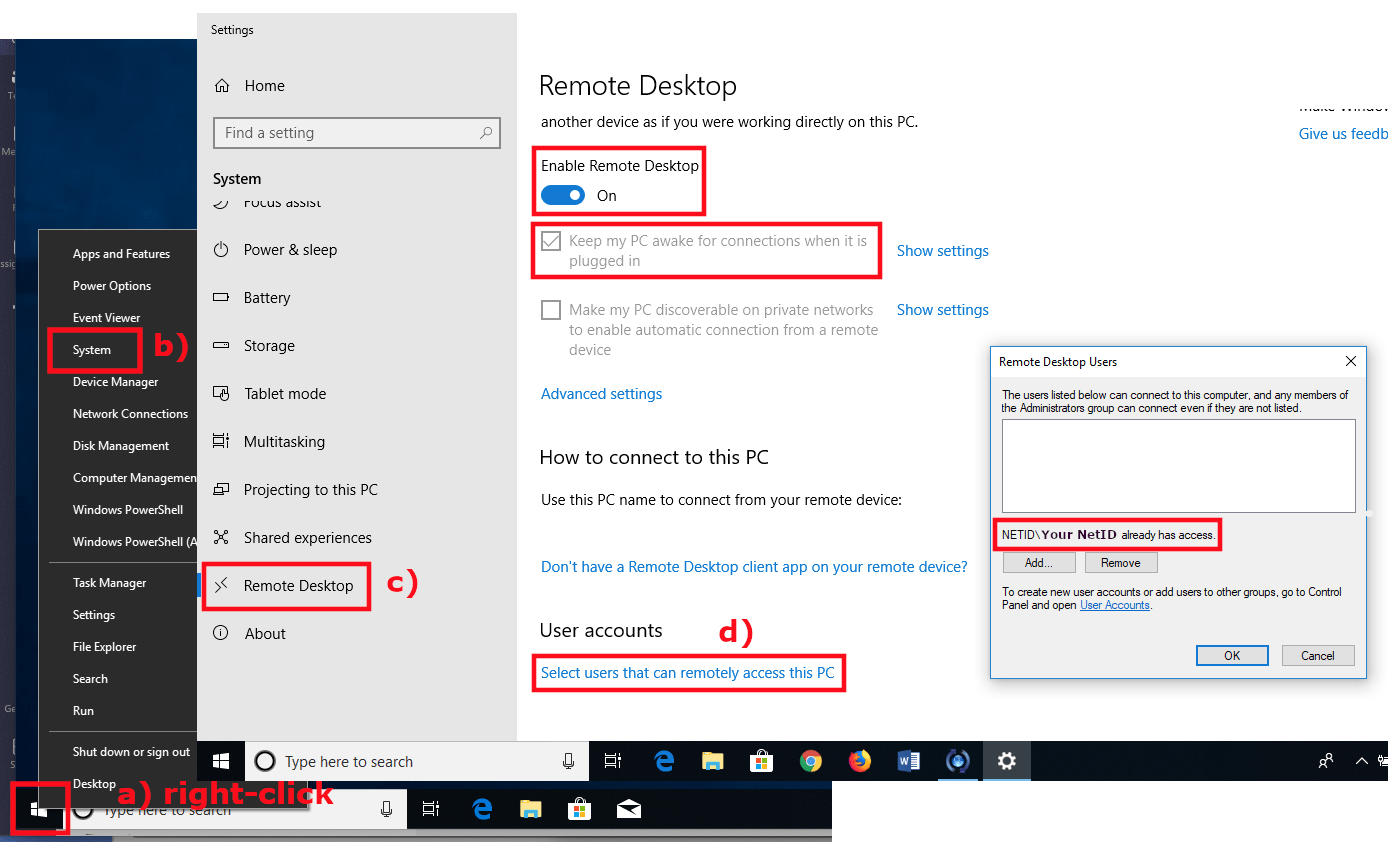
1) Right-click the lower-left Windows icon, click System.

Your computer’s name is next to “Device name” or “Computer name:” (depending on Windows 10 version) and usually something like “is-YourNetIDx220” or “is-YourNetID450” or “is-YourNetID360” or “is-YourNetIDx1c.”

Confirm your iSchool work computer will allow remote connections

Windows 10

Windows 10

1) Right-click the lower-left Windows icon, click System, click Remote Desktop, click Select users that can remotely access this PC.

2) Confirm the following settings:

Enable Remote Desktop should be On.
Keep my PC awake for connections when it is plugged in should be checked.
In the Remote Desktop Users window, you should see NETID\Your NetID already has access.


Connect to your work computer from a separate computer (follow these steps from your home computer).

connecting from a Windows 10 computer
connecting from a Mac OS X computer


Windows 10

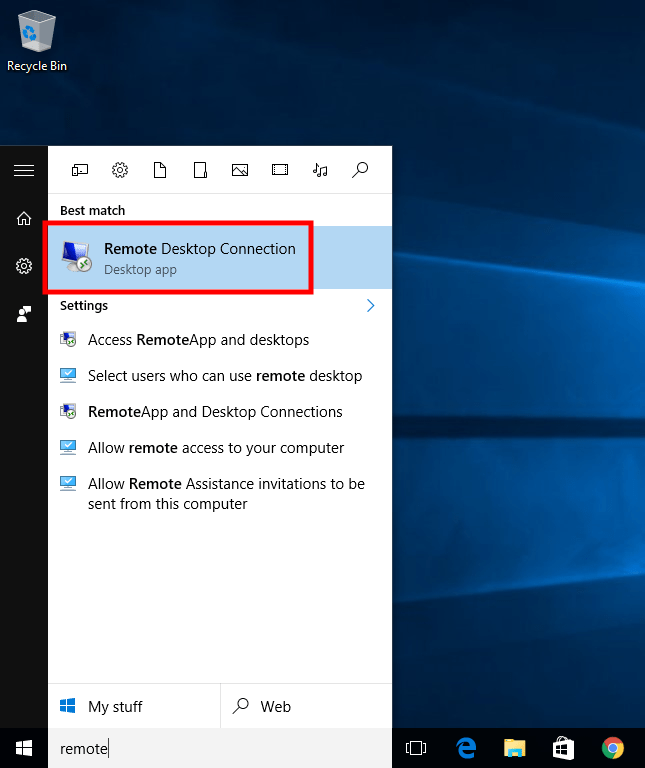
1) Start the application Remote Desktop Connection (already installed on any Windows 10 computer).

start_remote_desktop_connection

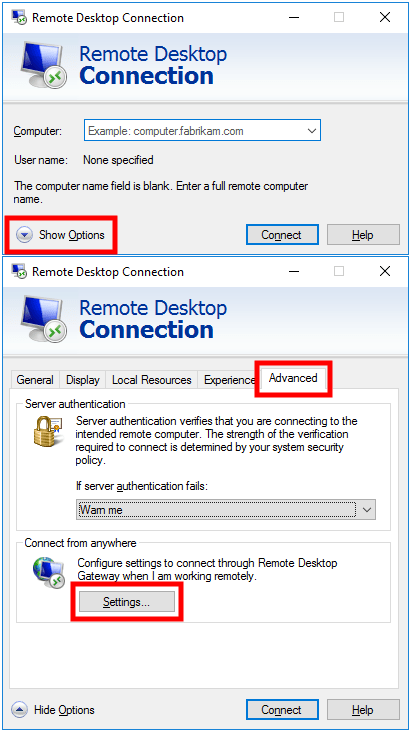
2) Click Show Options, click Advanced, click Settings…


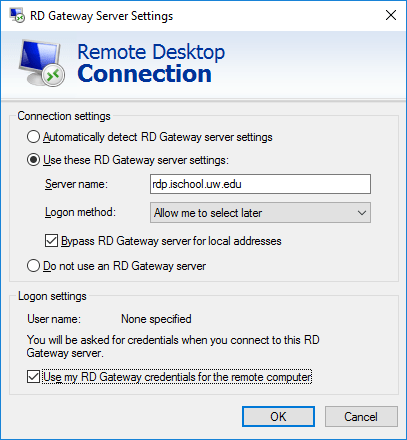
3) For Connection settings:

You need to check the RD Gateway server settings.
Server name: rdp.ischool.uw.edu
Logon method: Allow me to select later
You need to check the Bypass RD Gateway server for local addresses.

For Logon settings:

Check Use my RD Gateway credentials for the remote computer

Click OK


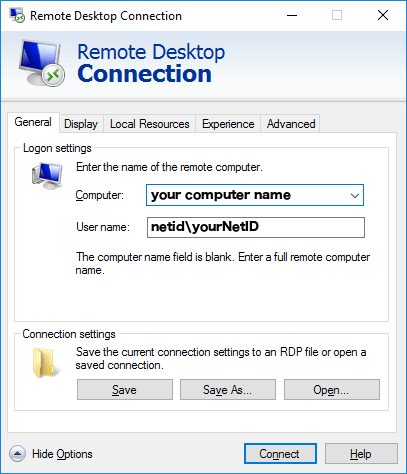
4) Click General

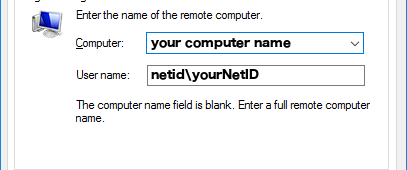
For Computer: use your computer name (usually something like is-yourNetidx220, see this if you need to find your computer name).
For User name: use netid\yourNetID

Click Connect, enter your NetID password when prompted to connect to the network.


Mac OS X

1) Download and install the free Microsoft Remote Desktop application from the Apple Store, you will need an Apple ID to download the application.

microsoft remote desktop

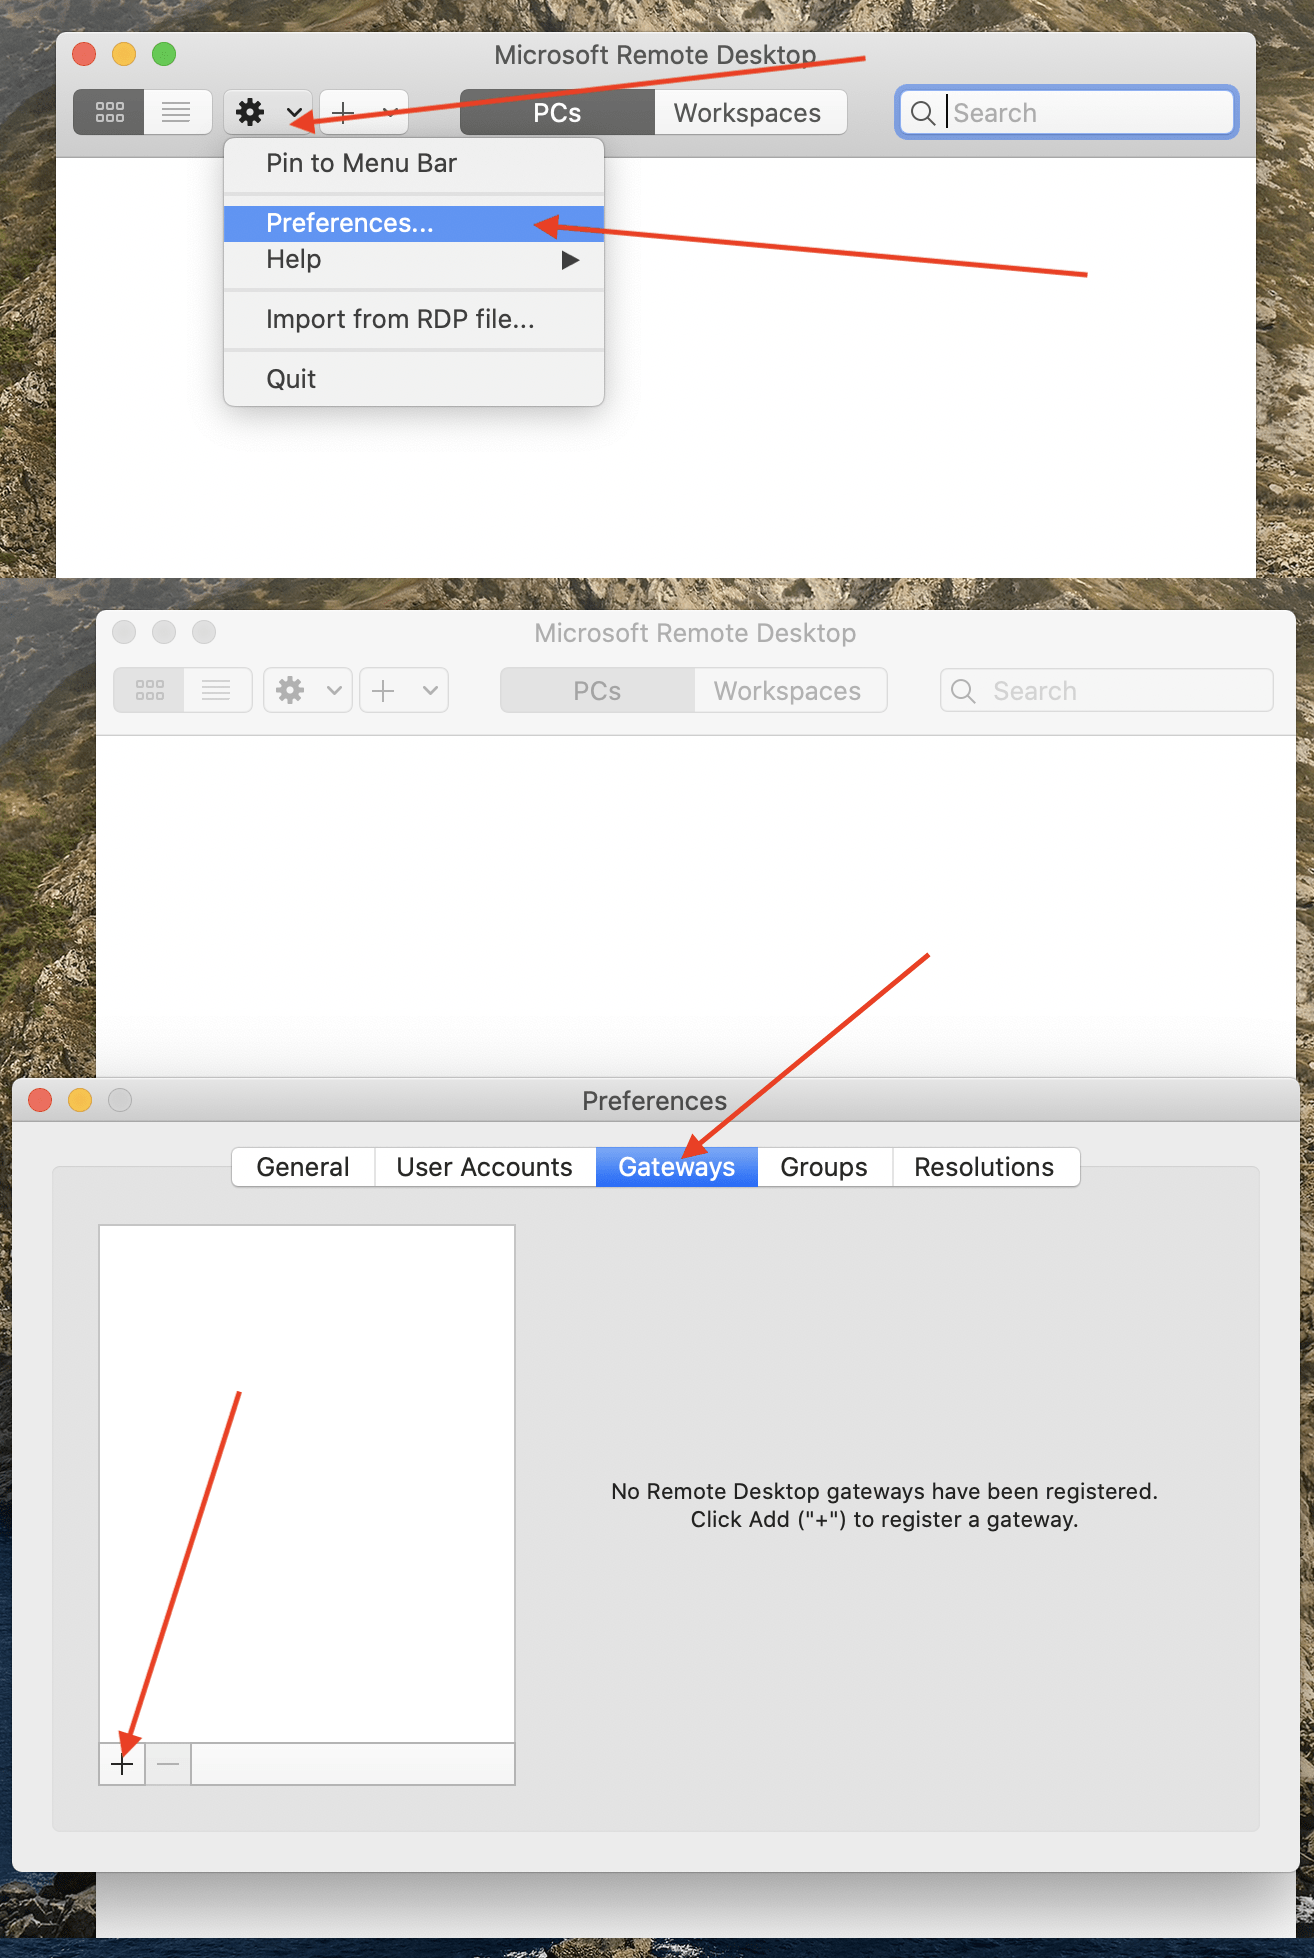
2) Start the Microsoft Remote Desktop application, (settings about improving performance or giving access to your microphone or webcam are up to you; select the settings you prefer), click the gear-looking-icon, click Preferences…, click Gateways.

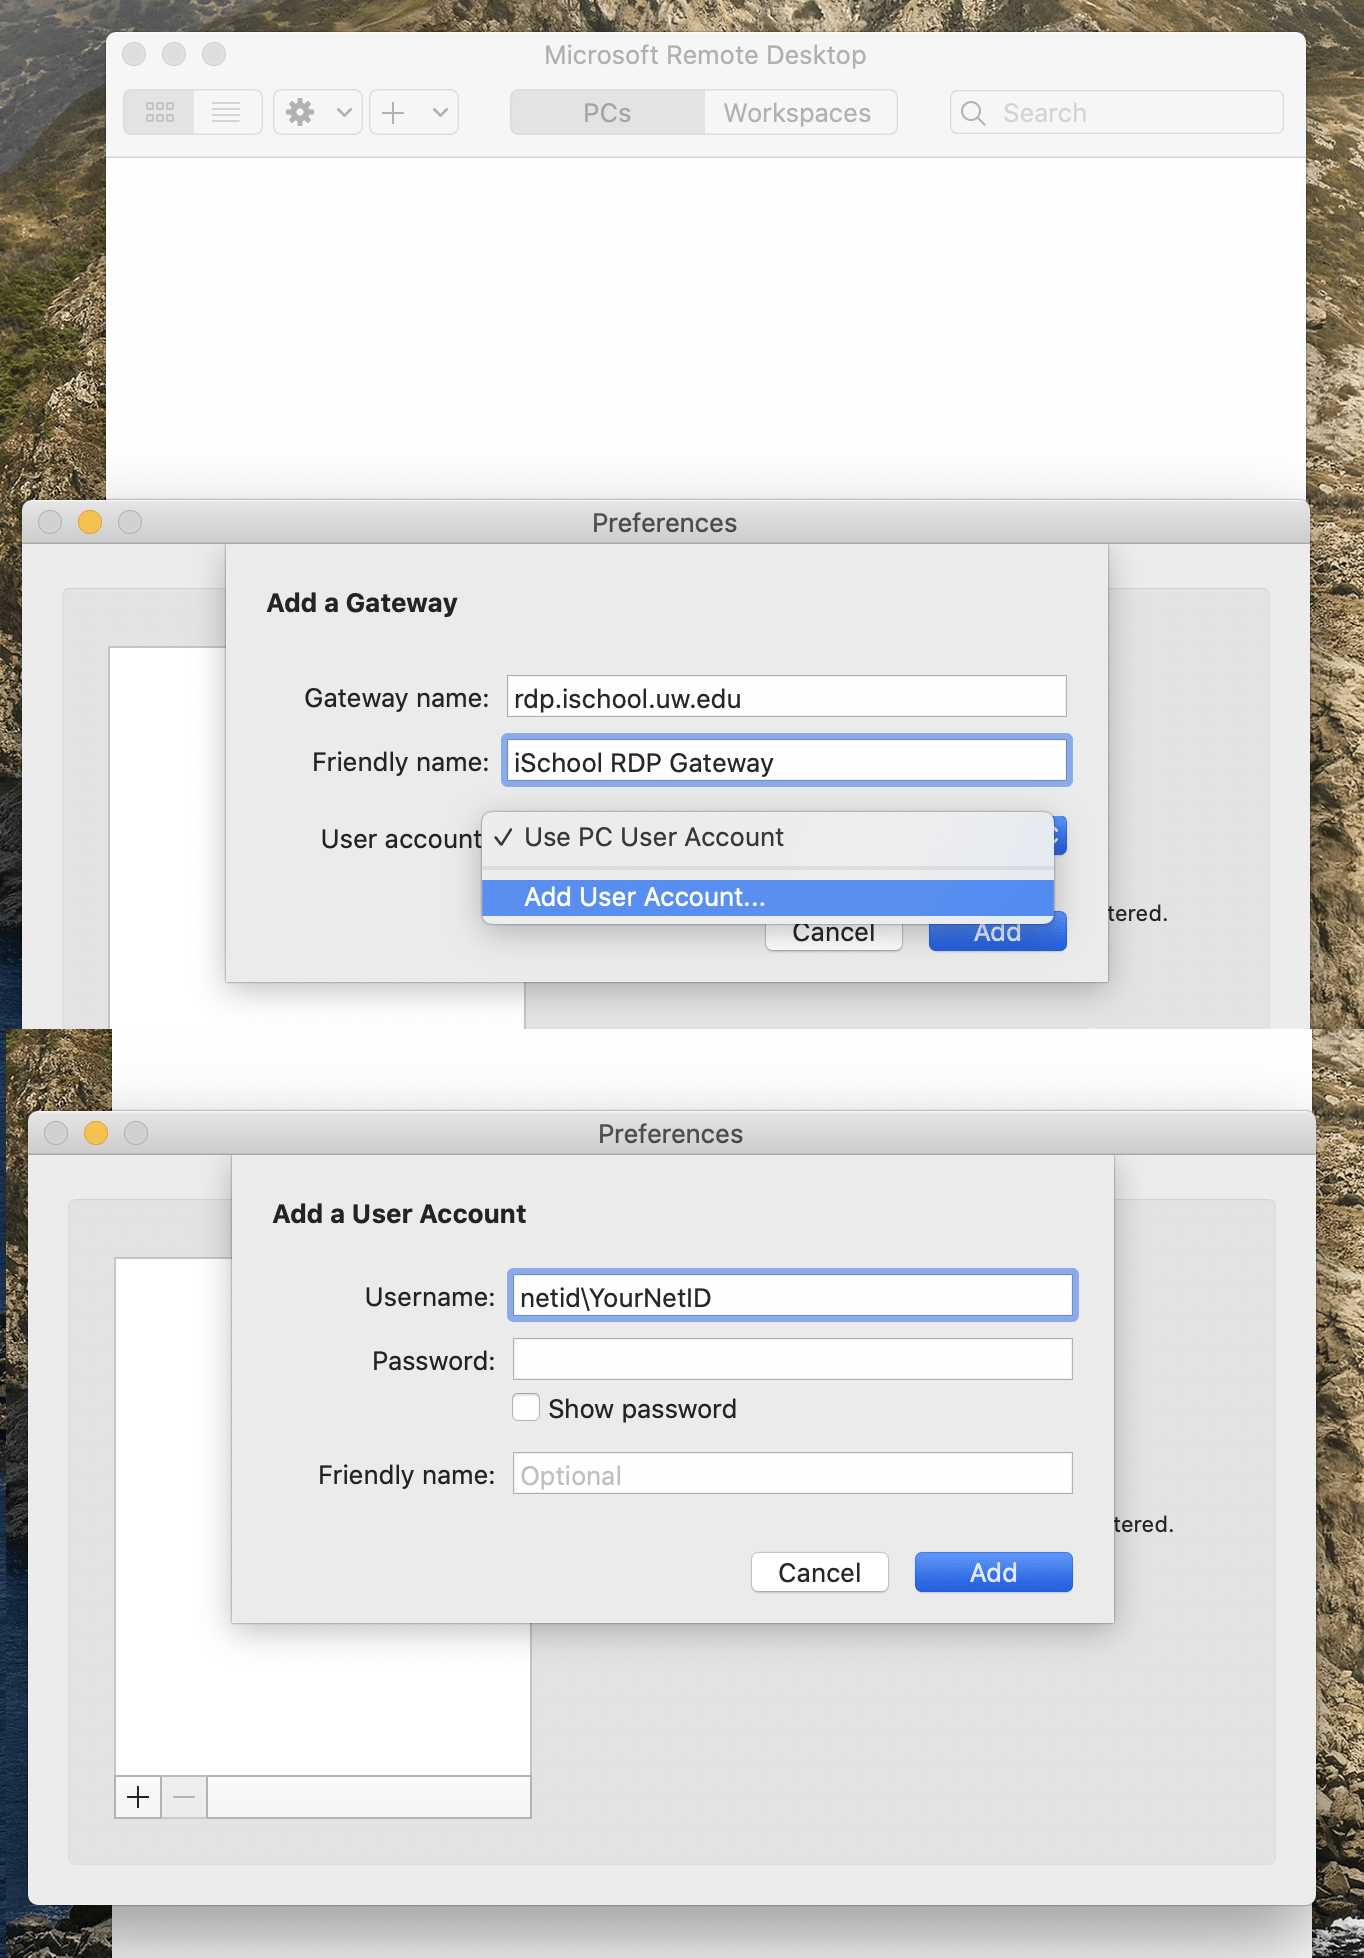
Click the + button in the bottom-left, use the following settings:

Gateway name: rdp.ischool.uw.edu
Friendly name: iSchool RDP Gateway

Click the drop-down next to User account:, click Add User Account…

use the following settings:

User name: netid\YourNetID
Password: YourNetIDPassword

Click Add, click Add

Close the Preferences window

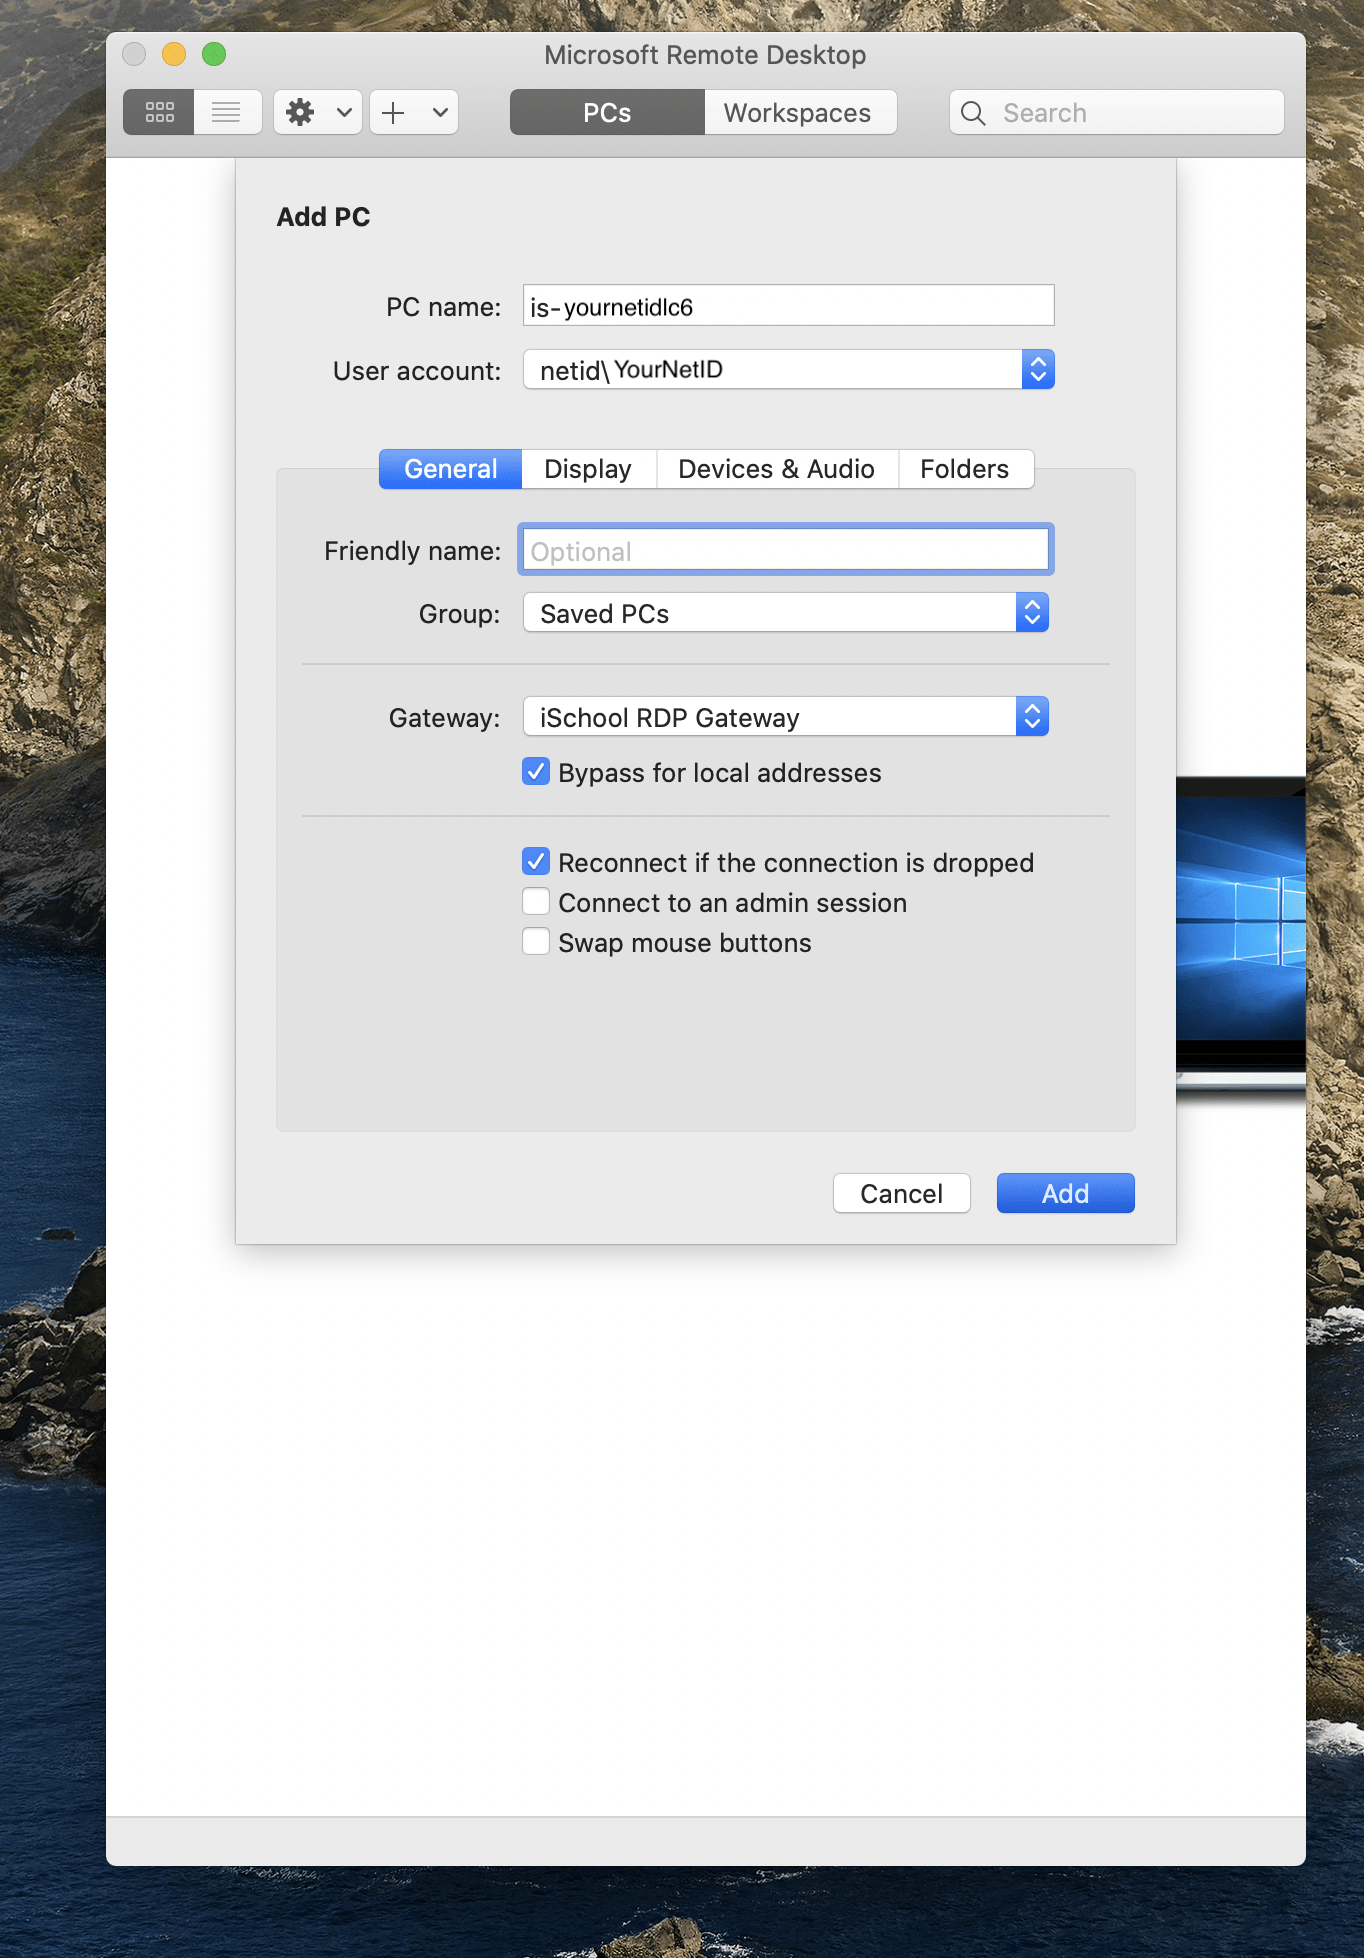
3) In the Microsoft Remote Desktop window click Add PC, use the following settings:

PC name: usually something like: is-YourNetIDlc6 or is-YourNetIDly3 or is-YourNetIDl480

User account: select the user account you created in the previous step (netid\YourNetID)

Gateway: select the iSchool RDP Gateway (or whatever name you created in Step 2)

(Other settings are fine to leave as is. They can be modified later).

Click Add

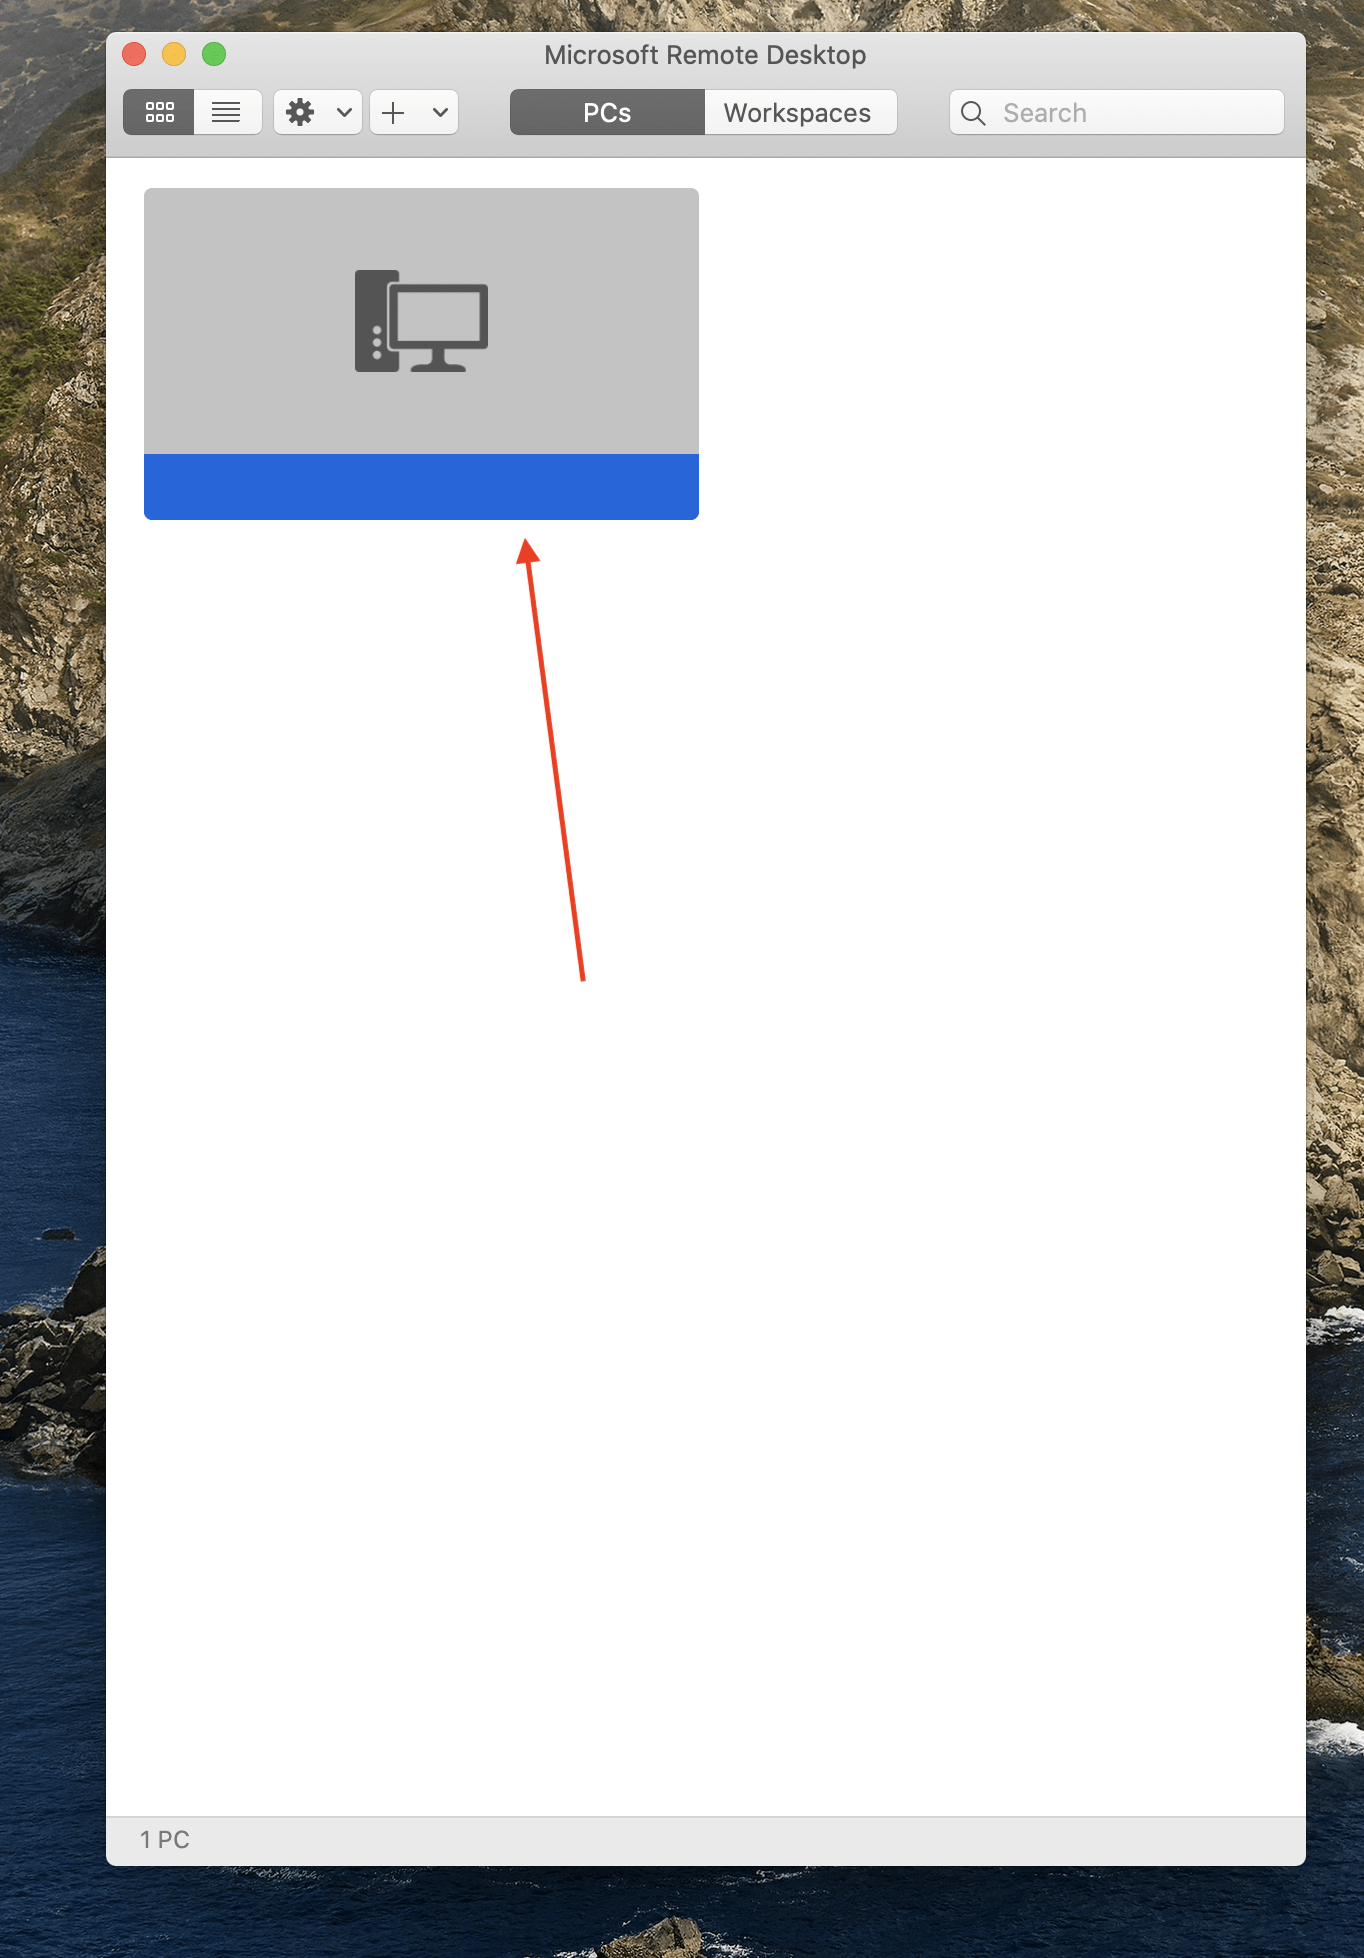
4) Double-click the connection you made in Step 3, if a certificate-verification window appears it is fine to click Continue.

How to run Windows (and software that will only run on Windows) on a Mac

This is a high-level overview of running Windows on a macOS device.  This is not intended as a fully detailed walkthrough. There are fully detailed guides findable via web-searching. If web searching and this article are not enough information, please contact or stop by the iSchool IT Help Desk.

There are two ways to run Windows on a macOS device:

  1. Apple Boot Camp
  2. Virtual Machine (VM) software

Either method requires a full Windows operating system installation file before proceeding. Either method can be done for zero-cost, assuming you already have access to a macOS device. If you are a University of Washington student, you can download a full Windows installation file, compatible with either method, for zero-cost, from the Microsoft Azure for Education website:

Microsoft Azure for Education software downloads

Visit this web page for much more information:

University of Washington information about Microsoft Azure for Education

In general, you will want to download and use the most recent, 64-bit version of Windows Education.

METHOD 1
Apple Boot Camp

The advantage of this method is you get to use all of your CPU and RAM for Windows allowing it to run as fast as possible on your computer.  The disadvantage is that you will have to reboot your computer in order to switch between operating systems.

Apple’s Boot Camp Support website has more information and detailed instructions:

https://www.apple.com/support/bootcamp/

METHOD 2
Virtual Machine

The advantage of this method is you can use Windows in addition to your default macOS environment.

You will need to install one of the software options below.  The software options below, allow you to run a Virtual Machine.

Parallels costs money to obtain. Parallels is relatively easy to use, fully featured, and has detailed online support.  Parallels can be obtained at a discount by faculty, students, and staff, by searching this website: https://onthehub.com/.

Detailed instructions for creating a Parallels Virtual Machine, and installing Windows onto it, can be found by searching the Parallels Knowledge Base:

https://kb.parallels.com/

VirtualBox is zero-cost.  It is also arguably the most complicated to use.

Detailed instructions for creating a VirtualBox Virtual Machine, and installing Windows onto it, can be found by searching the VirtualBox documentation:

https://www.virtualbox.org/wiki/Documentation

UTM is zero-cost.

Detailed instructions for creating a UTM Virtual Machine, and installing Windows onto it, can be found by searching the UTM documentation:

https://docs.getutm.app/

Tips for working with Virtual Machines:

  • Consult the Virtual Machine-software-maker’s documentation.
  • For the best performance, your macOS device should have a Solid State Drive (SSD).
  • Check for updates to your VM software and install them all.
  • There may be some VM settings you need to configure to get Windows to run optimally.  Check the documentation for the software you are using for recommendations.

How to Export (to PST) or Import (from PST) a folder in Outlook

This article is designed specifically to assist people who are involved in a Records Request but is helpful for anyone who wants to save or transfer any amount of Outlook email (or any other Outlook folders).

If a Records Request asks for email, it must be saved as a PST (Personal Storage) file. We recommend that you create a unique Folder for the Records Request and then copy (not move) all the messages that were requested to this Folder. Then you can export just this Folder to a PST.

NOTE

  • Prior to starting this process, we recommend that you use the search feature in Outlook to narrow/refine the results as much as possible. Here are instructions for searching in Outlook.

https://support.microsoft.com/en-us/office/how-to-search-in-outlook-d824d1e9-a255-4c8a-8553-276fb895a8da

  • This process can only be done on Windows. If you are using Outlook on a Mac, please export your email to an OLM file following these instructions and then contact iSchool IT so we can convert the OLM file to a PST file.

https://support.microsoft.com/en-us/office/export-items-to-an-archive-file-in-outlook-for-mac-281a62bf-cc42-46b1-9ad5-6bda80ca3106

To export (archive) a folder using Outlook on Windows do the following:

  1. Open Outlook.
  2. Click File -> Open & Export.
  3. Choose Import/Export, select Export to a file and click Next.
  4. Select Outlook Data File (.pst) and click Next.
  5. Select the folder you created for this Records Request and check the Include subfolders box and click Next.
  6. Decide where to save the exported file using the Browse button if that makes it easier to find or just accept the default location and click Finish.
  7. We usually do not recommend adding a password to the data file. You can just leave the password fields blank and click OK.

If you saved the data file to the default location it is here:

\Documents\Outlook Files\backup.pst

To import a data file using Outlook on Windows do the following:

  1. Save the Data File to your computer.
  2. Open Outlook.
  3. Click File -> Open & Export.
  4. Click Import/Export, select Import from another program or file, and click Next.
  5. Select Outlook Data File (.pst) and click Next.
  6. Click the Browse button to select the data file and click Next.
  7. Make sure the Include subfolders box is checked, select Import items into the same folder in and click Finish.

You should now see this data file connected to Outlook in the left-hand pane of Outlook.

Connecting to (Mapping or Mounting) the iSchool N Drive

Connecting to (Mapping or Mounting) the iSchool N Drive

The iSchool provides a shared collection of network storage folders commonly referred to as the N Drive (“N” for network). The following directions are for accessing the folders on the N Drive. The directions presuppose you have the correct permissions to access the N Drive folders. If you are unsure of your permissions to access the N Drive, or specific folders within the N Drive, please contact the iSchool IT Help Desk.

If you need to map or connect to the N Drive on your computer, use the following server addresses:

Windows: \\netid.washington.edu\ischool
macOS: smb://netid.washington.edu/ischool

Fully detailed instructions are below.


The N Drive is only accessible from the UW network. If the computer you are using is physically off campus, you must first connect to the Husky OnNet before you will be able to access the N Drive.


Access the N Drive using an iSchool issued computer

Access the N Drive using a personal computer


Access the N Drive using an iSchool issued computer
Windows 10
macOS


Windows 10

If you are off campus, connect to the Husky OnNet VPN.

1) Click the Windows File Explorer button in the lower-left corner of the screen, click N Drive below This PC.

Windows 8 N: Drive Location


macOS

Follow the “personal computer” directions for macOS


Access the N Drive using a personal computer
Windows 10
macOS


Windows 10

If you are off campus, download, install, then connect to the Husky OnNet VPN.

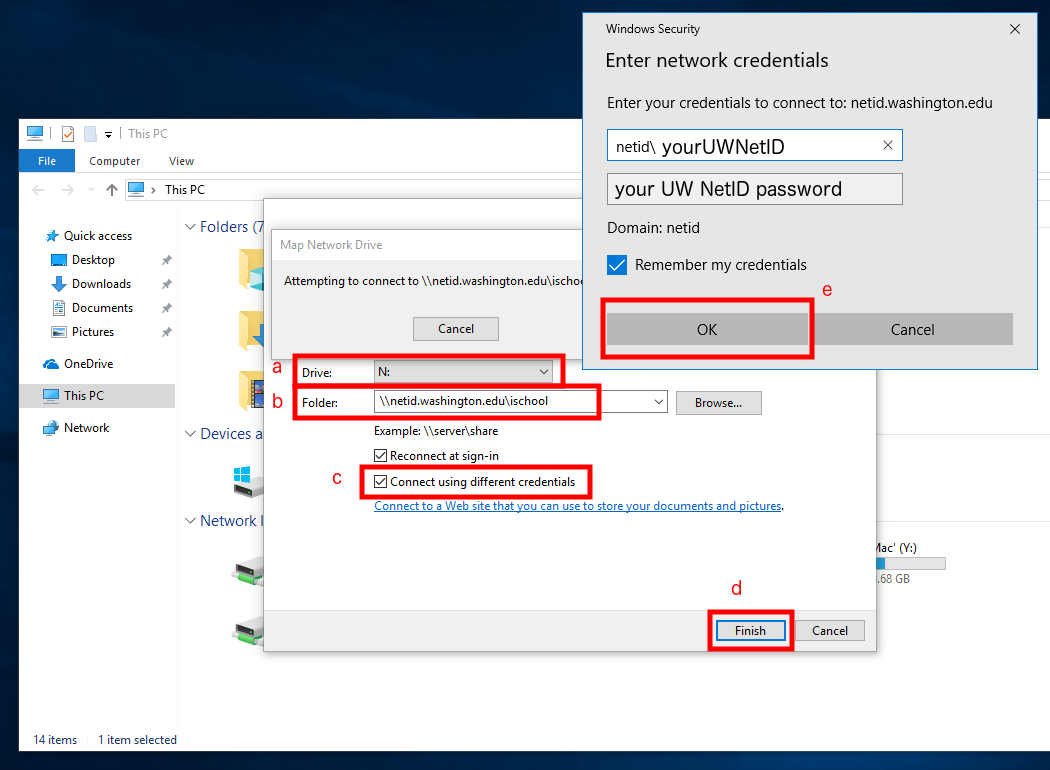
1) Right-click the lower-left Windows icon, click File Explorer, click This PC, click Computer, click Map network drive.

2) In the Map Network Drive window, for Drive: use N, for Folder: use \\netid.washington.edu\ischool, check Connect using different credentials, click Finish, for User name use the format netid\yourNetID, for Password use your NetID password, click OK.

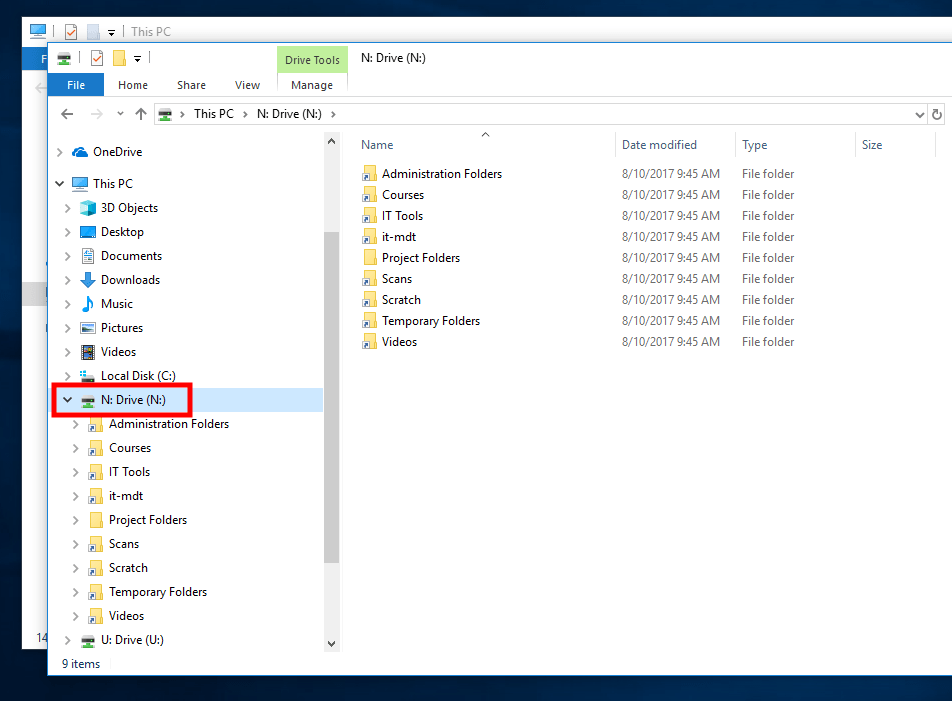
3) The N Drive and its folders will appear below This PC.


macOS

If you are off campus, connect to the Husky OnNet VPN.

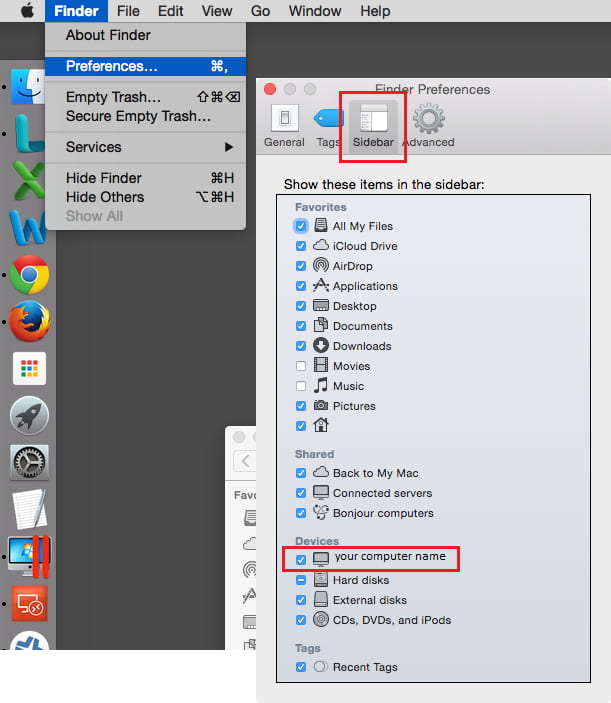
1) Open Finder, click Preferences…, click Sidebar, check the box next to your computer name, close the Finder Preferences window.

Finder Preferences

2) In Finder, click Go, click Connect to Server… (⌘ + K on your keyboard).

Finder -> Go -> Connect to Server...

3) For Server Address: use smb://netid.washington.edu/ischool, click the plus (+) button, click Connect, select Connect as: Registered User, for Name:, use netid\yourNetID, for Password: use your NetID password.

4) Finder will open a folder titled ischool with all of the N Drive folders, you can also find the N Drive folders in Finder by clicking your computer name -> ischool.